Step by Step Guide to Reset Password in FlutterFlow with Supabase
Note : This article operates under the assumption that you possess a foundational understanding of FlutterFlow and Supabase. This includes familiarity with setting up accounts on both platforms, establishing the necessary connections between Supabase and FlutterFlow, and configuring your FlutterFlow project with all requisite pages.
Hello and welcome to zerocodeskills. Today, our focus is on enabling users to reset their account password on supabase using the supabase backend in Flutterflow.
As of the time of writing this article, FlutterFlow is still in the process of enhancing its support for supabase integration. One notable feature that is currently absent is the Reset Account Password functionality.
It’s important to clarify that the absence of this feature is not a fault of Flutterflow per se, but rather a characteristic of how supabase operates. Presently, when you trigger the Reset Account Password action in Flutterflow, it merely sends an email to the user.
Upon clicking the link provided in the email, if the link hasn’t been configured on your supabase dashboard, users will encounter an empty screen.
This behaviour can be tested accordingly. However, once you configure the redirect link on your supabase dashboard by heading to the Authentication tab of your configured supabase project then URl configuration > then add the url of your flutterflow project.
This marks the initial phase of configuring the reset password feature. From this point forward, when users click the “Forgot Password” button on your app, the email they receive will contain a link that redirects them to the specified URL. This URL, once configured, should seamlessly redirect users back to your Flutterflow app.
Once users are redirected back to your app you then need custom code to trigger an action to update the supabase account password update. Currently, this is the sole method to ensure the functionality operates smoothly.
Now, before we go into the initial steps, here are a few things to note:
The redirect url you will set can only work for websites and if you are building a flutterflow web app then there is no problem when you are testing you can use the default “flutterflow.app” link provided by flutterflow when you publish your web app on flutterflow until you publish using your custom domain, but if your app is a mobile application, you have to set up a webpage for this to work.
The webpage you setup can be used only for the password reset and you can build it in flutterflow and he major reason for this is also the way supabase operates.
when users click that they have forgotten their password they are typically not signed into the app and to secure this process supabase adds an authentication process embedded in the email link that you added in your supabase dashboard and is sent to their email and what it does is automatically authenticates the user once they click the link because they have proved that they have access to the email that controls the account and to the best of my knowledge and research this only works on web.
How to Reset Password in FlutterFlow with Supabase
Let’s delve into the main steps. By now, you should have supabase authentication set up, and your website or custom domain link should be posted in your supabase dashboard. Here’s a recap of the steps:
Setup 1: redirect link on your dashboard
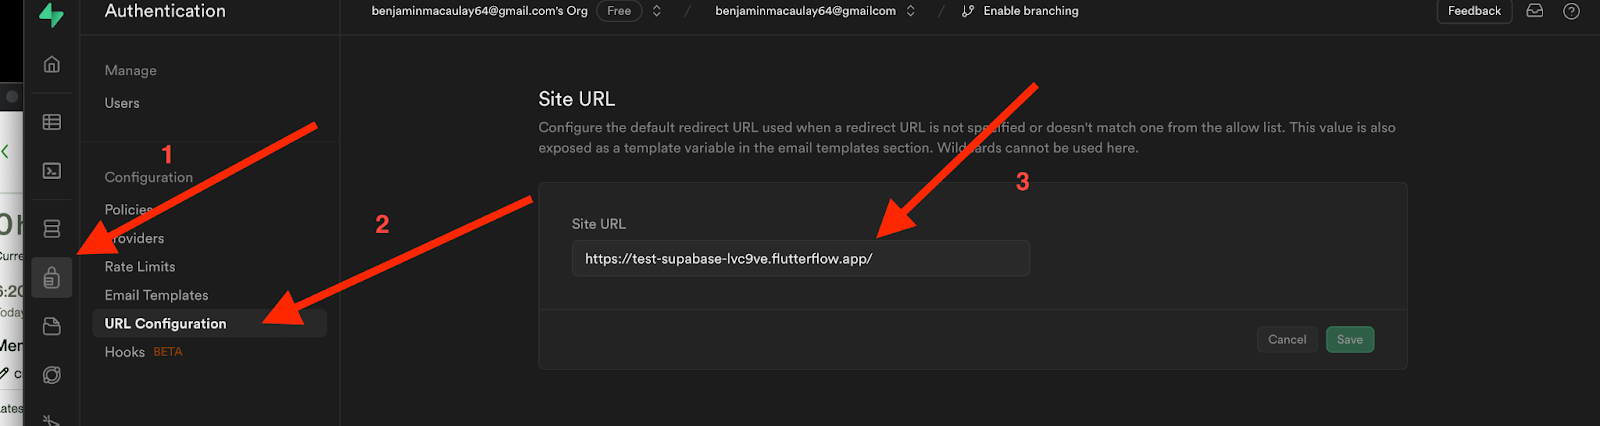
1. Navigate to your supabase dashboard and access the authentication tab.
2. Paste your website URL in the designated “Site URL” field. This URL serves as the general link for your site.
3. Additionally, you can specify a redirect URL in the section provided just below the Site URL field. This redirect URL allows for more detailed links that emails from supabase can redirect to.
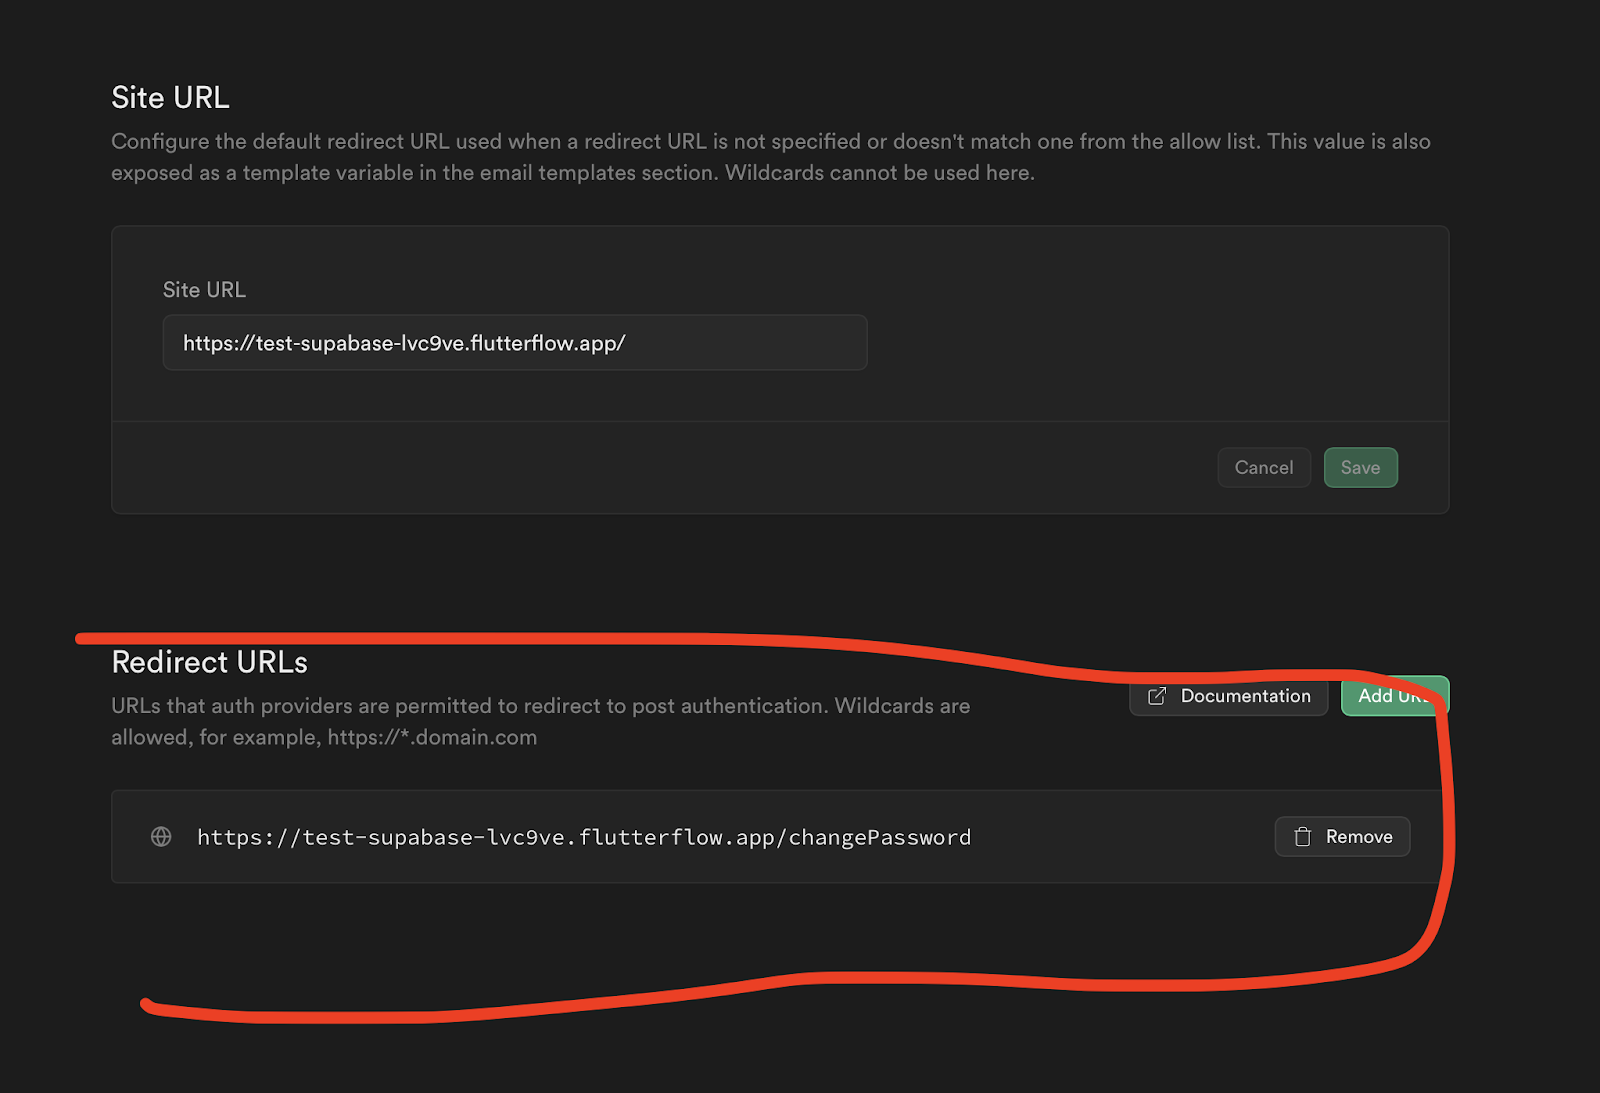
4. In our own web app, for instance, we have our main link along with a “forgot password” extension. The redirect URL plays a crucial role as it enables the inclusion of query parameters.
(Query parameters are a means to add extra information to your link, providing your website with additional context about your application)
Understanding the distinction between the Site URL and redirect URL is pivotal. While the Site URL serves as the primary link for your site, the redirect URL allows for more specific redirections within your website, such as those associated with password reset functionalities.
Step 2: Set up your supabase password reset email template
Once you’ve configured your redirect URL in supabase , the next step is to navigate to the email template section within the authentication tab of your supabase dashboard. Specifically, access the “Password Reset Email” template.
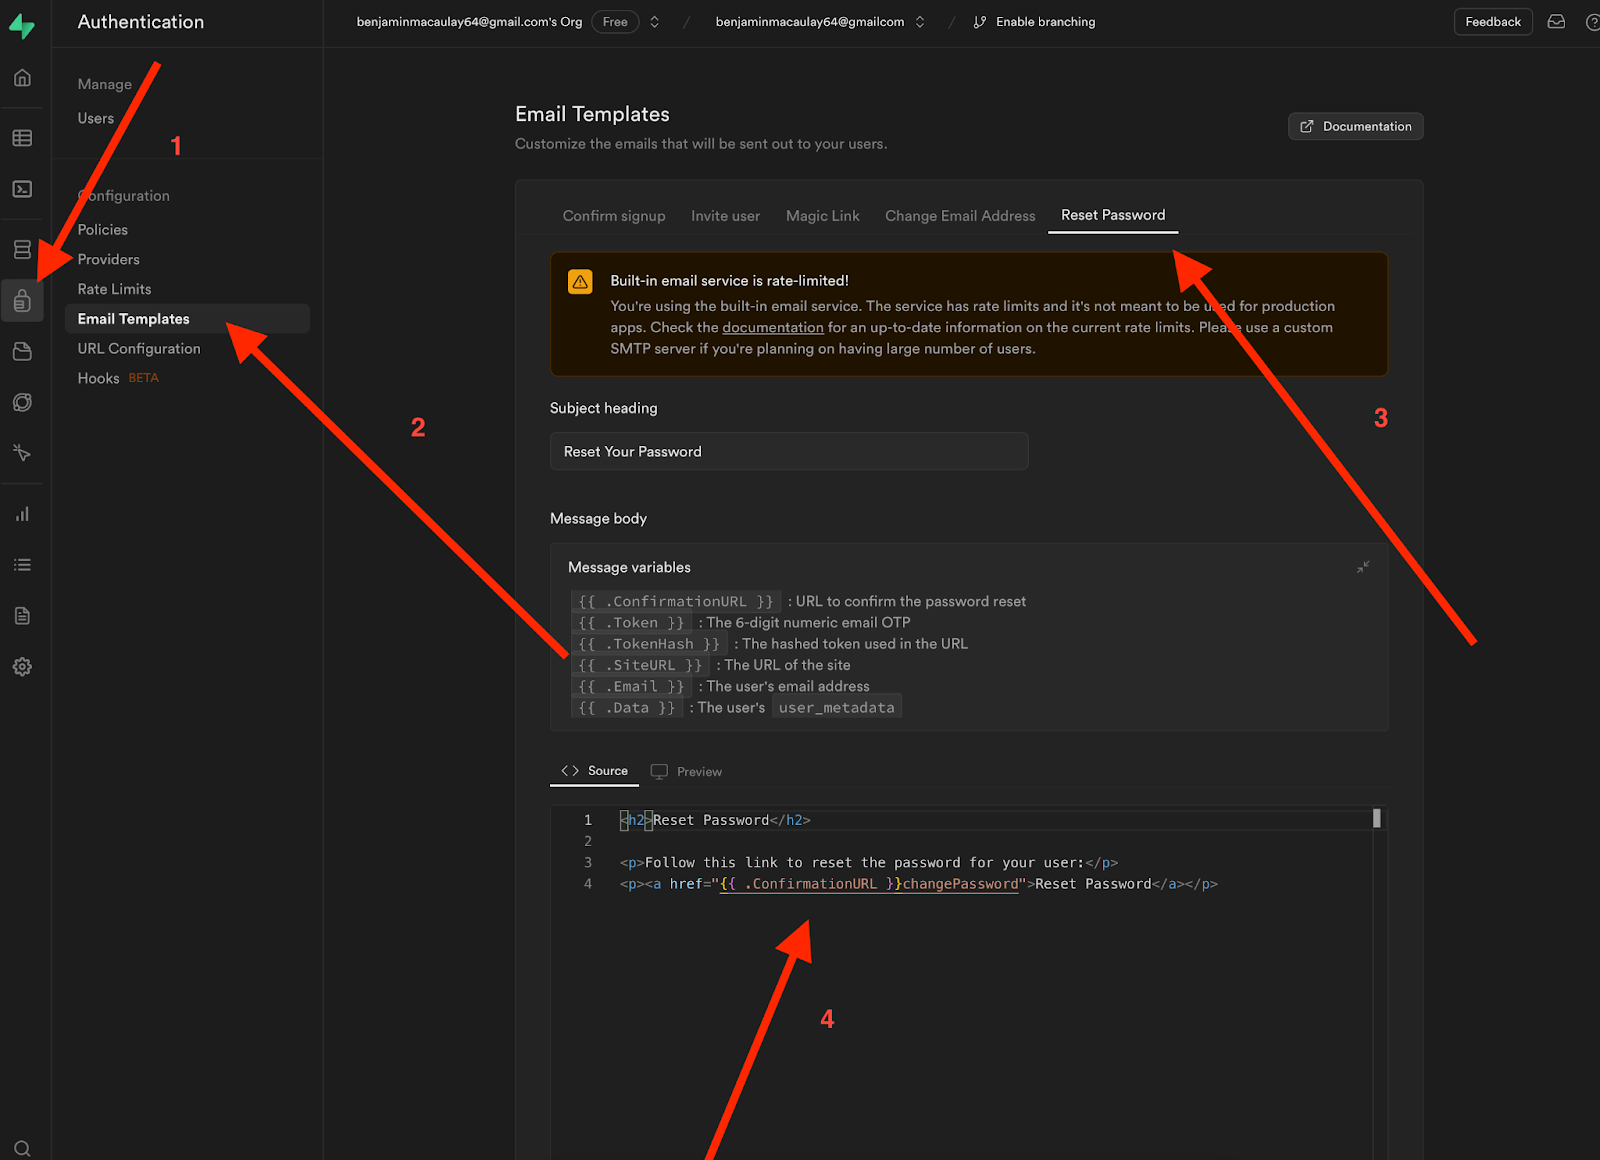
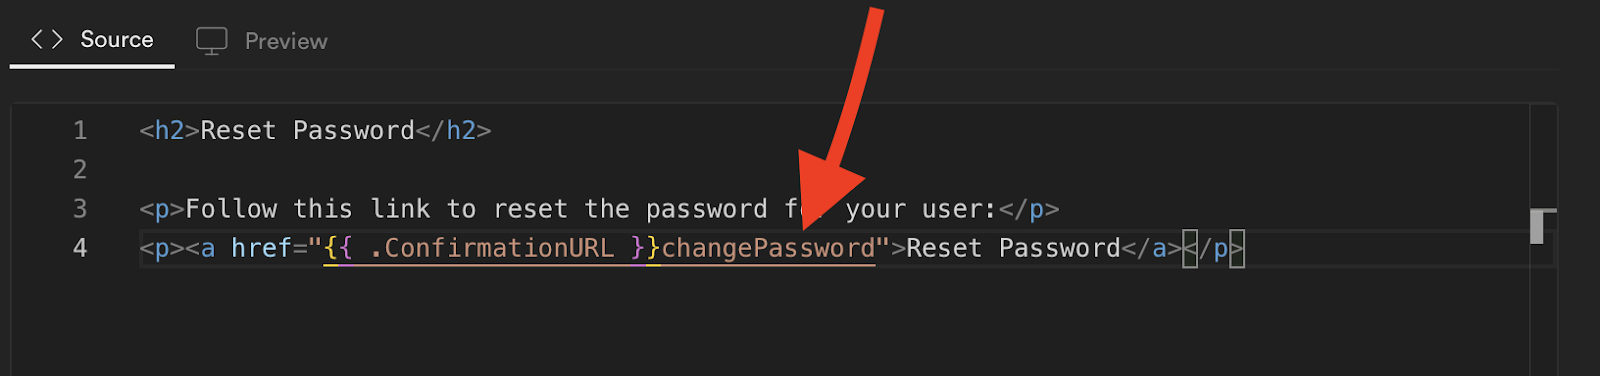
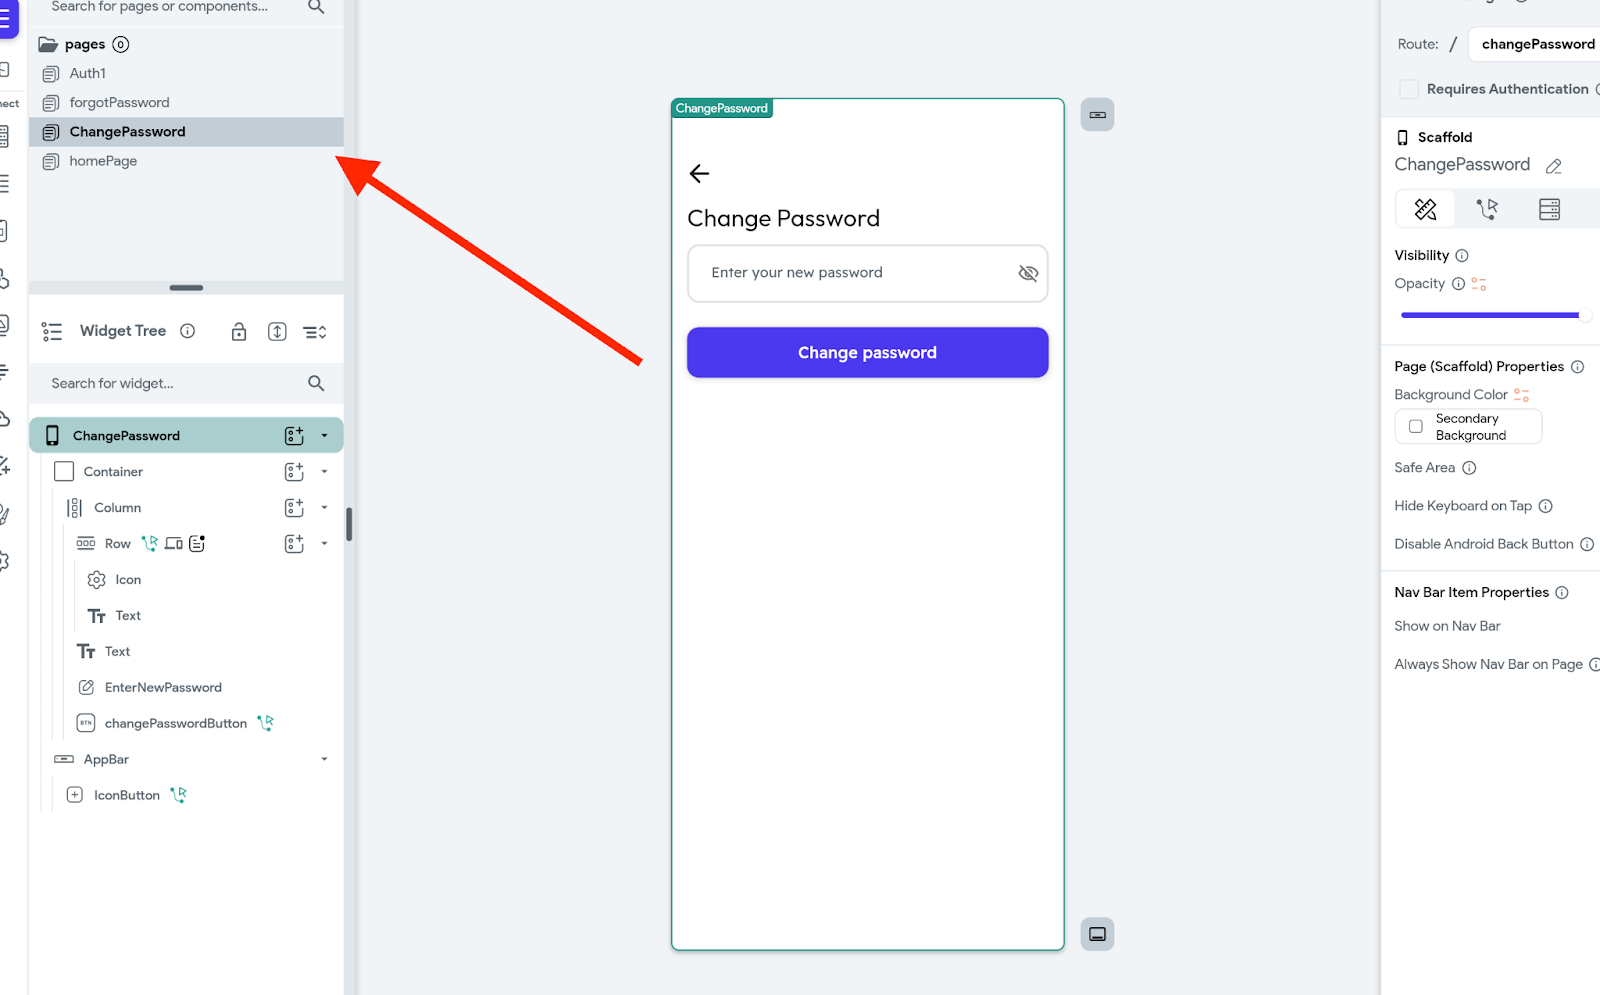
Here, you’ll find the confirmation URL tagged like this “{{ .ConfirmationURL }}”, which is set by default to connect to your Site URL and all you need to do is add the name of the target page after the confirmation url “{{ .ConfirmationURL }}changePassword”
After adding the link, remember to save your changes.
With the email template configured, let’s return to Flutterflow to continue the setup process.
Step 3: Configure your flutterflow application
In Flutter Flow, you should have already set up all the necessary pages, including the forgot password page, login page, and basic authentication flow.
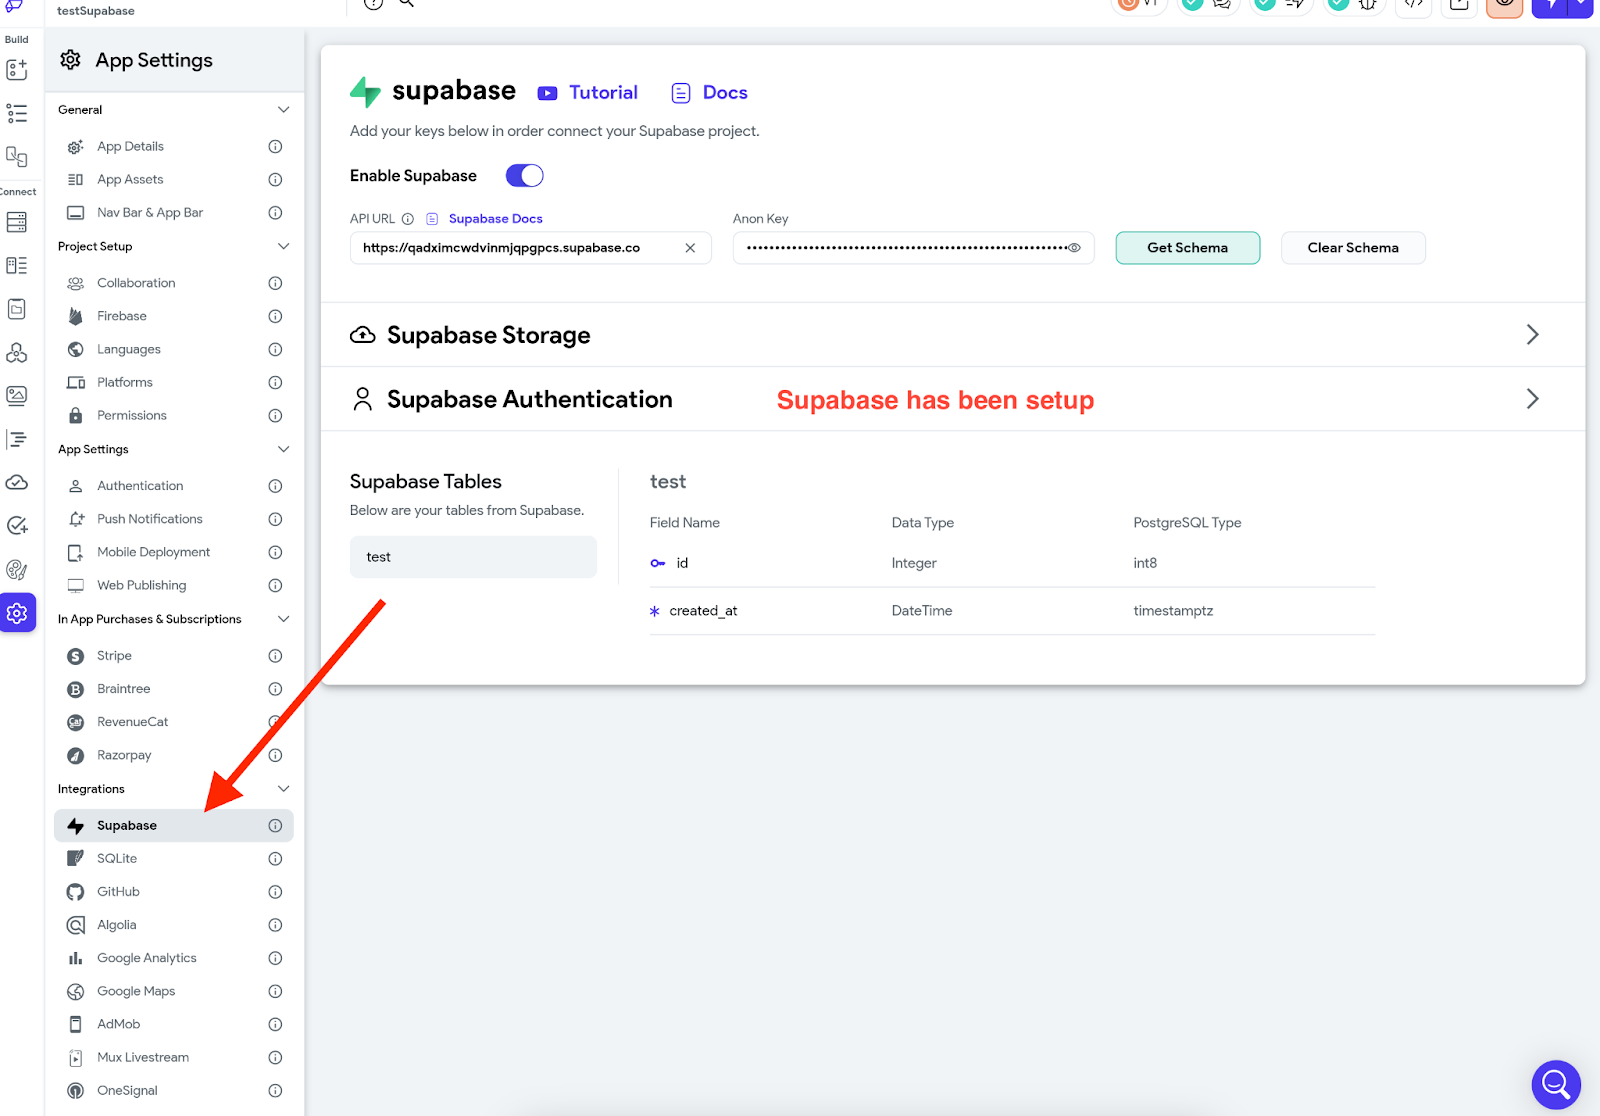
Once supabase authentication is integrated into your FlutterFlow project, you gain access to various Flutter Flow actions that facilitate authentication tasks such as signing in a user and resetting passwords.
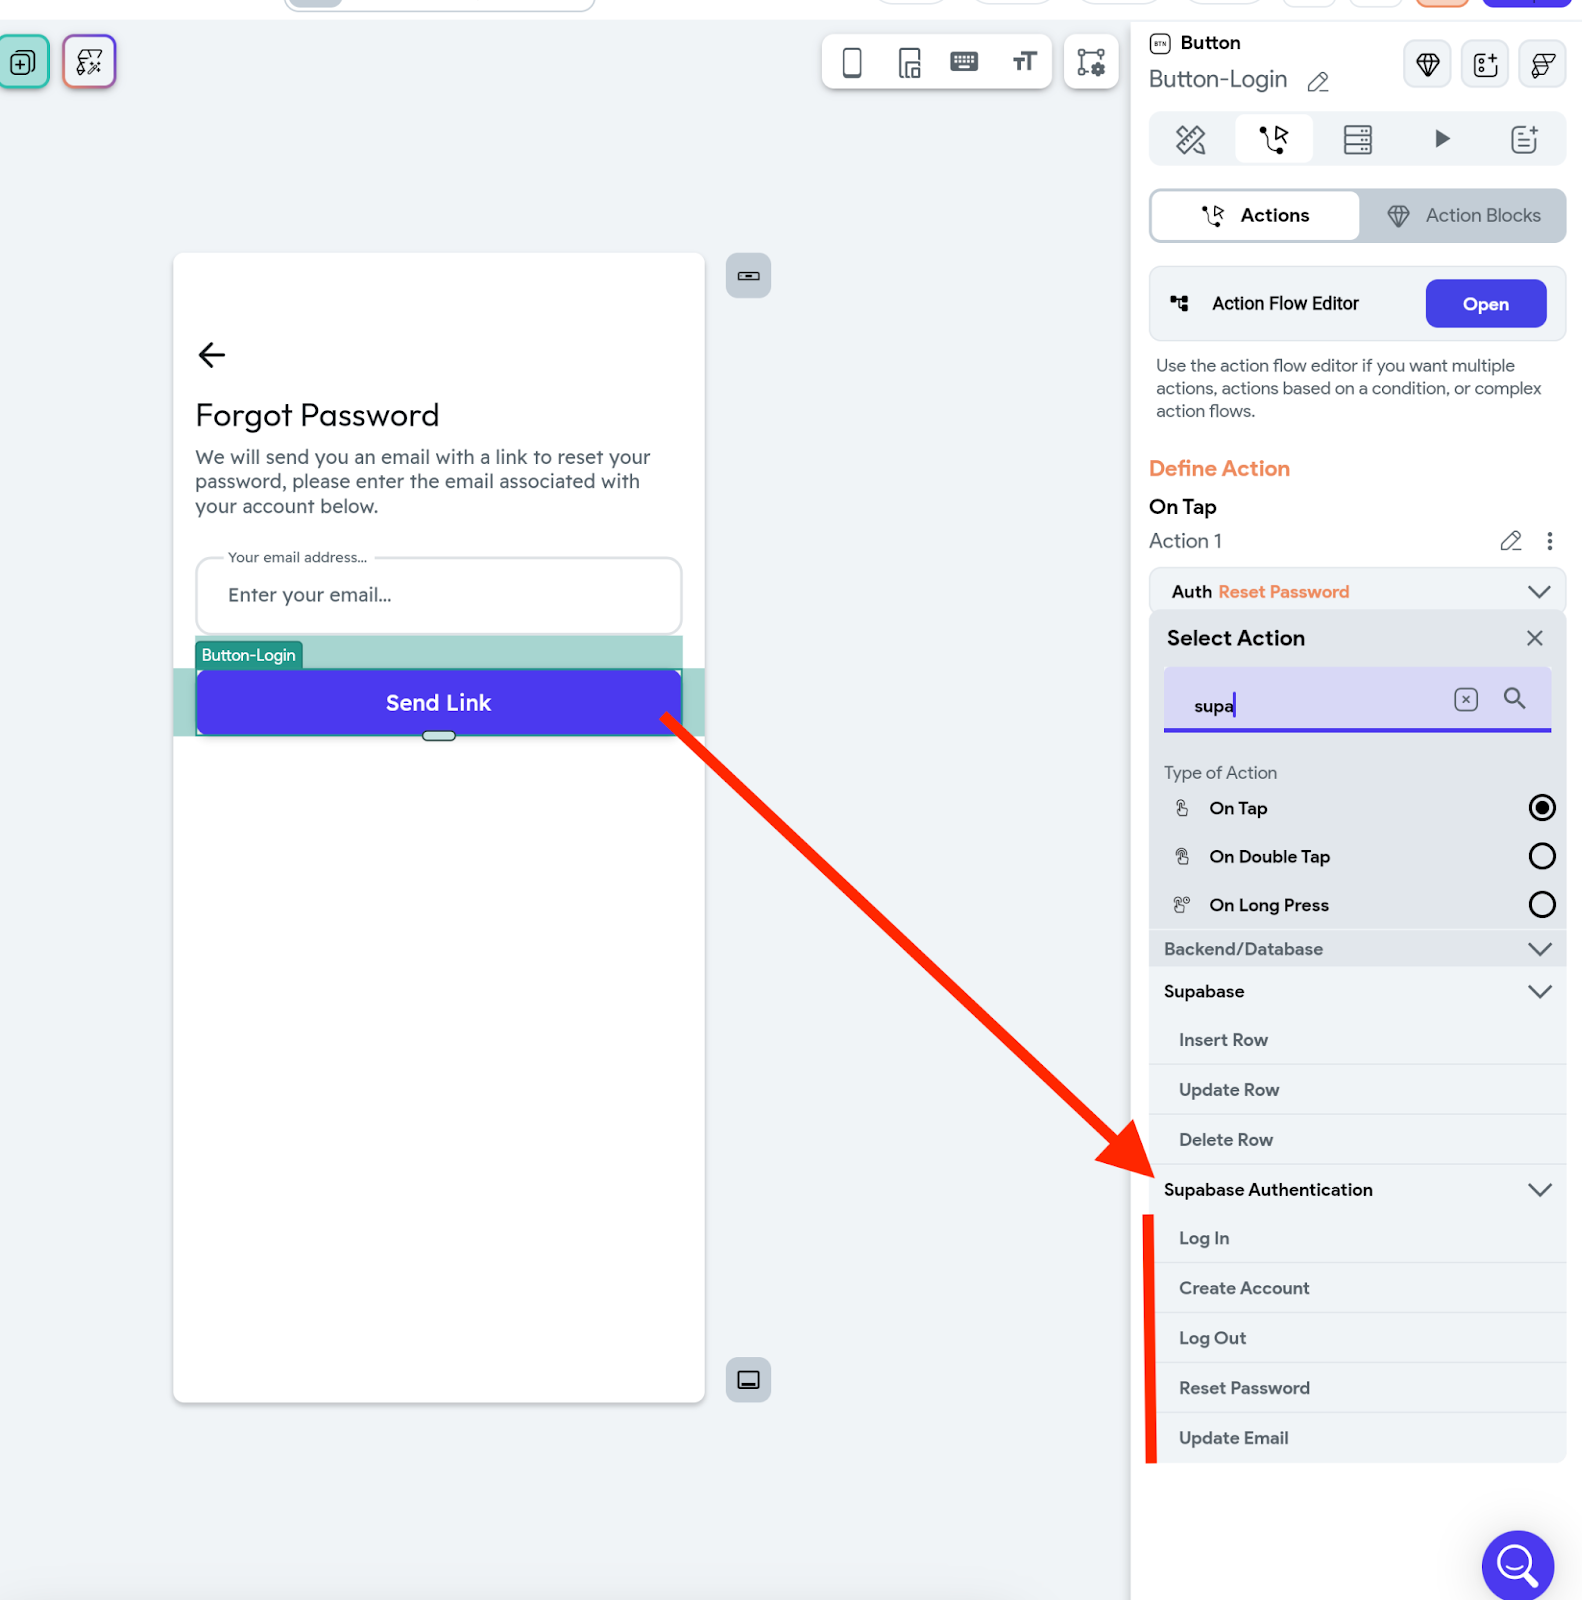
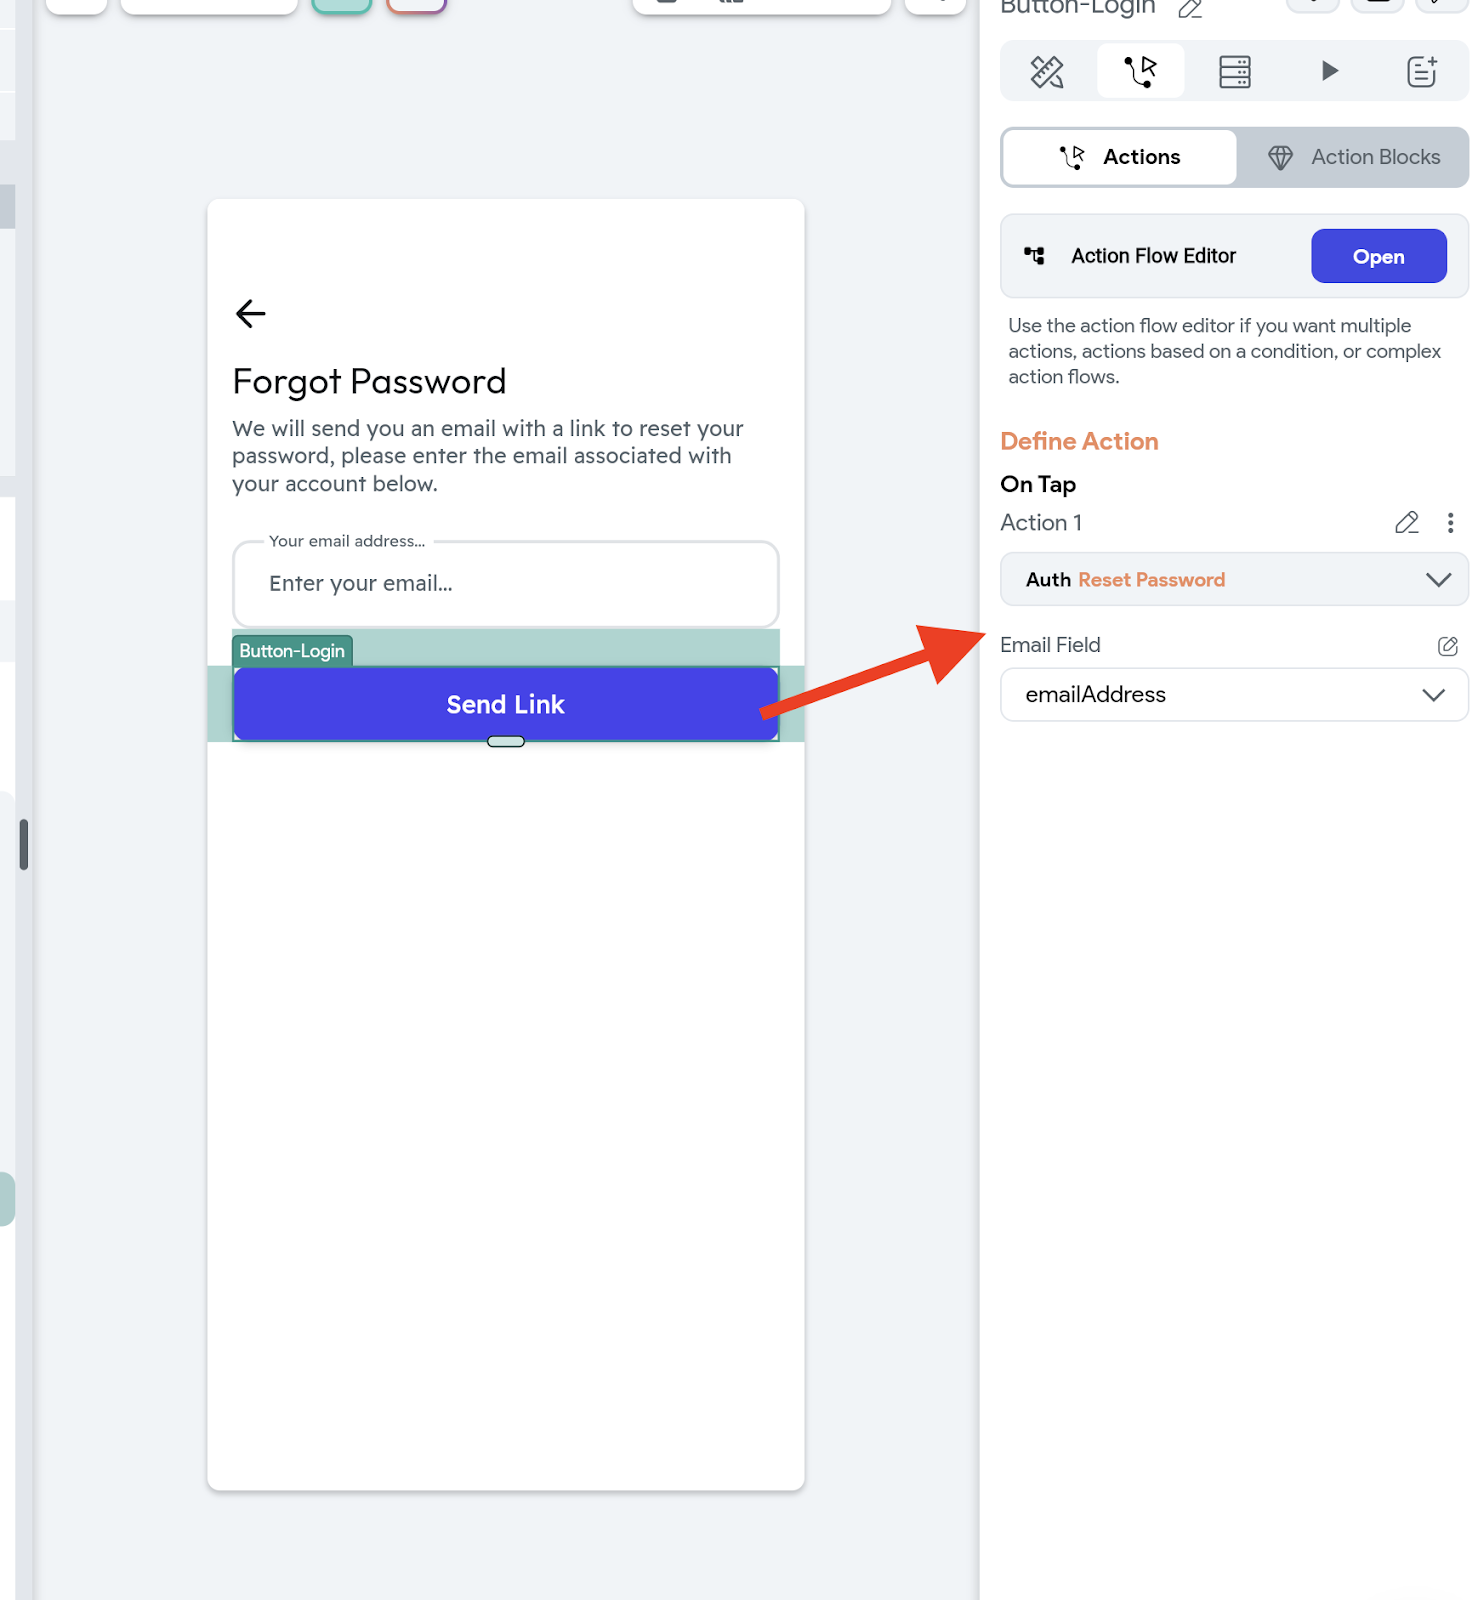
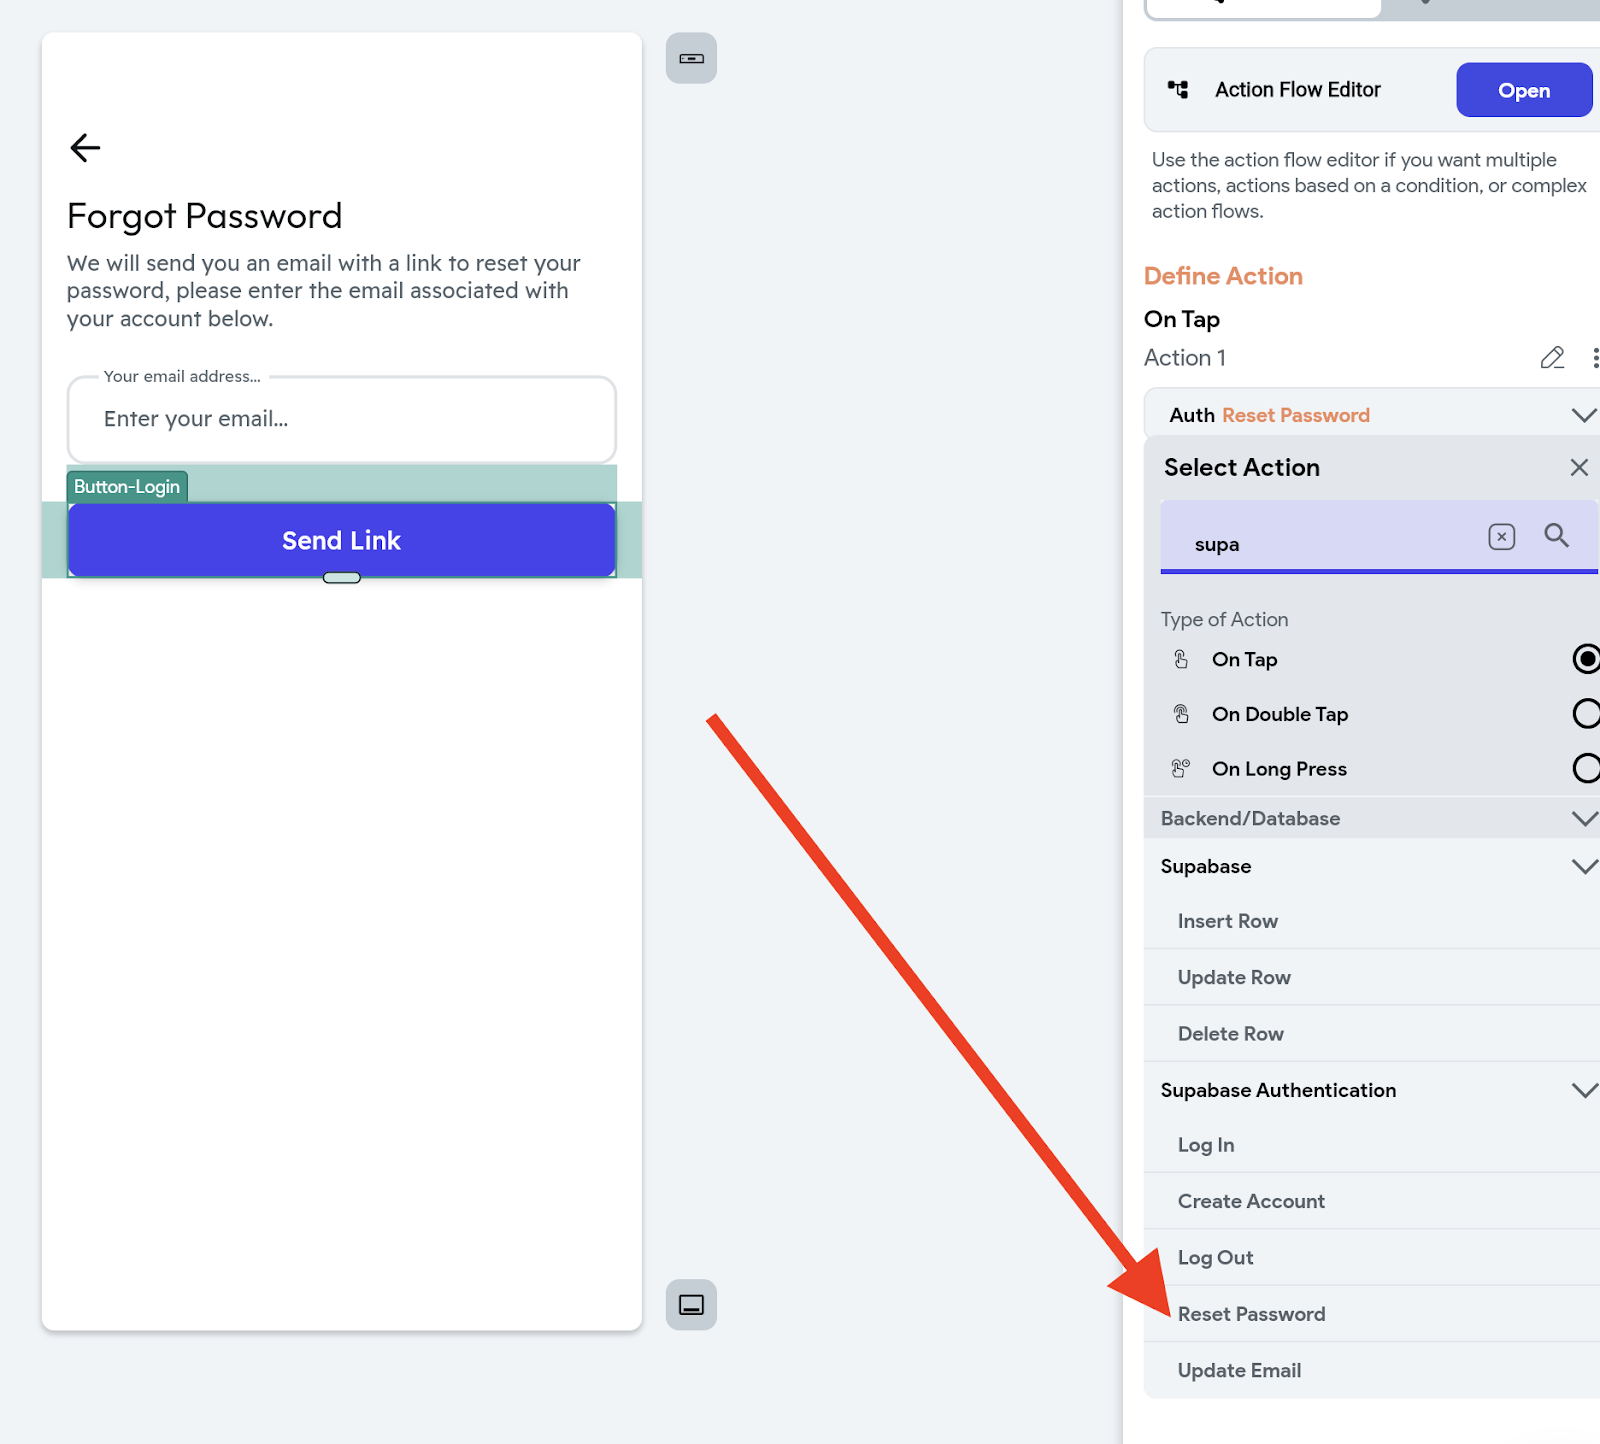
Next, navigate to your forgot password page in Flutterflow. Attach a supabase action to the button responsible for sending the reset link. This action will trigger the email to be sent to the user, initiating the password reset process.
Step 4: Set up the custom code on flutterflow
Finally, the last step involves adding custom code to facilitate the password change process. This step allows you to handle the password reset functionality within your application, ensuring a seamless user experience.
The code snippet below demonstrates the essential imports and functionalities required for this process:
You can easily copy this code and integrate it into your action flow editor within Flutter Flow as a custom action and save it.
Here’s a breakdown of the code:
This line imports a package called Supabase that provides functionality for interacting with Supabase services.
This line defines a function named `changePassword` that takes a single parameter called `newPassword`, which represents the new password that the user wants to set.
The function returns a `Future` that will eventually contain a boolean value (`true` if the password change was successful, `false` otherwise). The `async` keyword indicates that the function is asynchronous, meaning it can perform operations that might take some time to complete.
This is a try-catch block, which is used to handle errors that might occur while executing the code inside the `try` block. If an error occurs, it will be caught and handled in the `catch` block.
This line sends a request to Supabase to update the user’s password. The `await` keyword is used to wait for the response from Supabase. Once the response is received, it is stored in the `response` variable.
If the password change is successful, Supabase will return information about the user whose password was updated.
This line checks if the `response` contains information about the user (`response.user`). If it does, it returns `true`, indicating that the password change was successful. Otherwise, it returns `false`.
If an error occurs while updating the password, this line prints an error message to the console.
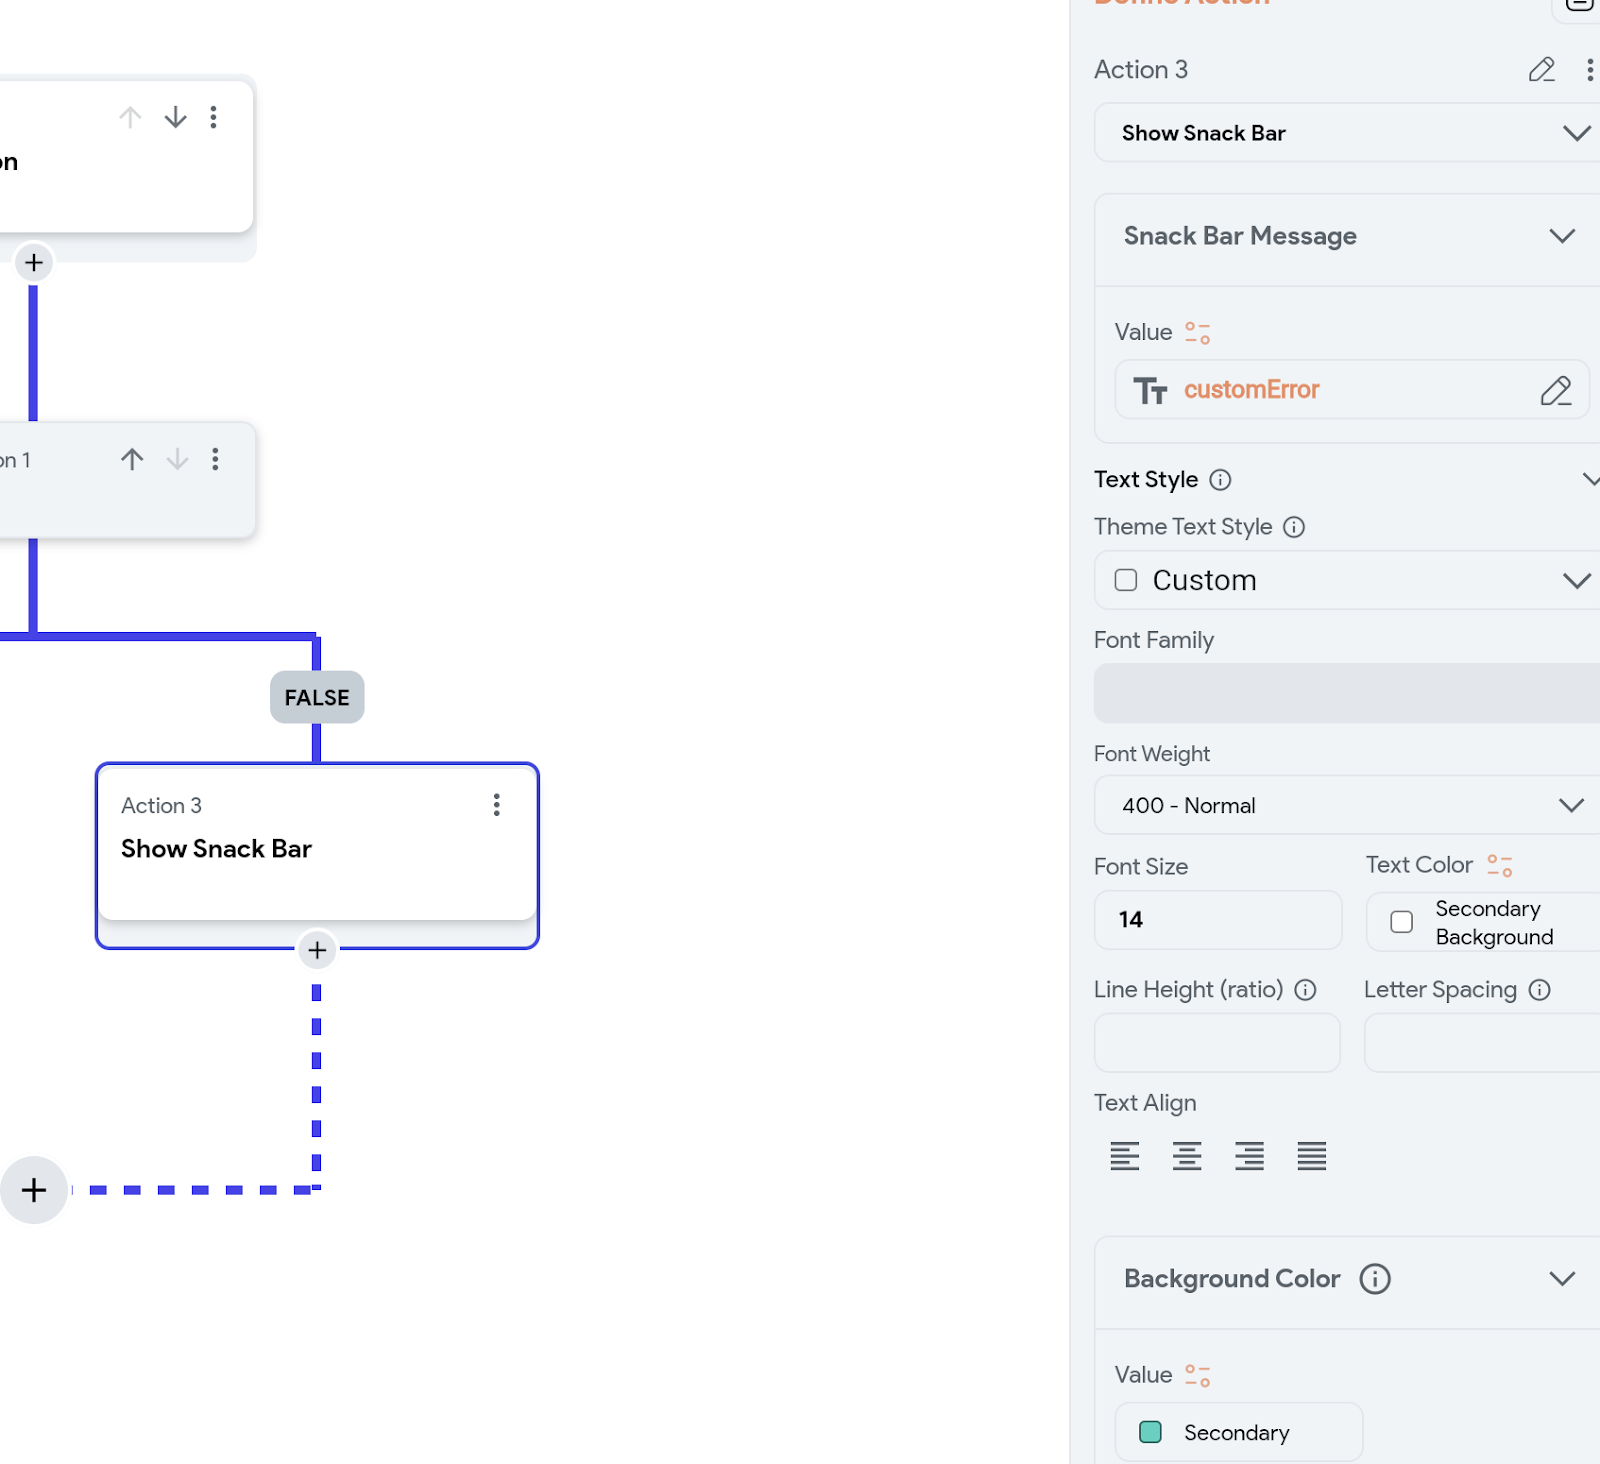
This line updates the app state in flutterflow called “customError” to reflect the error that occurred during the password change process. Make sure you have the same appstate name in your flutterflow project.

If an error occurs while updating the password, the function returns `false` to indicate that the password change failed else if it is successful then return true.
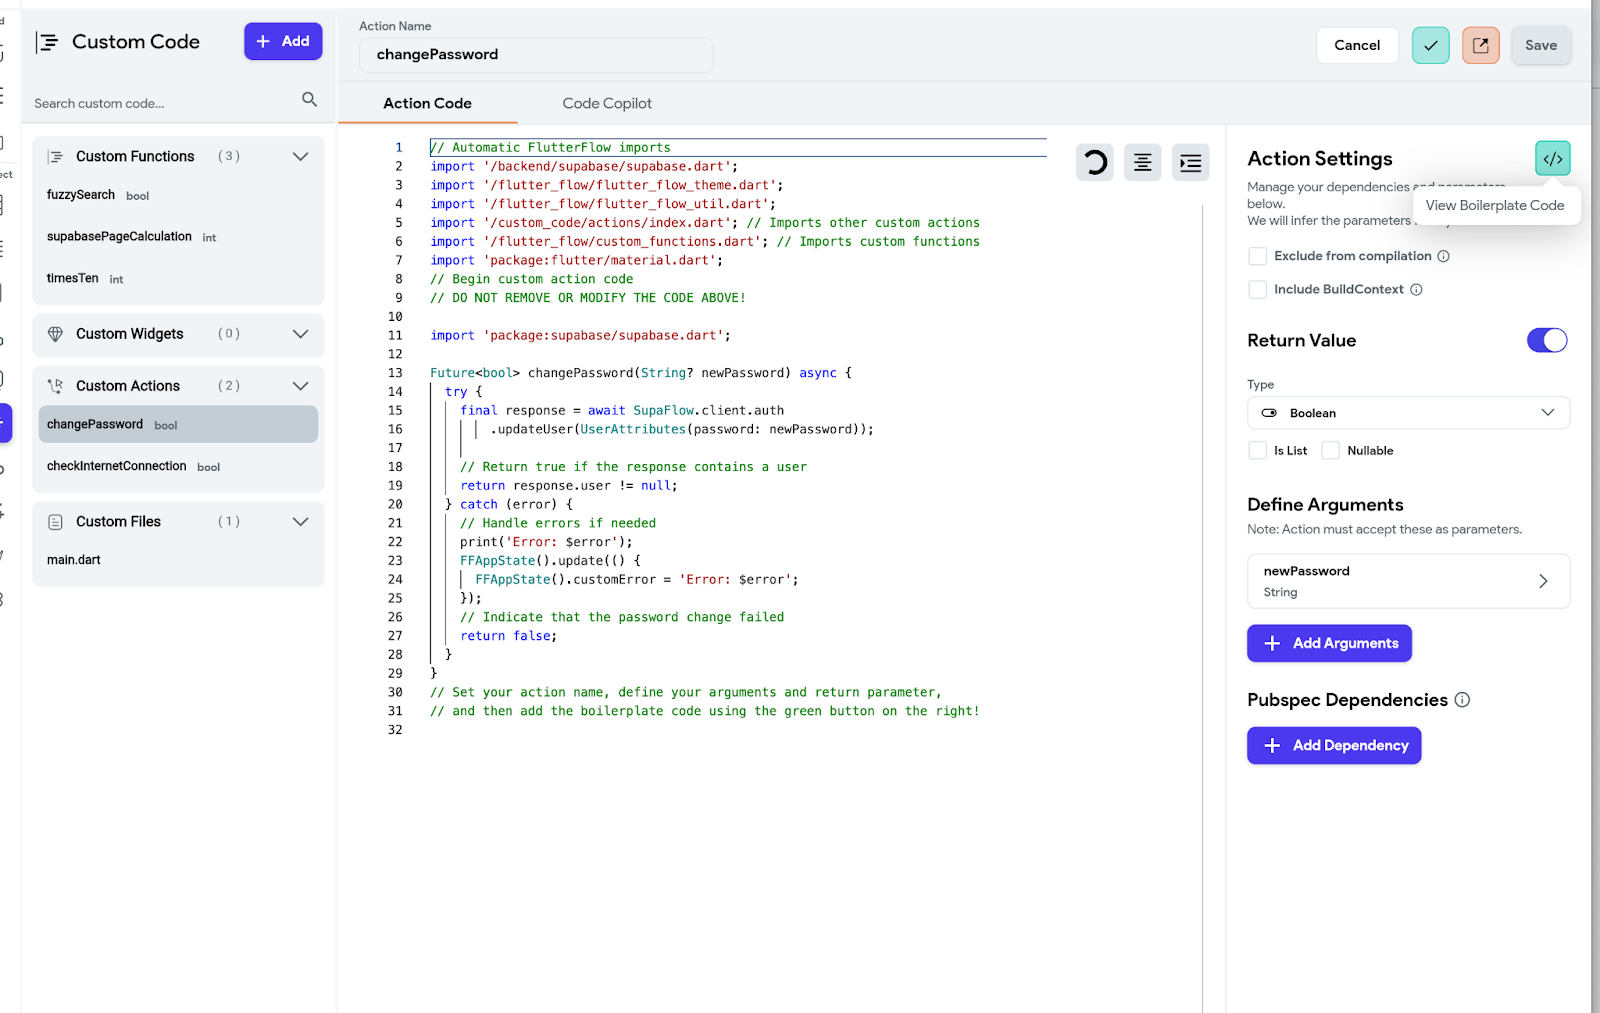
The screenshot provided illustrates how you can add the code, including the parameter for the user’s new password, which is essential for initiating the password change process.
Once you’ve pasted the code and configured the app state, navigate back to the page where users can change their password. Here, ensure that there is a text input to serve as a password field.
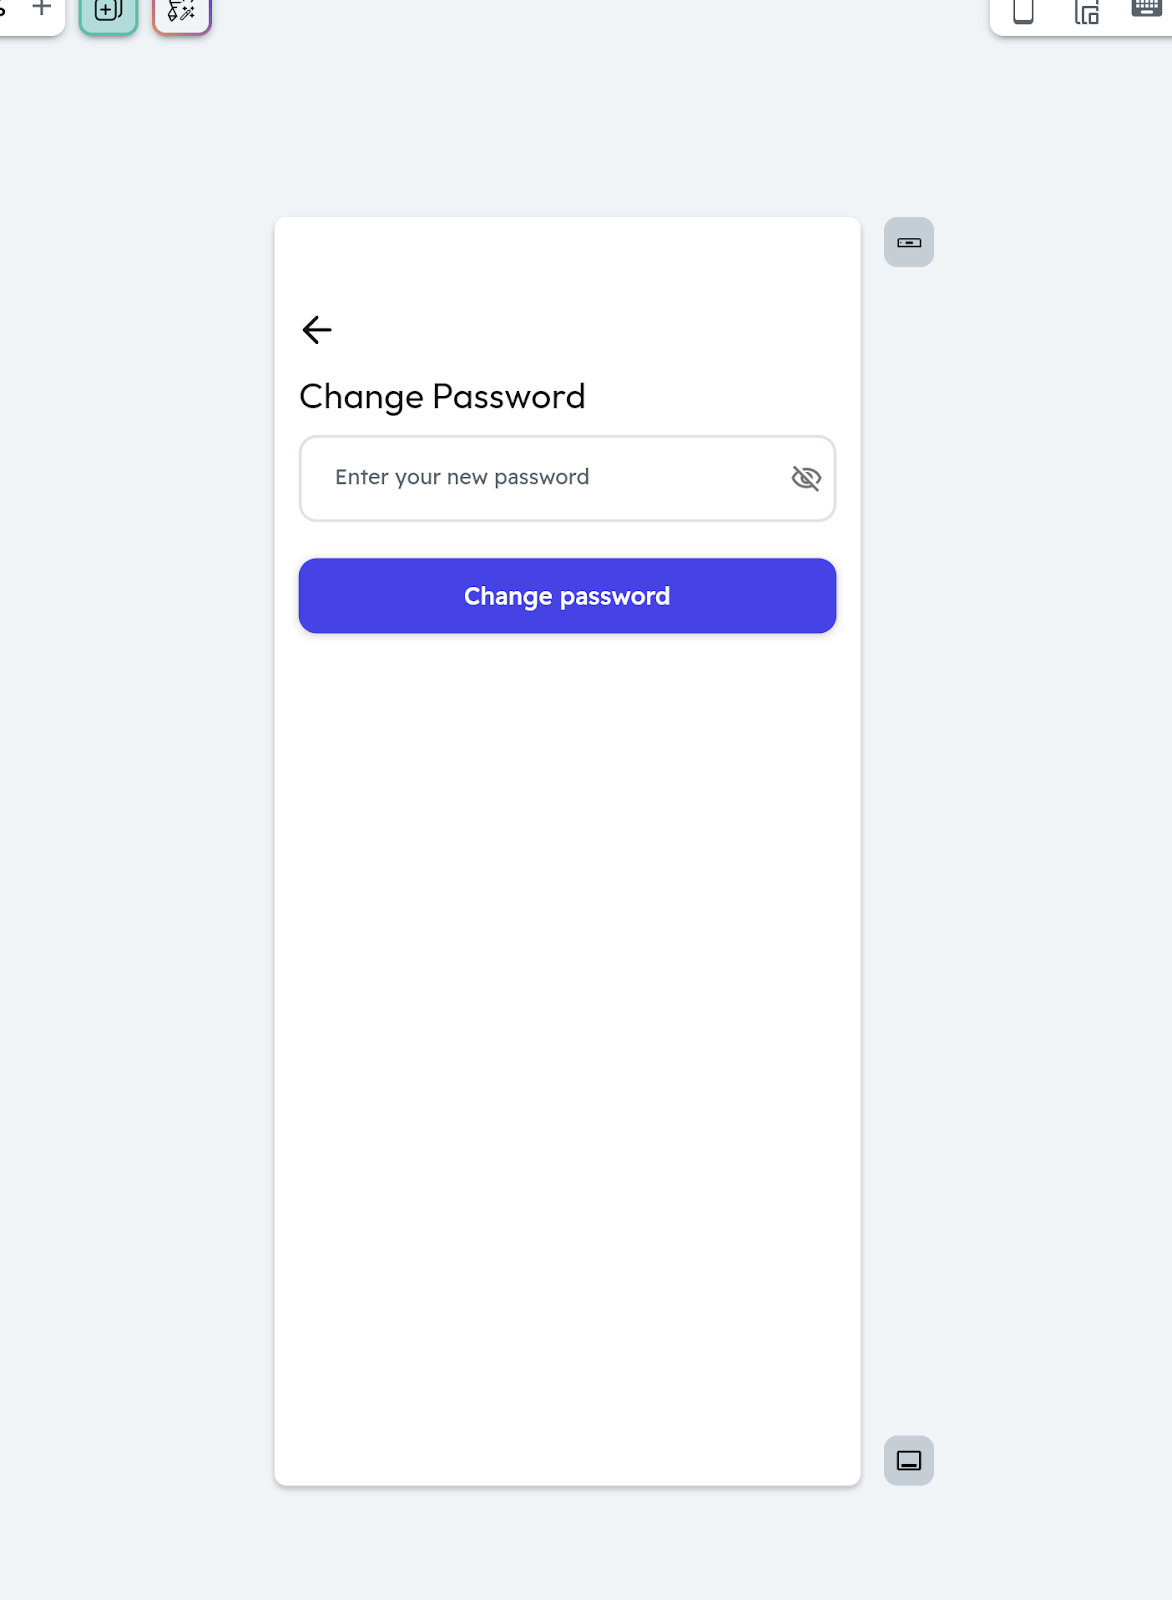
Link the custom action for changing the password to the designated button, then add an action output variable name to monitor the success of the action
. Additionally, link the password input field to pass the user’s password to the custom action.
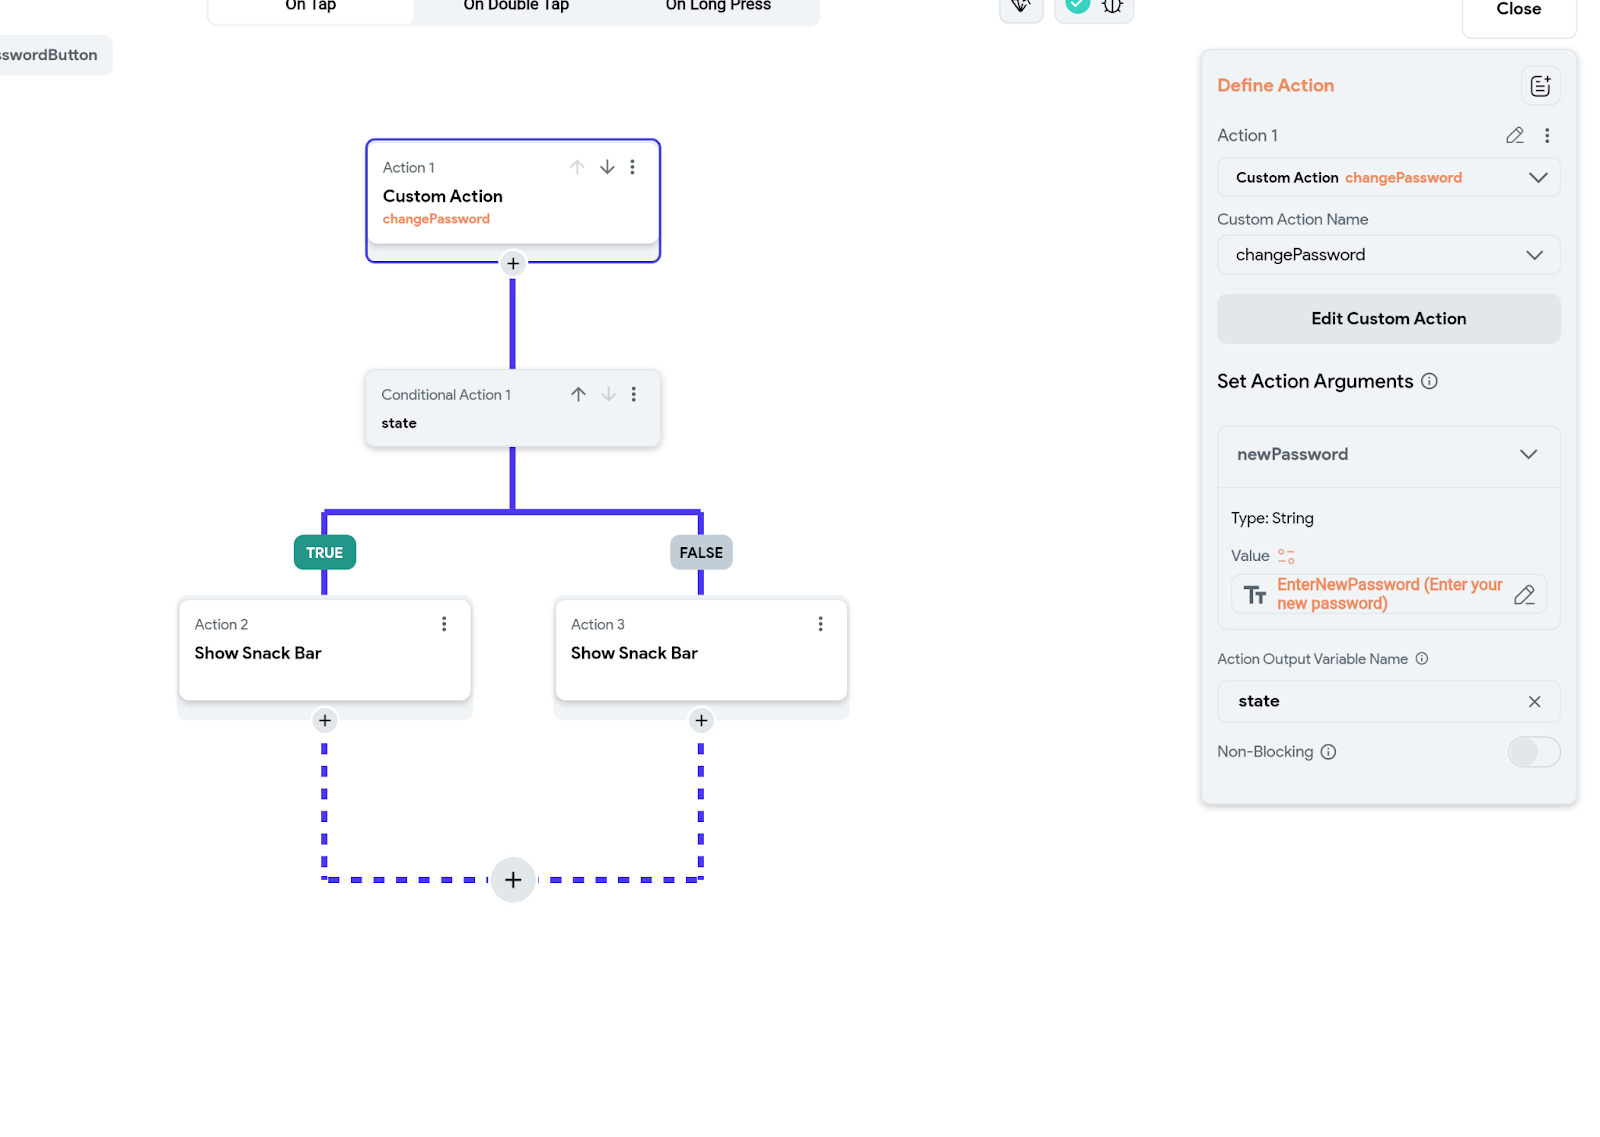
On password reset action fail then update a snackbar with the custom error appstate variable.
With these configurations in place, users can seamlessly initiate the password change process by clicking on the ‘forgot password’ link, receiving an email, and then accessing the password change functionality within your Flutter Flow website. This comprehensive flow ensures a user-friendly and secure password management experience.