How to make pagination in flutterflow with supabase step by step
Pagination, in simple terms, involves breaking down a large dataset into smaller, more manageable pages.
This process offers several advantages, including cost savings when handling numerous users accessing your application and preventing overwhelming users with excessive data.
As of the time of writing, while there are abundant resources covering pagination with Firebase, information regarding pagination with Supabase—being a recent addition to FlutterFlow—is relatively limited. Therefore, in this article, we will explore how to paginate data from your Supabase database.
For those unfamiliar with Supabase, it serves as an open-source alternative to Firebase, providing real-time databases, authentication, and file storage functionalities akin to Firebase, albeit with an SQL database.
Additionally, Supabase offers the flexibility to self-host your own backend infrastructure.
Related :
How to find trending and low competition apps ideas
Best free flutterflow courses for beginners
How to make a flutterflow pdf generator app step by step
How to make pagination in flutterflow with supabase step by step
Before enabling pagination with Supabase in your FlutterFlow apps, you’ll need to set up your Supabase project. Here are the steps you’ll need to take:
Step One: Create a New Project in Supabase
1. Sign up for Supabase and log in to your account using your credentials.
2. Once logged in, you’ll be directed to your Supabase dashboard.
3. Look for the “+ New Project” button, typically located in a prominent position on the dashboard interface.
4. Click on the “+ New Project” button to initiate the project creation process.
Additionally, as part of setting up your Supabase project, you’ll need to create tables and add data to them. These tables will be the ones to which we will apply pagination.
Here are the steps to set up your Supabase tables:
1. Navigate to your newly created project dashboard.
2. Locate the “Database” section or tab within the dashboard.
3. Click on “Database” to access the database management interface.
4. Within the database interface, you’ll find options to create new tables.
5. Define the schema for your tables, including the necessary columns and data types.
6. Once the tables are created, you can add data to them manually or import data from external sources.
By following these steps, you’ll not only create a new project in Supabase but also set up the necessary tables and populate them with data, laying the foundation for implementing pagination in your FlutterFlow application effectively.
Step Two: Set up your Api call to supabase
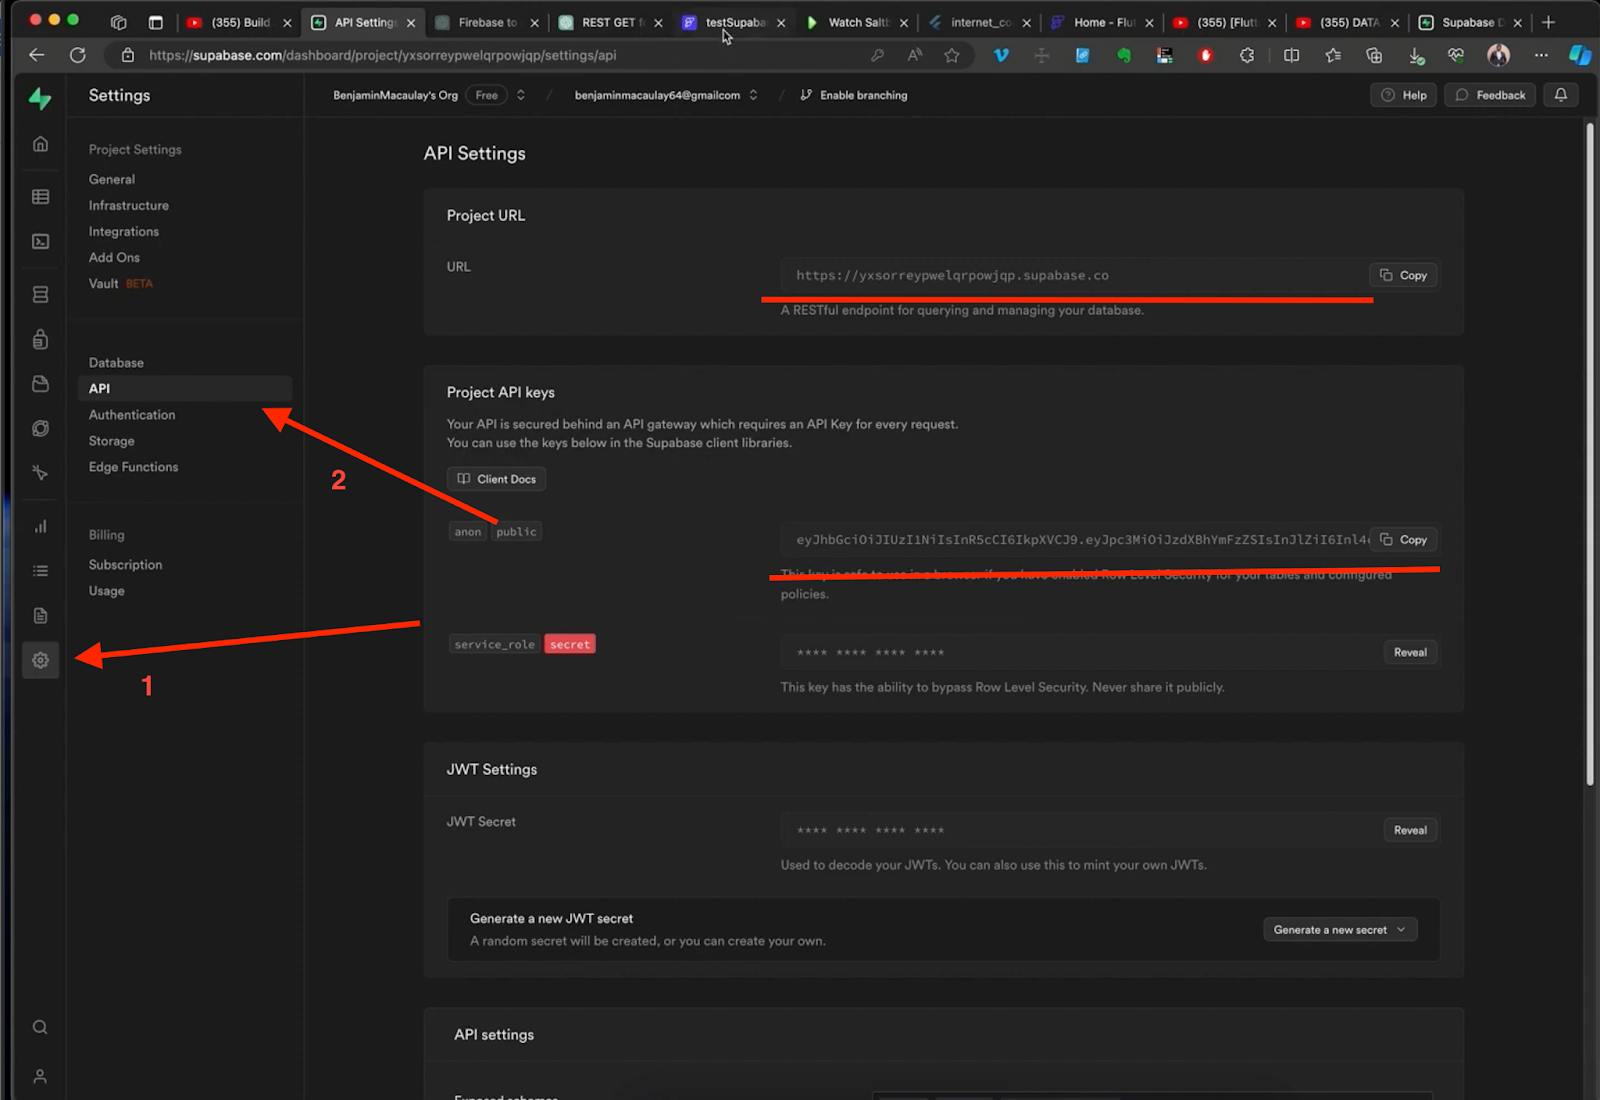
Once you’ve completed the task of setting up supabase, The next step involves navigating to your settings and accessing the API section. Here, you’ll need to copy the URL and the Anon key which will be very important in the future.
Note: As of the current writing, FlutterFlow lacks a built-in feature for seamless pagination integration with Supabase. Therefore, the sole solution entails establishing a connection to your Supabase table via API calls.
This article aims to provide comprehensive guidance on implementing pagination through API calls.
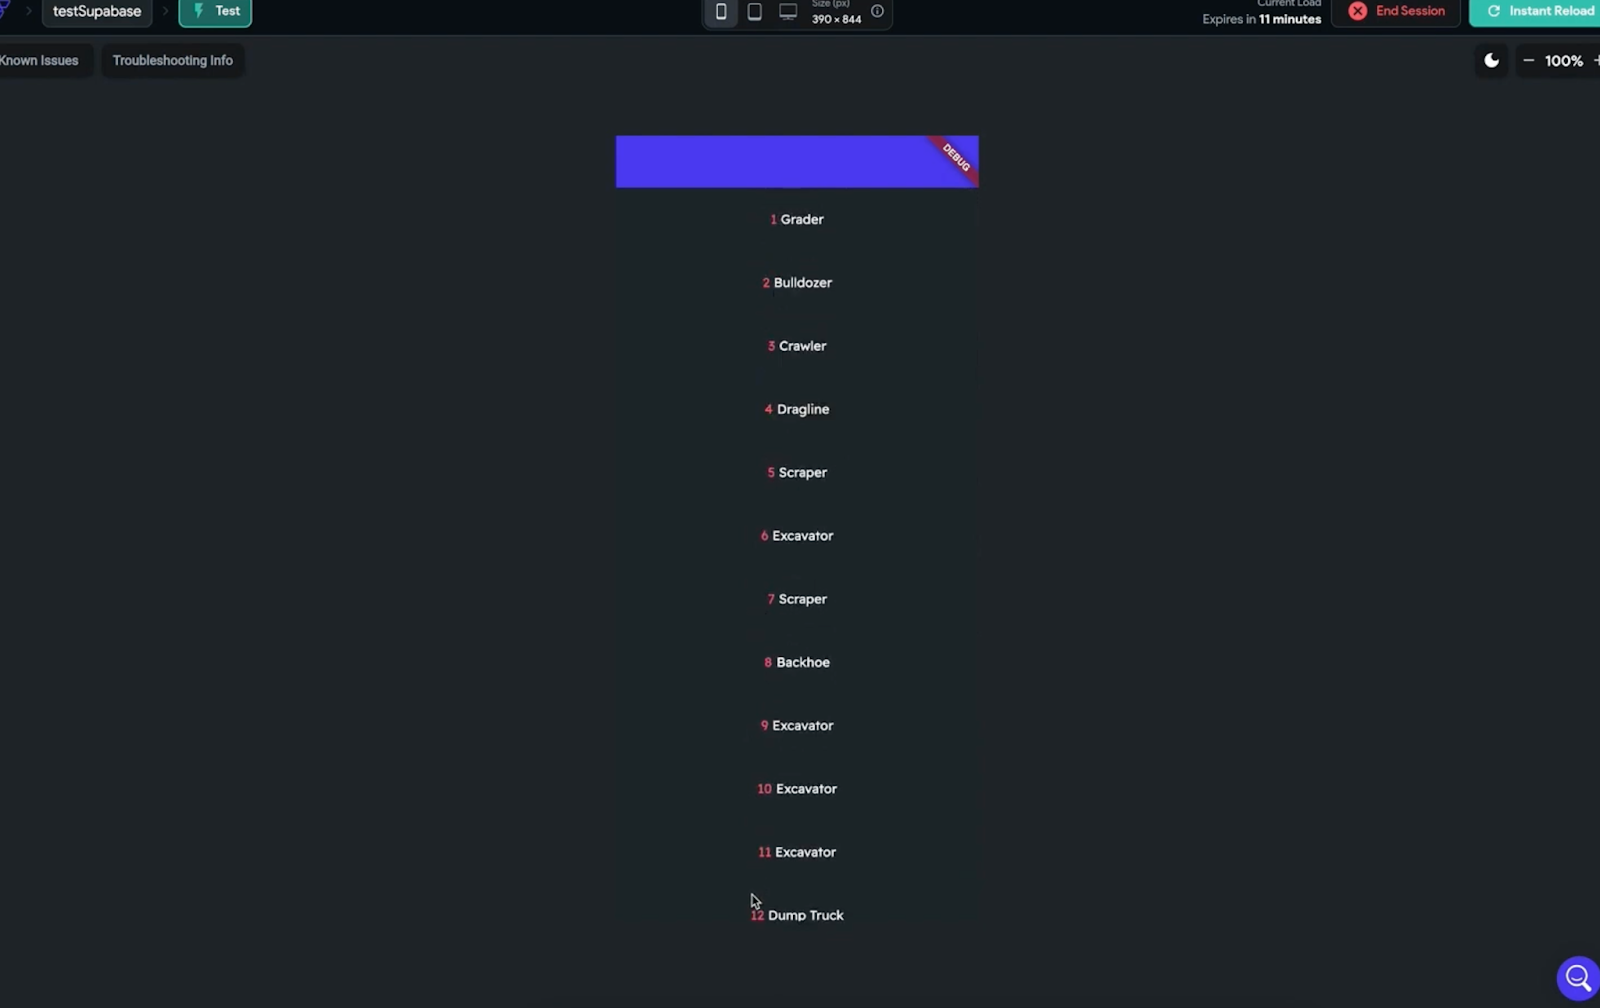
As you can see in the example below I have ten records I am passing from a table in supabase and when I click on next another set of Ten records appears and when I click Back then the previous ten records appear.
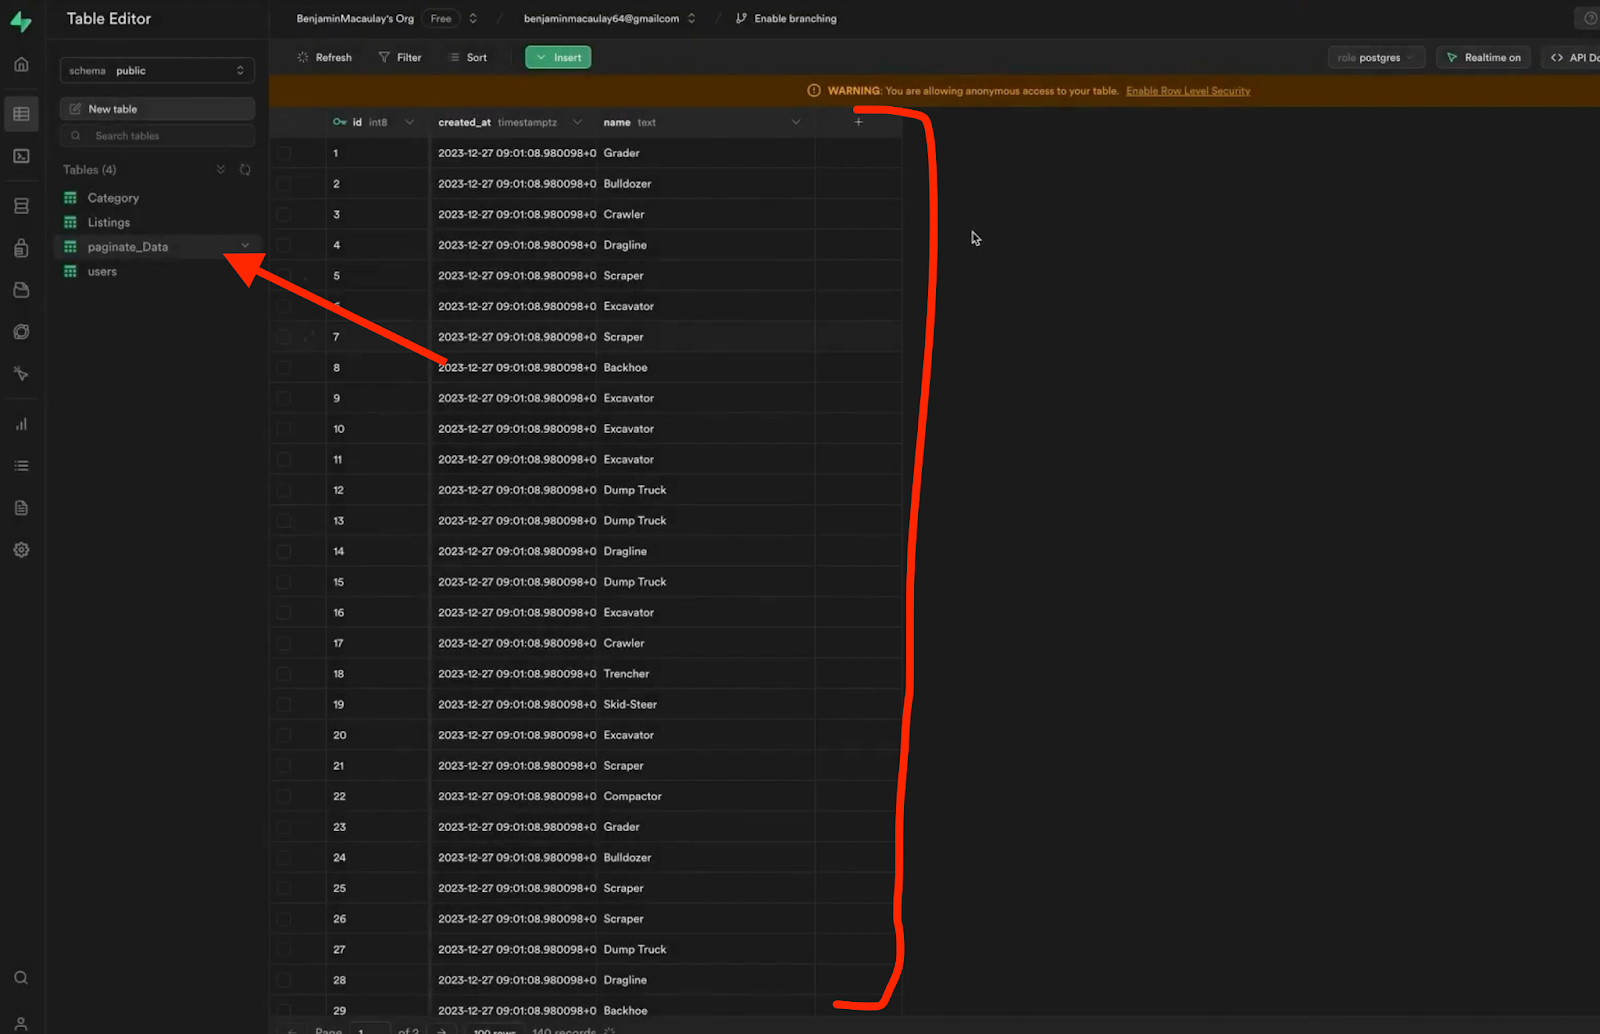
For my setup, I’m retrieving data from a table named “Paginate_Data” on Supabase. This table comprises over 1000 rows, featuring an ID field, which is a numerical field arranged in ascending order starting from one. Each row also contains a randomly generated name, solely for testing purposes.
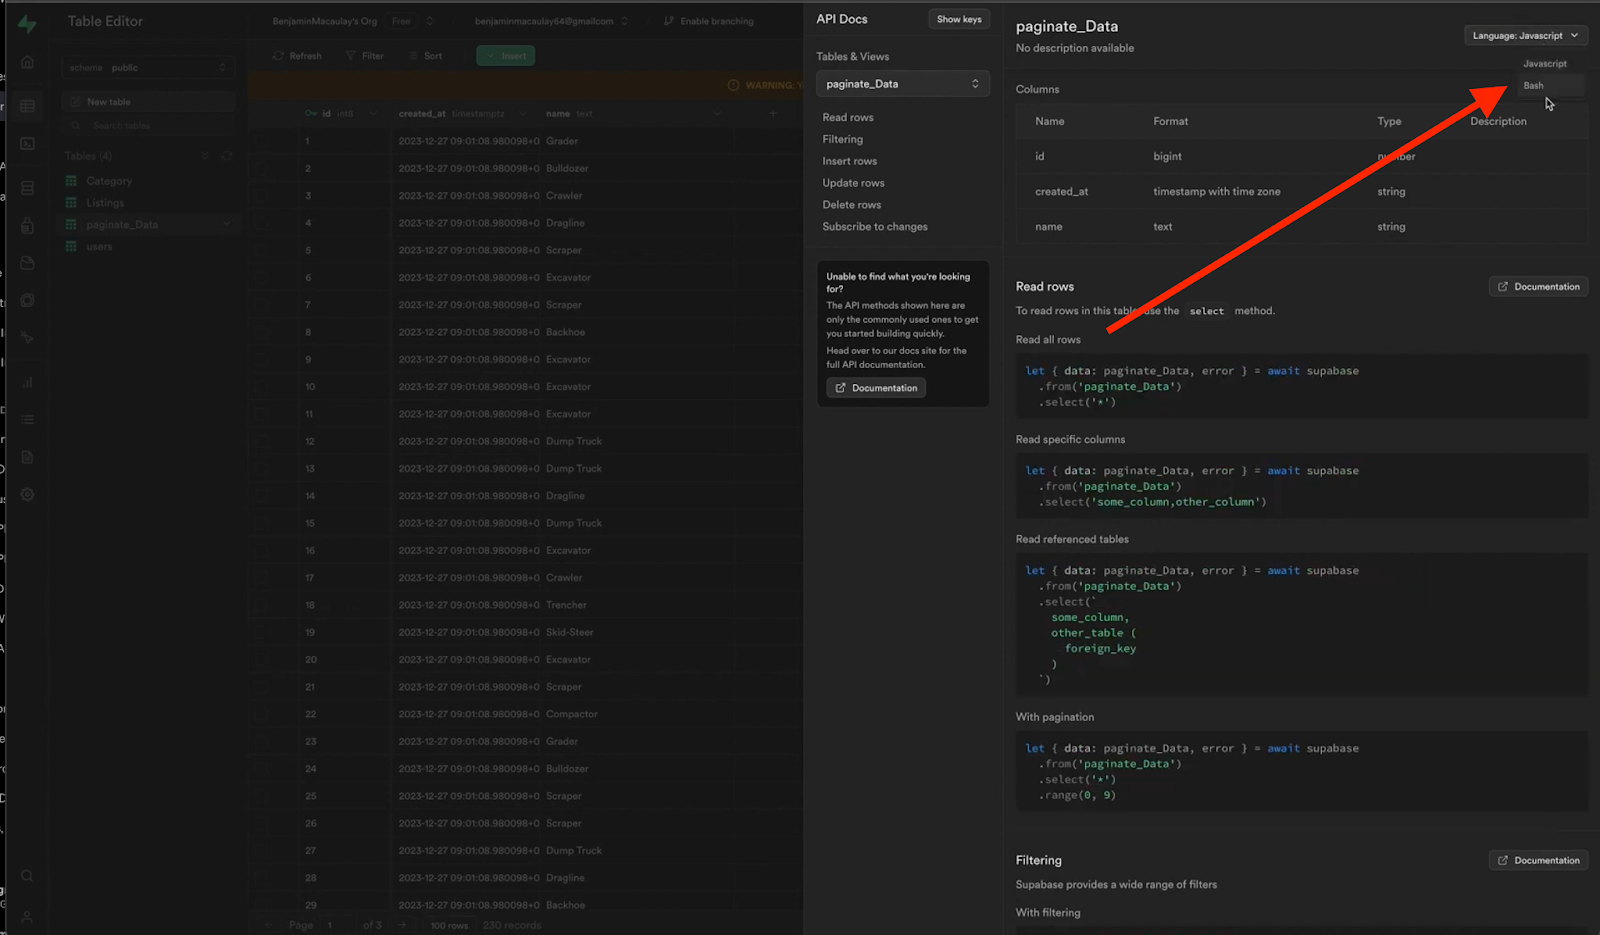
Next, let’s focus on establishing the API connection. To access the documentation, navigate to the table you intend to connect to within Supabase. Then, select “API Docs” located at the top right corner.
This action will unveil the necessary information on how to access the Supabase table via REST API, which is supported by FlutterFlow.

Another friend you should work with is chatgpt. ChatGPT as a resource can be immensely beneficial.
ChatGPT can effectively communicate and assist you in your own language, providing valuable insights and explanations. It’s easily accessible and capable of guiding you through various tasks, even if you lack prior experience.
For instance, you can ask ChatGPT to help you generate a cURL command with a JSON body for making an API call to read a Supabase table and paginate its contents.
Even if you’re unfamiliar with the process, ChatGPT can simplify the explanation and provide step-by-step guidance. So, it’s a great idea to have ChatGPT readily available in another tab for assistance.
I want to direct your attention to the api docs in supabase that we discussed earlier, you will get the api url link that you will need to create you api call in flutterflow
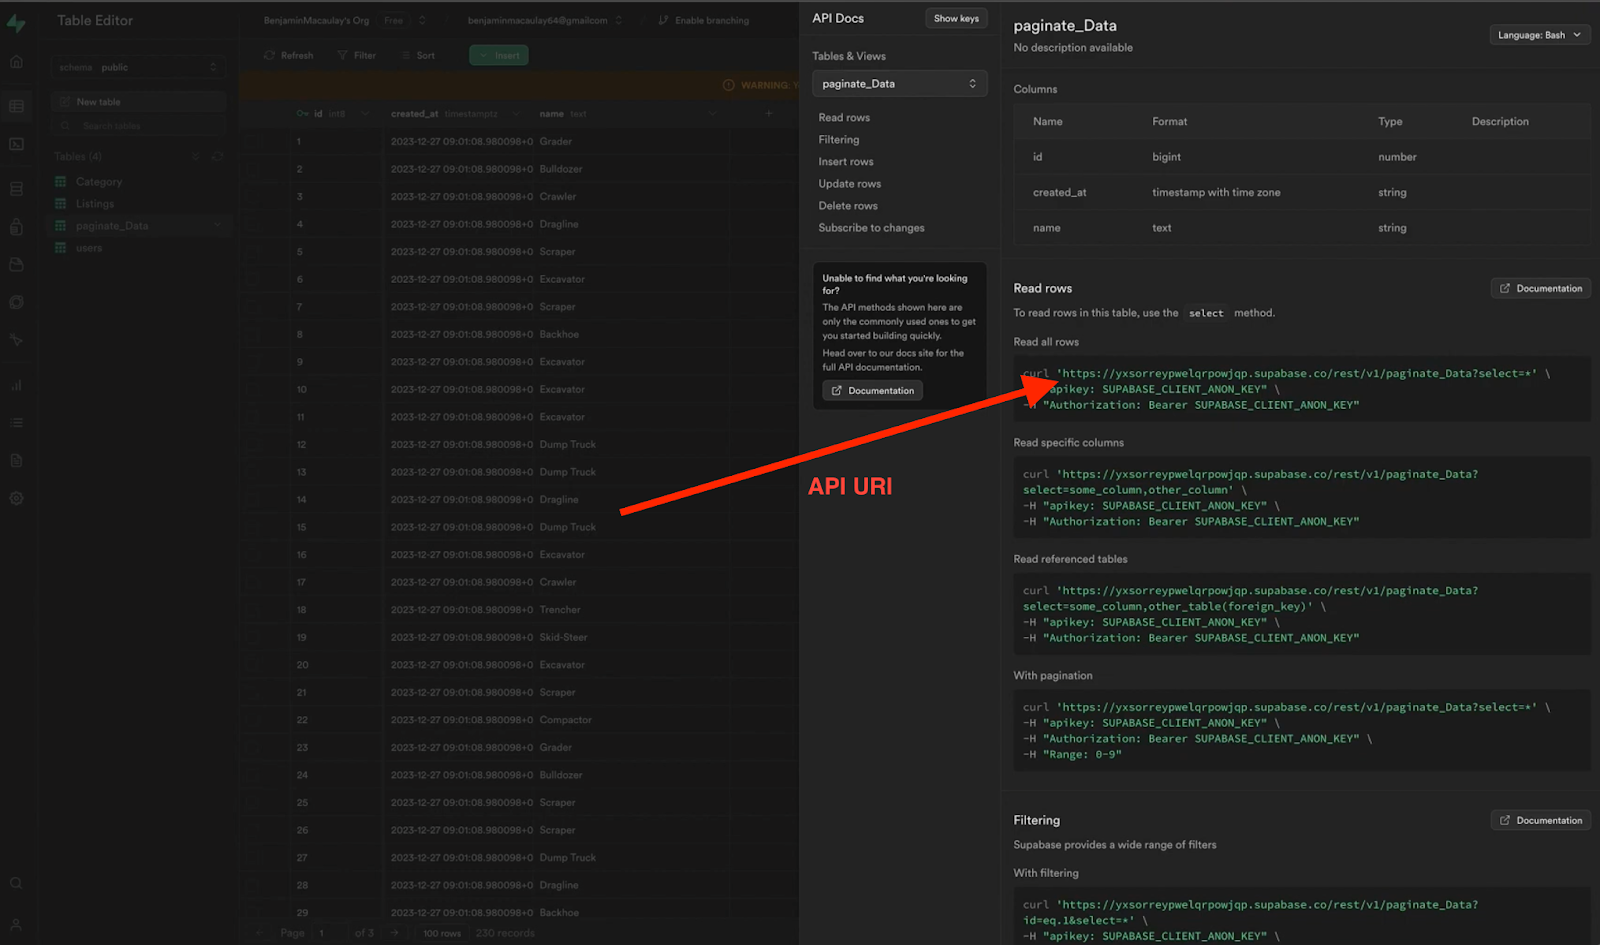
Once you combine reading the supabase documentation with queries to chatgpt you will come out with this api call structure.
API format (GET CALL)
- The url = (the url for your supabase table) – ‘https://yxsorreypwelgrpowigp.supabase.co/rest/v1/paginate Data?select=* (&limit=10&offset=0′)
Let’s break down the components of the API url:
Base URL: https://yxsorreypwelgrpowigp.supabase.co/rest/v1/
This is the base URL for accessing the Supabase REST API. It specifies the version (v1) and the RESTful endpoint (rest).
Resource: paginate Data
This part of the URL seems to specify the resource or endpoint for paginating data. It suggests that you’re requesting paginated data from a table named Data.
Query Parameters:
select=*: This parameter specifies that you want to select all fields from the table.
limit=10: LIMIT (I only want x amount of records returned) the limit specifies the maximum number of rows to be returned per section, in this example we only want 10 per page.
offset=0: This parameter specifies the starting point from which records should be returned. In this example it is set to “0” and an offset of 0 means that the results will start from the beginning of the dataset 0.
- Here are the headers you’ll need to include in your API request, along with the Supabase client anon key:
“`
“apikey: SUPABASE_CLIENT_ANON_KEY”
“Authorization: Bearer SUPABASE_CLIENT_ANON_KEY”
“`
Make sure to replace `SUPABASE_CLIENT_ANON_KEY` with the actual Supabase client anon key obtained from the previous steps where necessary. These headers will enable authentication and access to the Supabase table data via the API call.
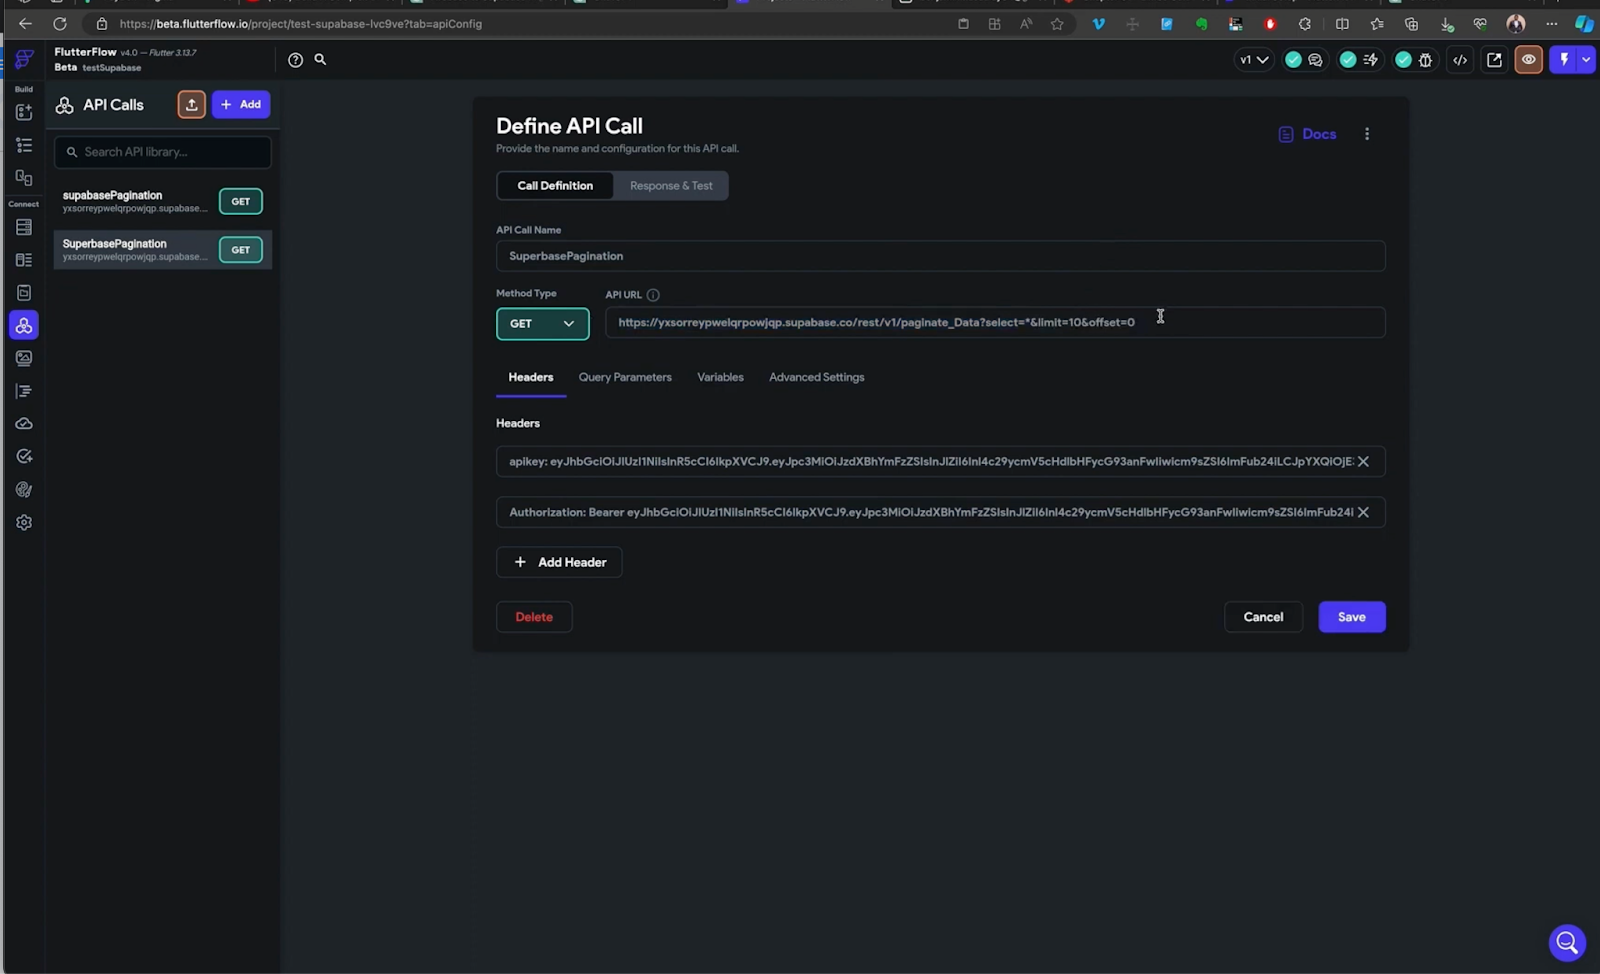
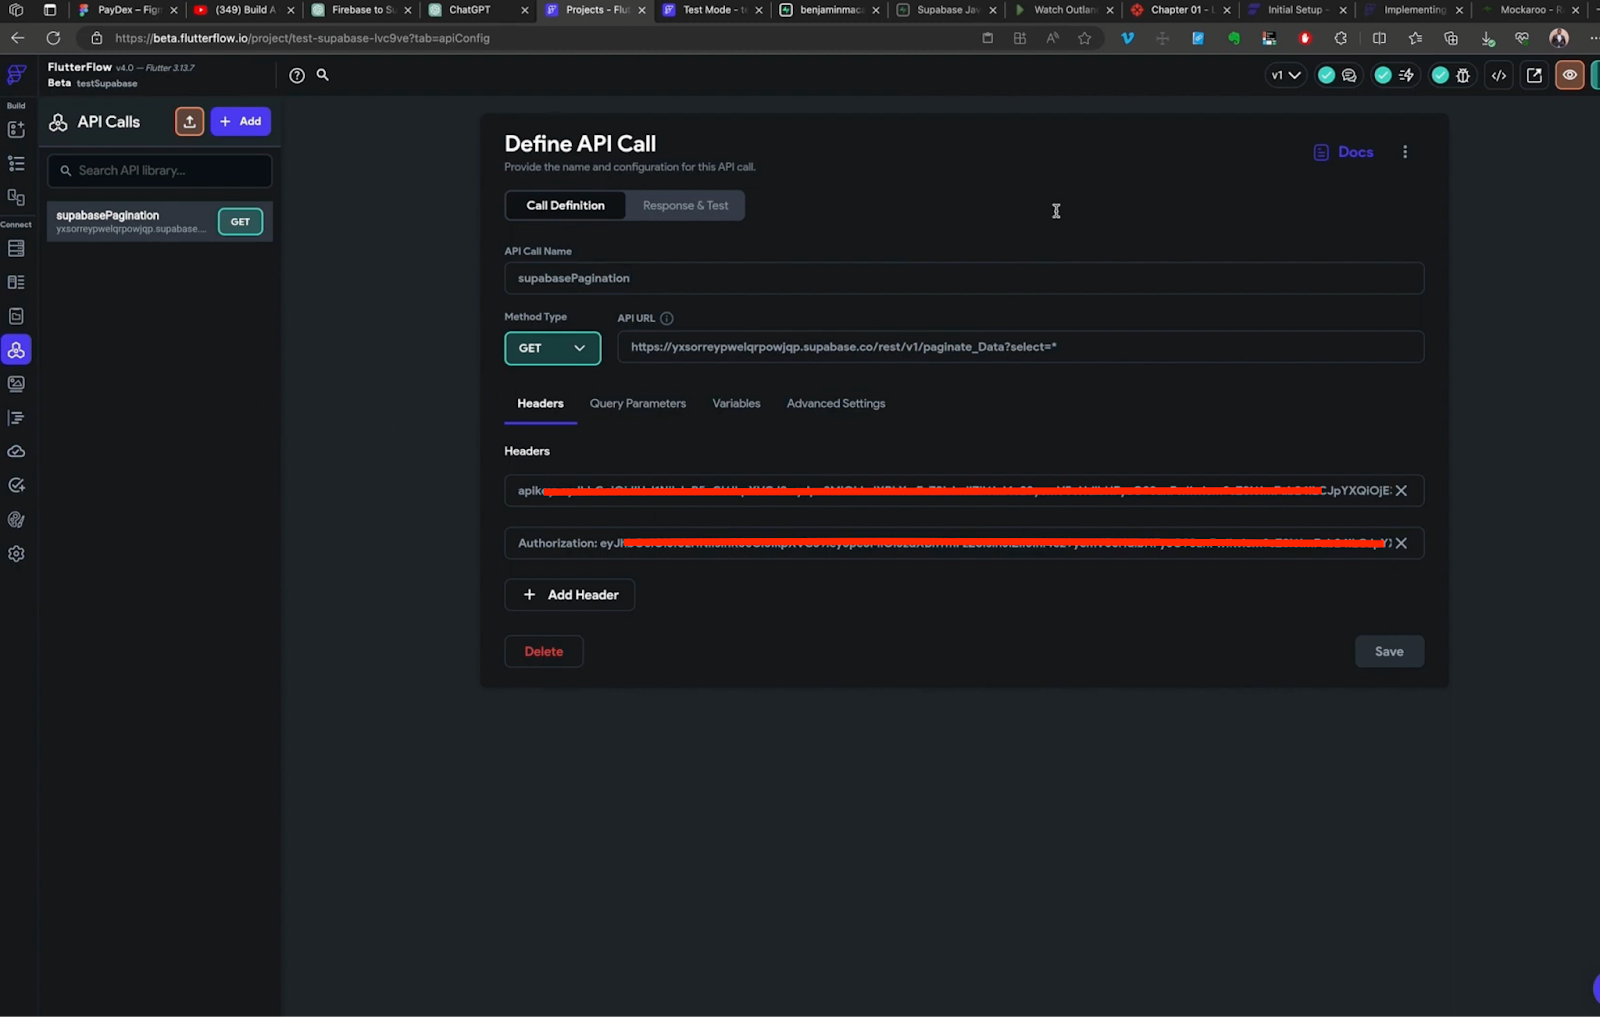
In FlutterFlow, navigate to the API call tab located on the left side of the interface. Here, you’ll add the URL along with the Anon keys to configure the API call.
First, ensure you have the URL endpoint of your Supabase table API. Then, incorporate the Anon keys in the headers section as follows:
1. URL: Paste the URL endpoint of your Supabase table API.
2. Headers: Add the following headers to authenticate the API call:
– Key: `apikey`
Value: Your Supabase client anon key
– Key: `Authorization`
Value: `Bearer` followed by your Supabase client anon key
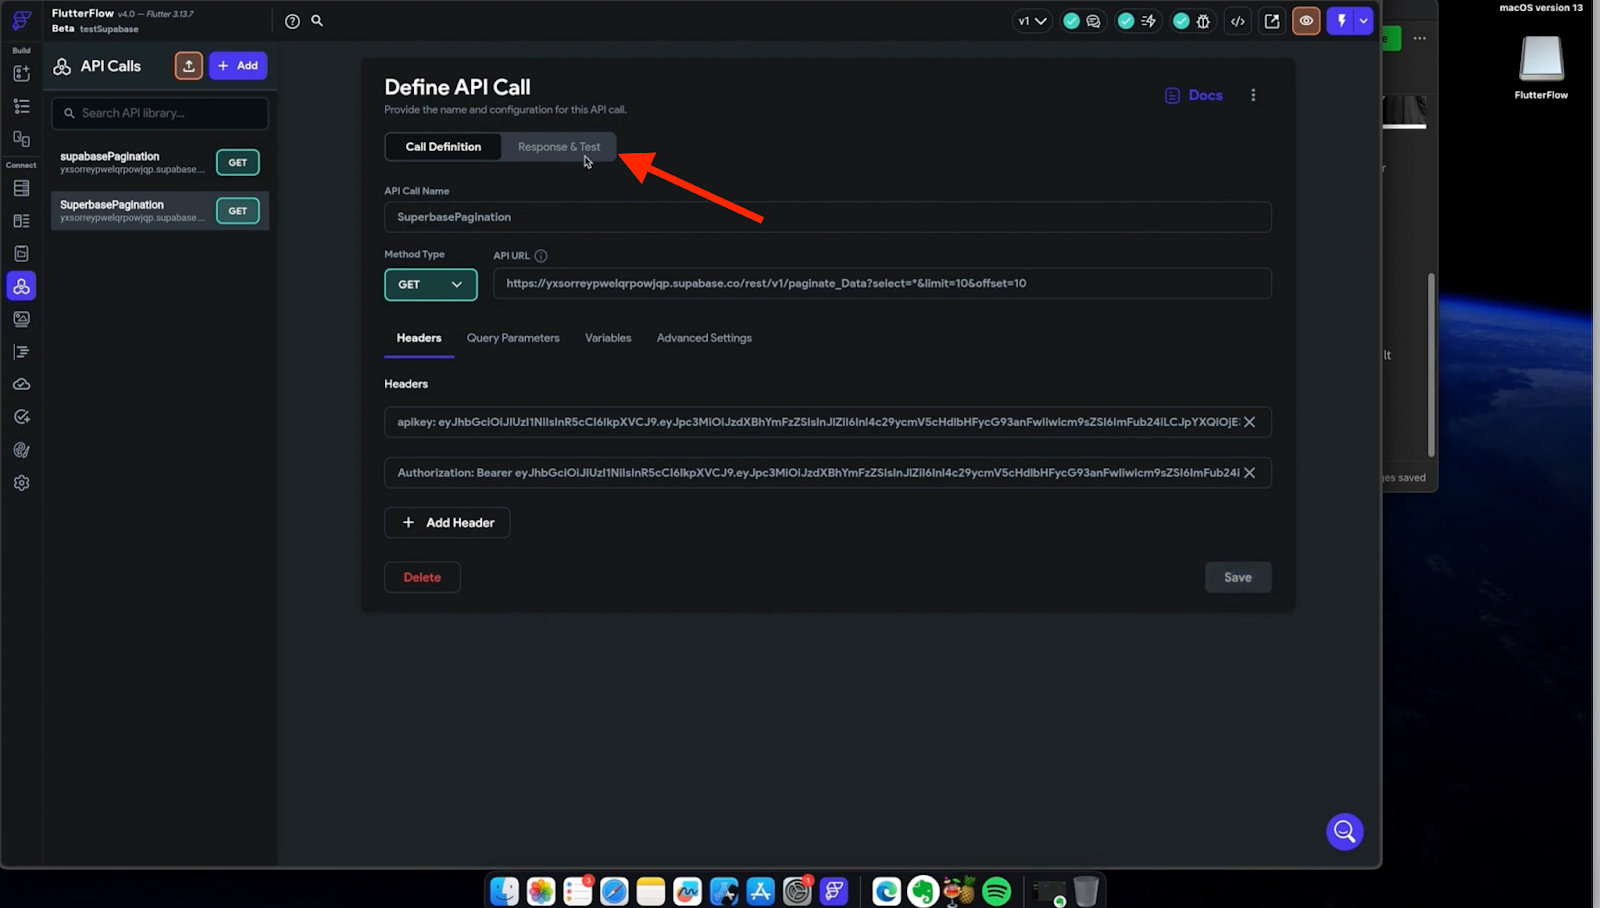
After adding all the necessary details in FlutterFlow, proceed to the “Response” section and initiate a test of the API call.
Here’s how to do it:
1. Response Tab: Locate the “Response” tab within FlutterFlow.
2. Test API Call: Click on the option to test the API call. This action will trigger the API request to the specified endpoint with the provided headers and parameters.
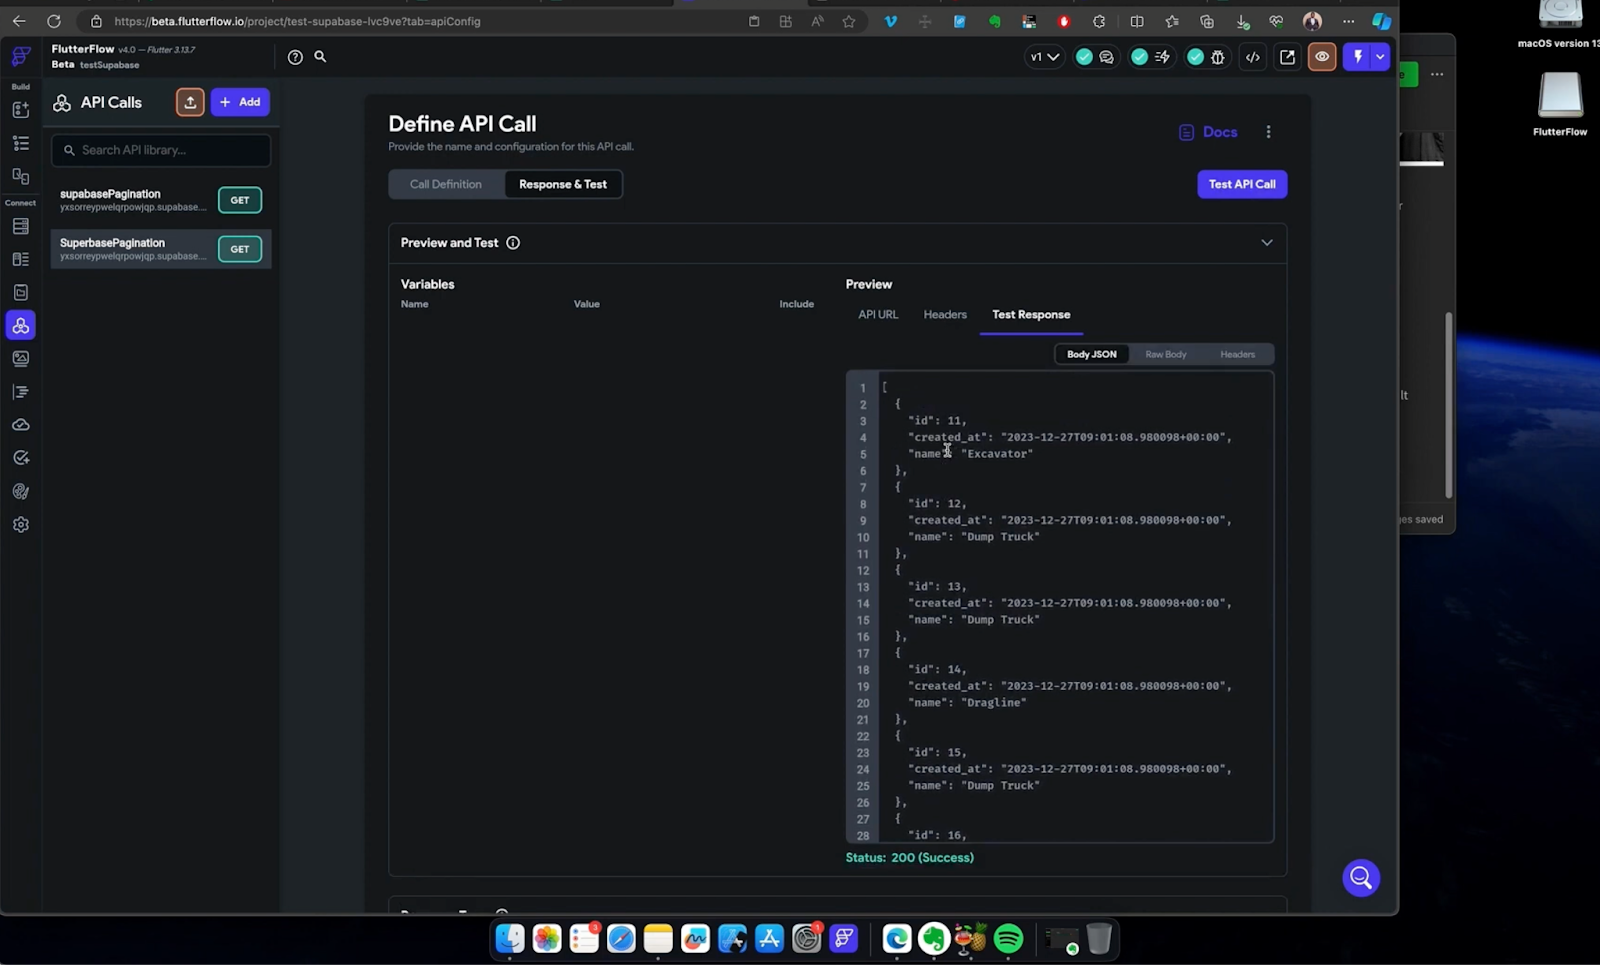
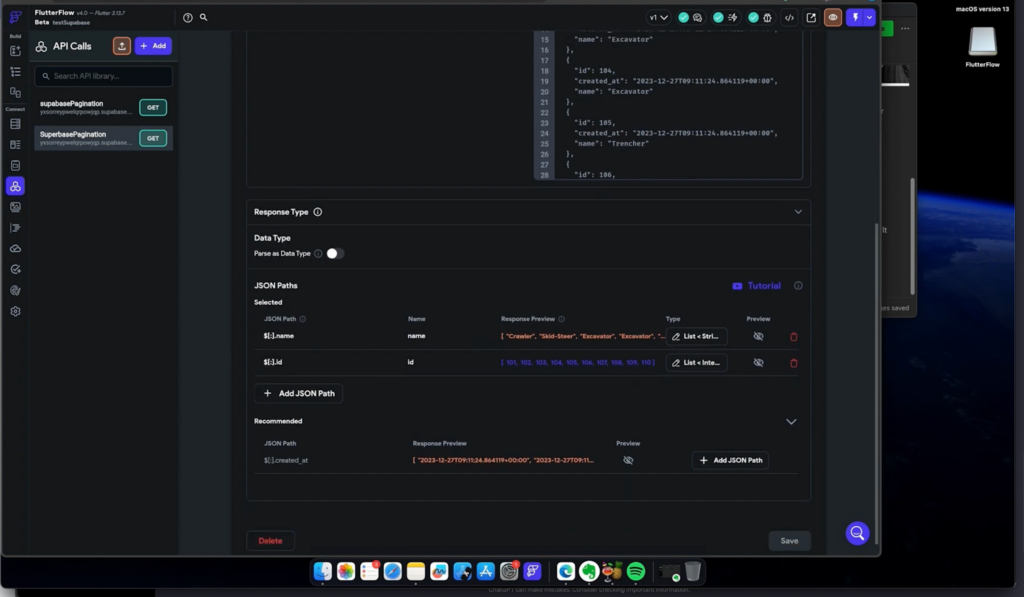
In the provided illustration, the results were as anticipated: 10 records were returned from a dataset exceeding 1000 entries.
This outcome was achieved by setting the LIMIT parameter in the query to 10. Additionally, the records commenced from number 11 due to the offset being set to 10.
Consequently, this API result effectively skipped over record number 10, assuming it had been previously called. As a result, the retrieval process initiated from record number 11 onwards.
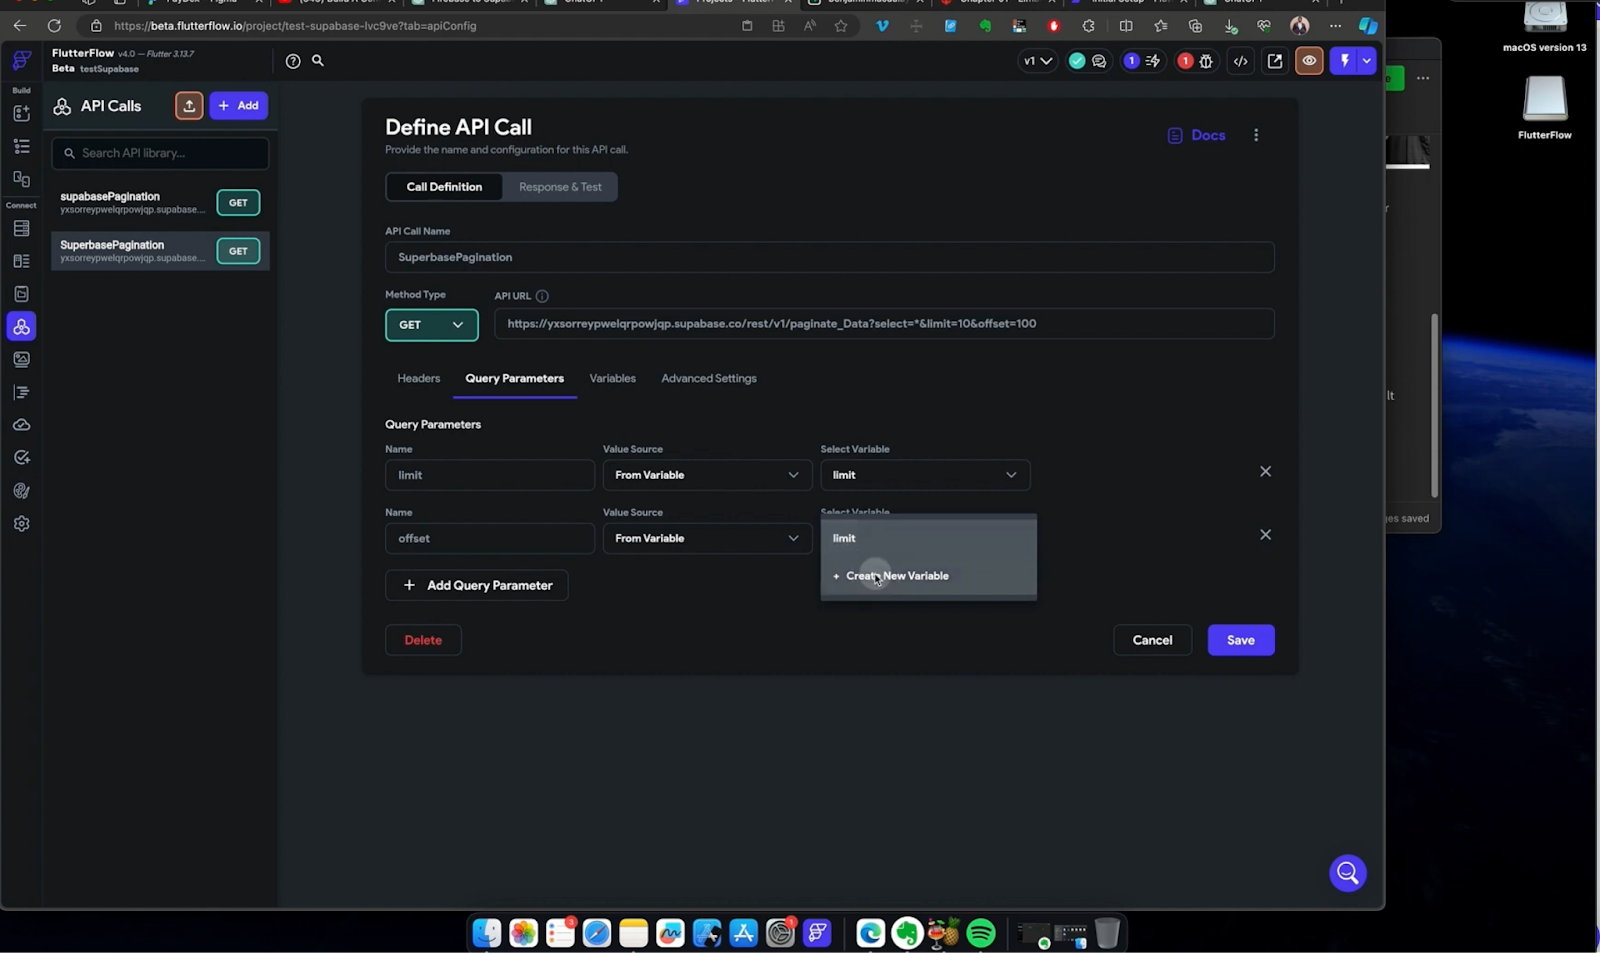
Before proceeding to the next step, let’s make the limit and offset parameters dynamic. This will enable us to pass any values we desire to make the pagination feature flexible. To achieve this, follow these steps:
1. Navigate to the query parameters section in FlutterFlow.
2. Add the limit and offset variables as options.
3. For the “select variable” option, click on “Create new variable.”
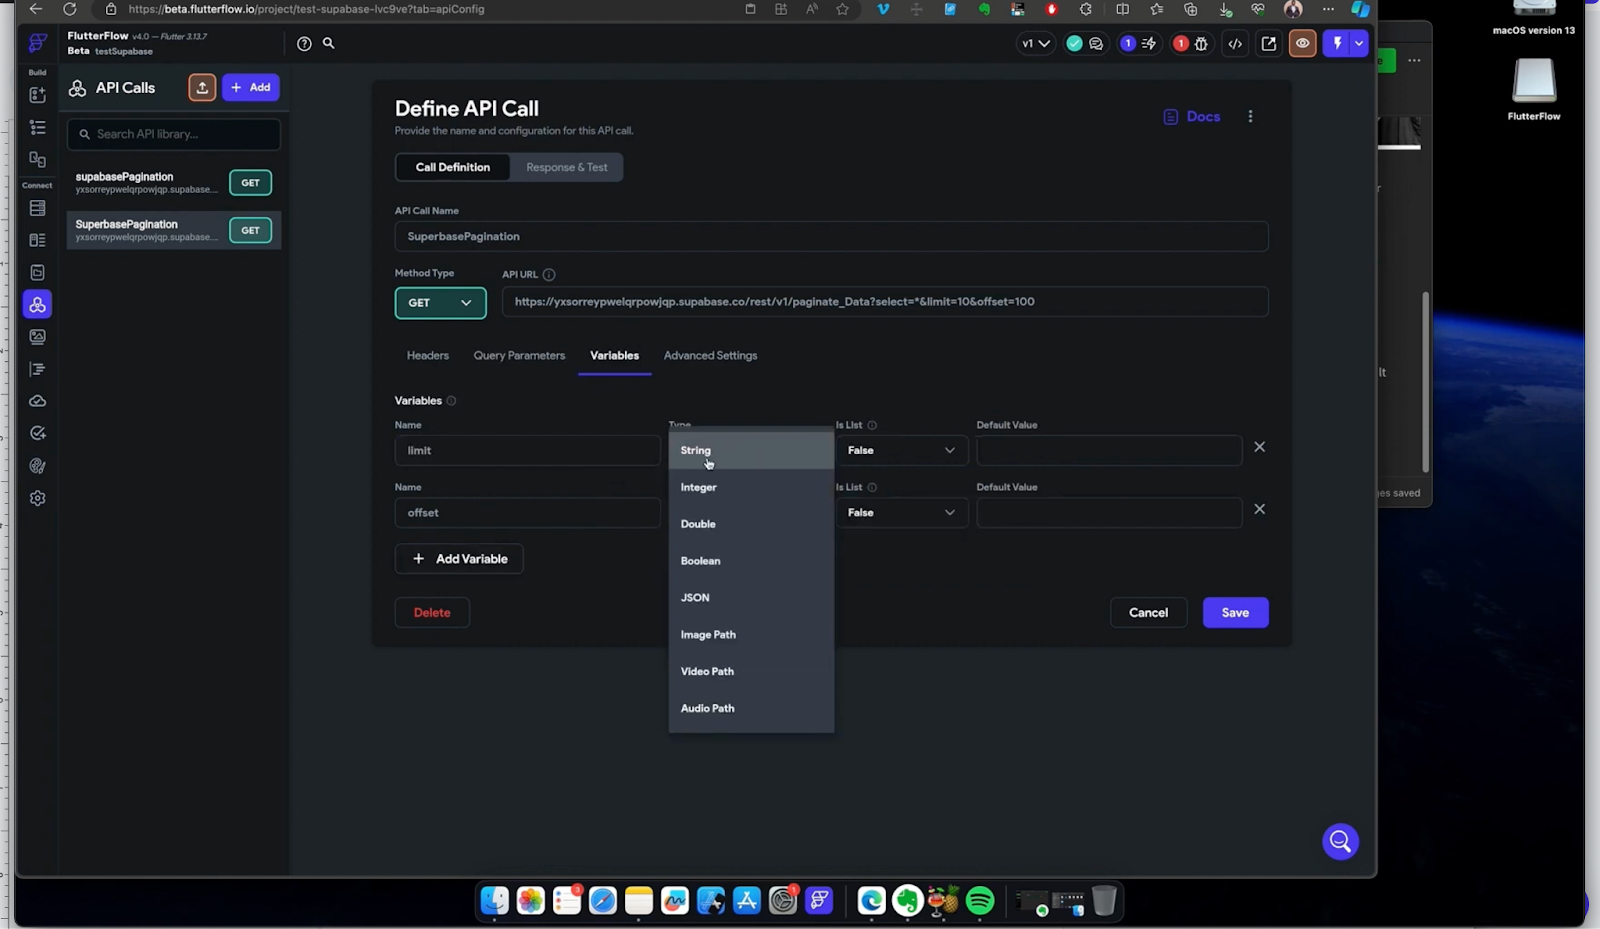
To set the variable types to string and save the changes to the API call, follow these steps:
1. Navigate to the query parameters section in FlutterFlow.
2. Set the variable types for both limit and offset parameters to string.
3. Save the changes to the API call settings.
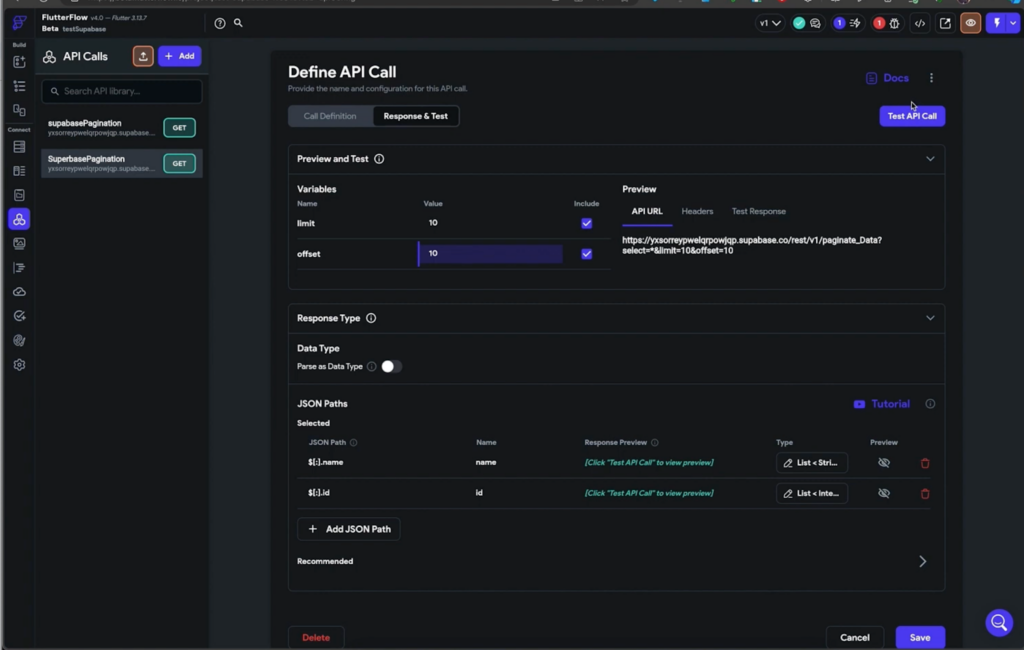
Once you’ve saved the changes, proceed to the response and test section. Here, you can experiment by inputting different numbers in the offset and limit parameters.
This simulation allows you to observe how dynamic data affects the pagination process, enabling you to fine-tune and optimize the pagination feature accordingly.
Step Three: Connect your Api call to a ui flow
In this step, we’ll explore a bonus form of pagination known as infinite scrolling with Supabase. We’ll learn how to apply this pagination technique to a page and then proceed to implement our API call pagination in FlutterFlow.
Let’s get started!
Pagination with infinite scrolling
Firstly, define the JSON paths that you want to represent in your app from the API call, specify the fields you wish to extract from the response JSON. In this example, we want to retrieve the “id” and “name” fields from the paginate Data table.
Next on a blank page add a listview and because our data from the api is just a string we added text inside the listview.
Then you can go to the top right corner on the database section and add the api call we just added and make sure you check the infinite scroll option.
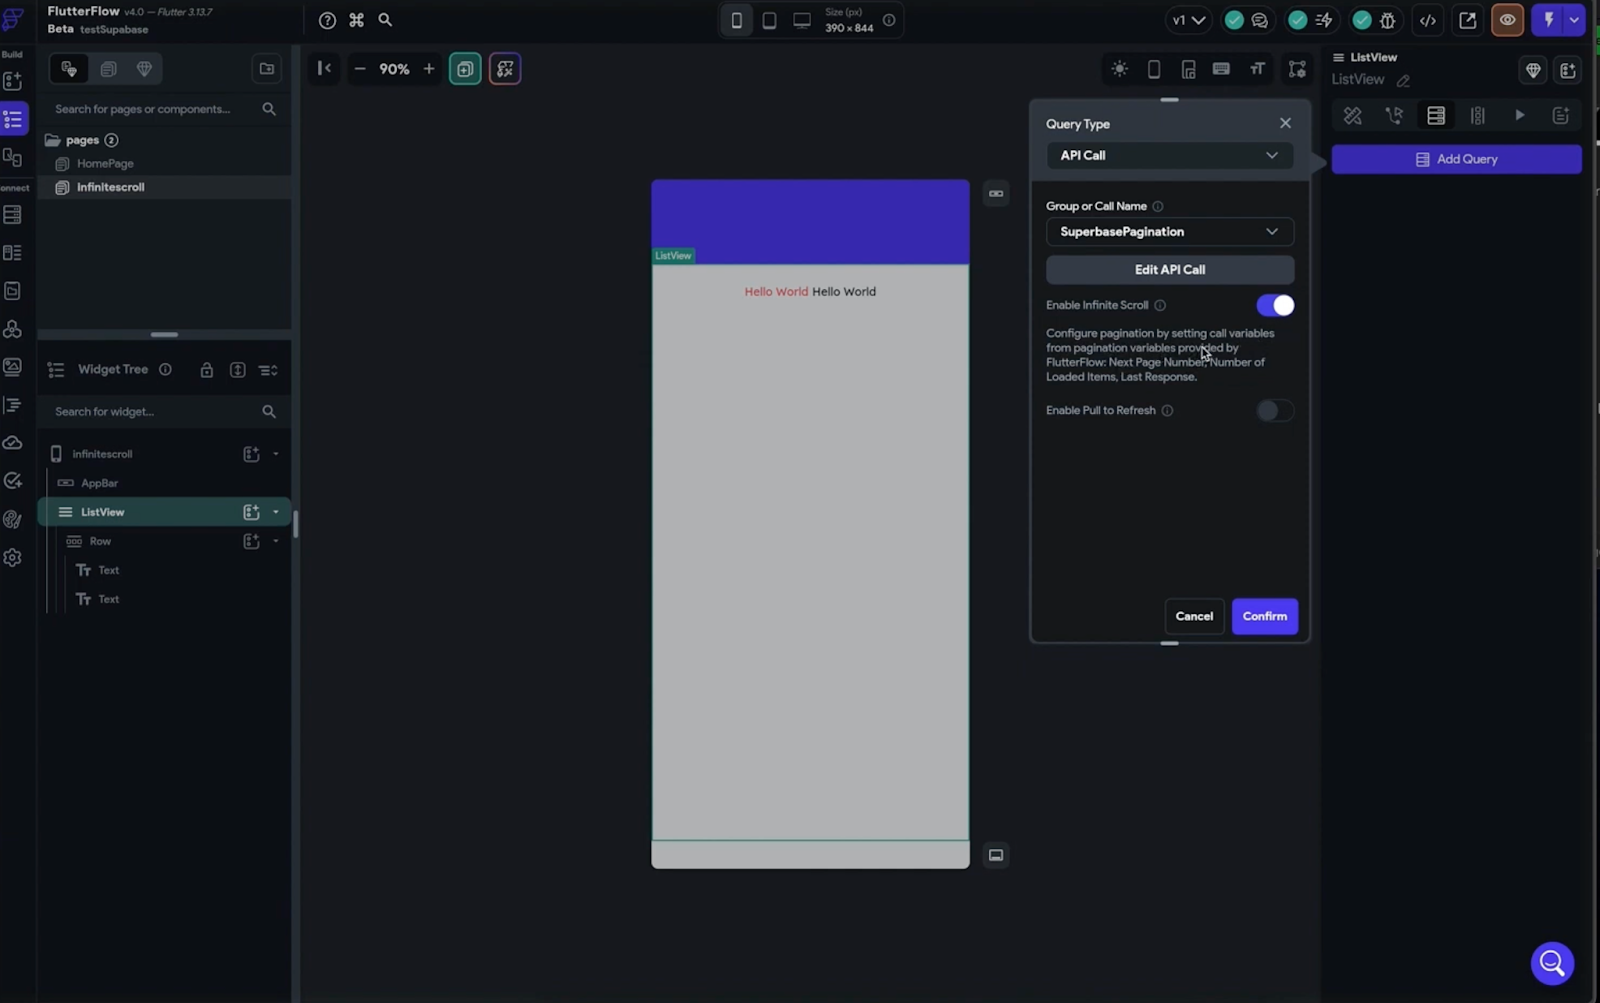
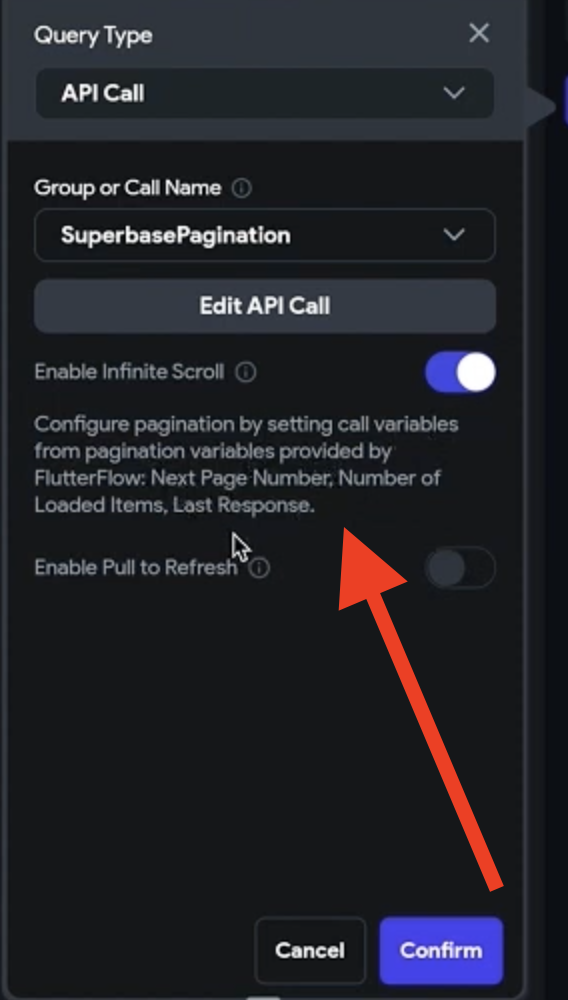
Take note that out of the box when you enable pagination flutterflow gives you default information like Nextpage number, number of loaded items etc.
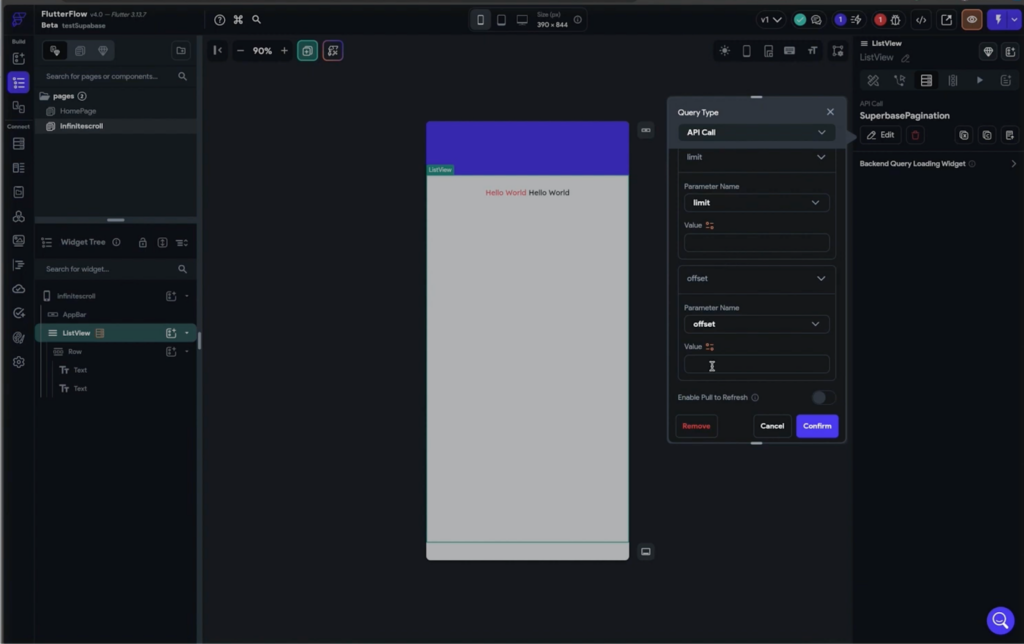
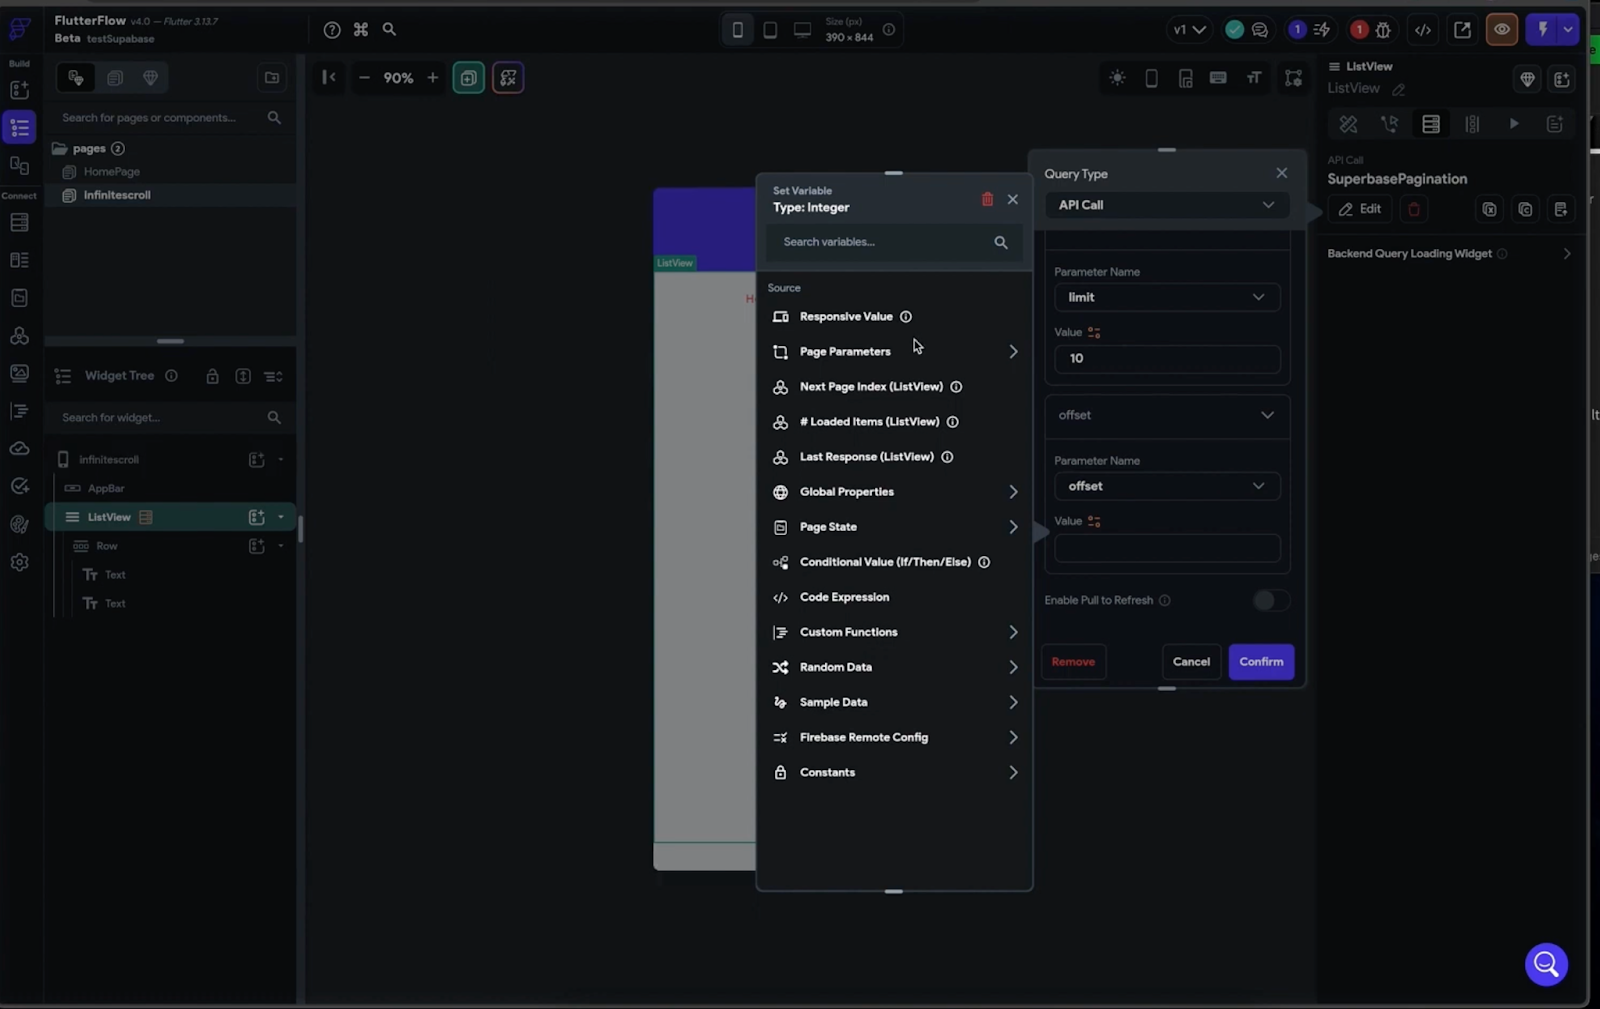
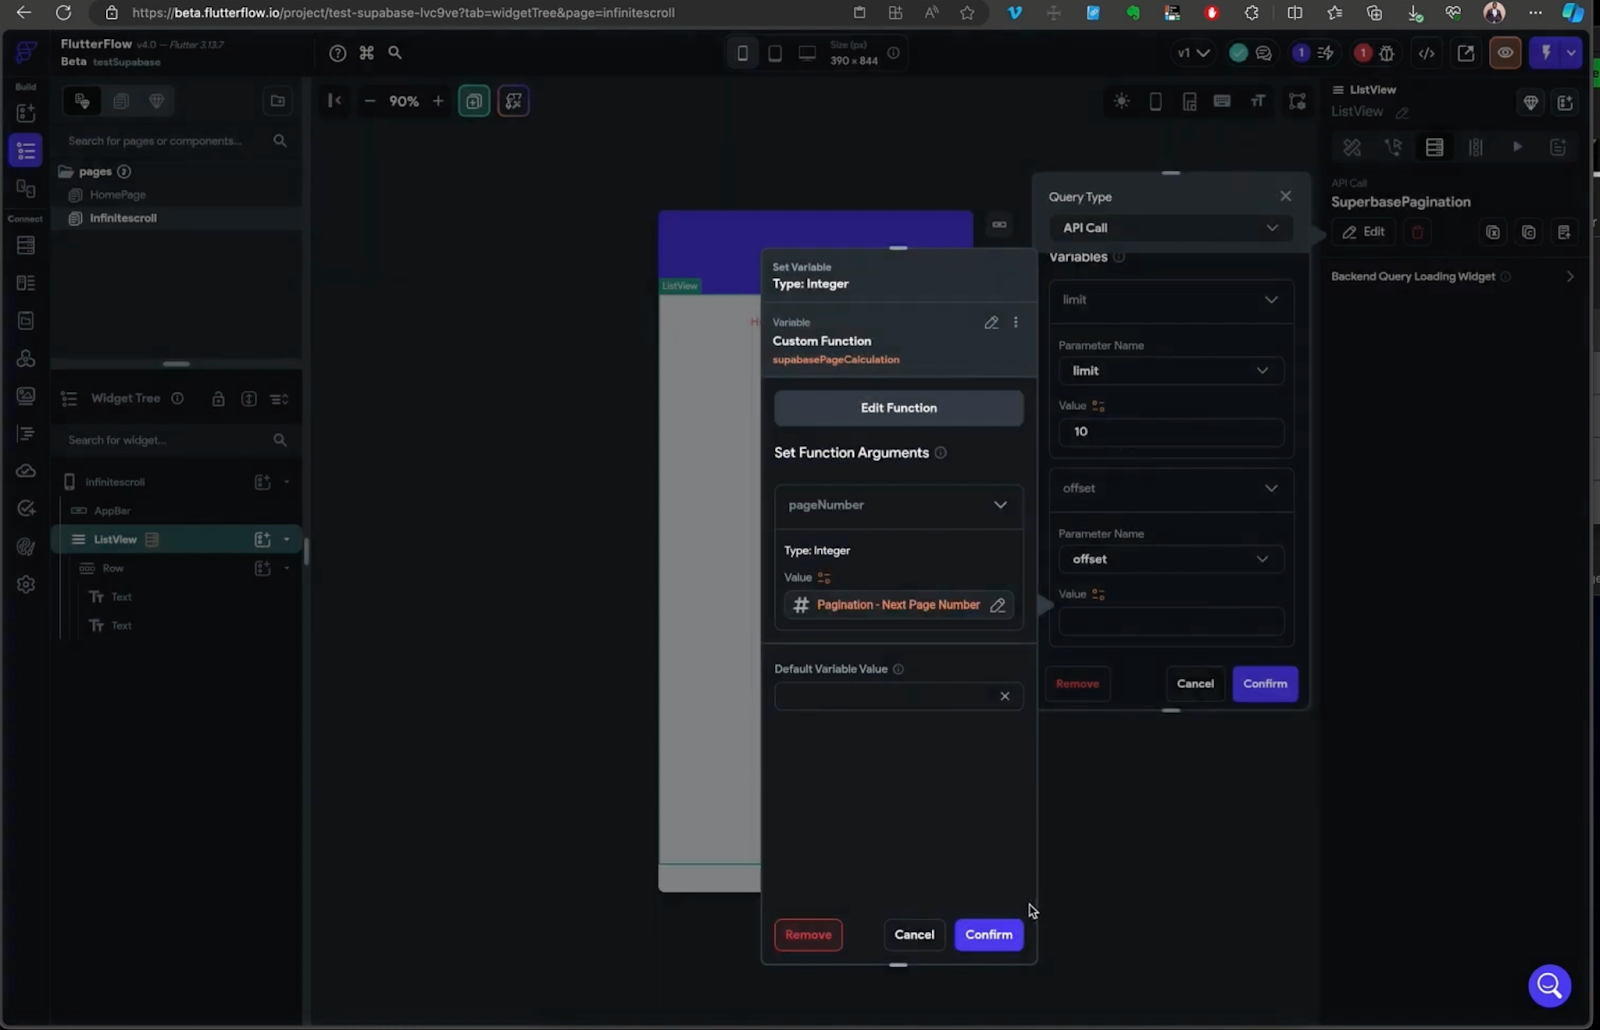
To complete the API call, we need to pass the limit and offset parameters. For the limit, we’ll set it to 10 to retrieve 10 records at a time.
As for the offset parameter, when implementing infinite scroll in FlutterFlow, the platform provides a “next page index” parameter that automatically tracks the specific page the user is on when scrolling, based on a set of x values.
To address this, we’ve devised a custom function (which was created with ai) that takes an integer (the next page index) and multiplies it by the number of expected results (in this example 10) to determine the value for the offset parameter.
This approach ensures that the API call fetches the correct subset of data corresponding to the user’s scroll position.
Note: Infinite scroll functionality allows users to scroll infinitely within a list or page. However, rows of data are only retrieved and displayed to the user as they scroll past the already returned rows, refreshing the listview dynamically.
This approach ensures that users receive new rows of data gradually as they scroll, rather than loading all the data at once, thereby enhancing the user experience and optimizing performance.
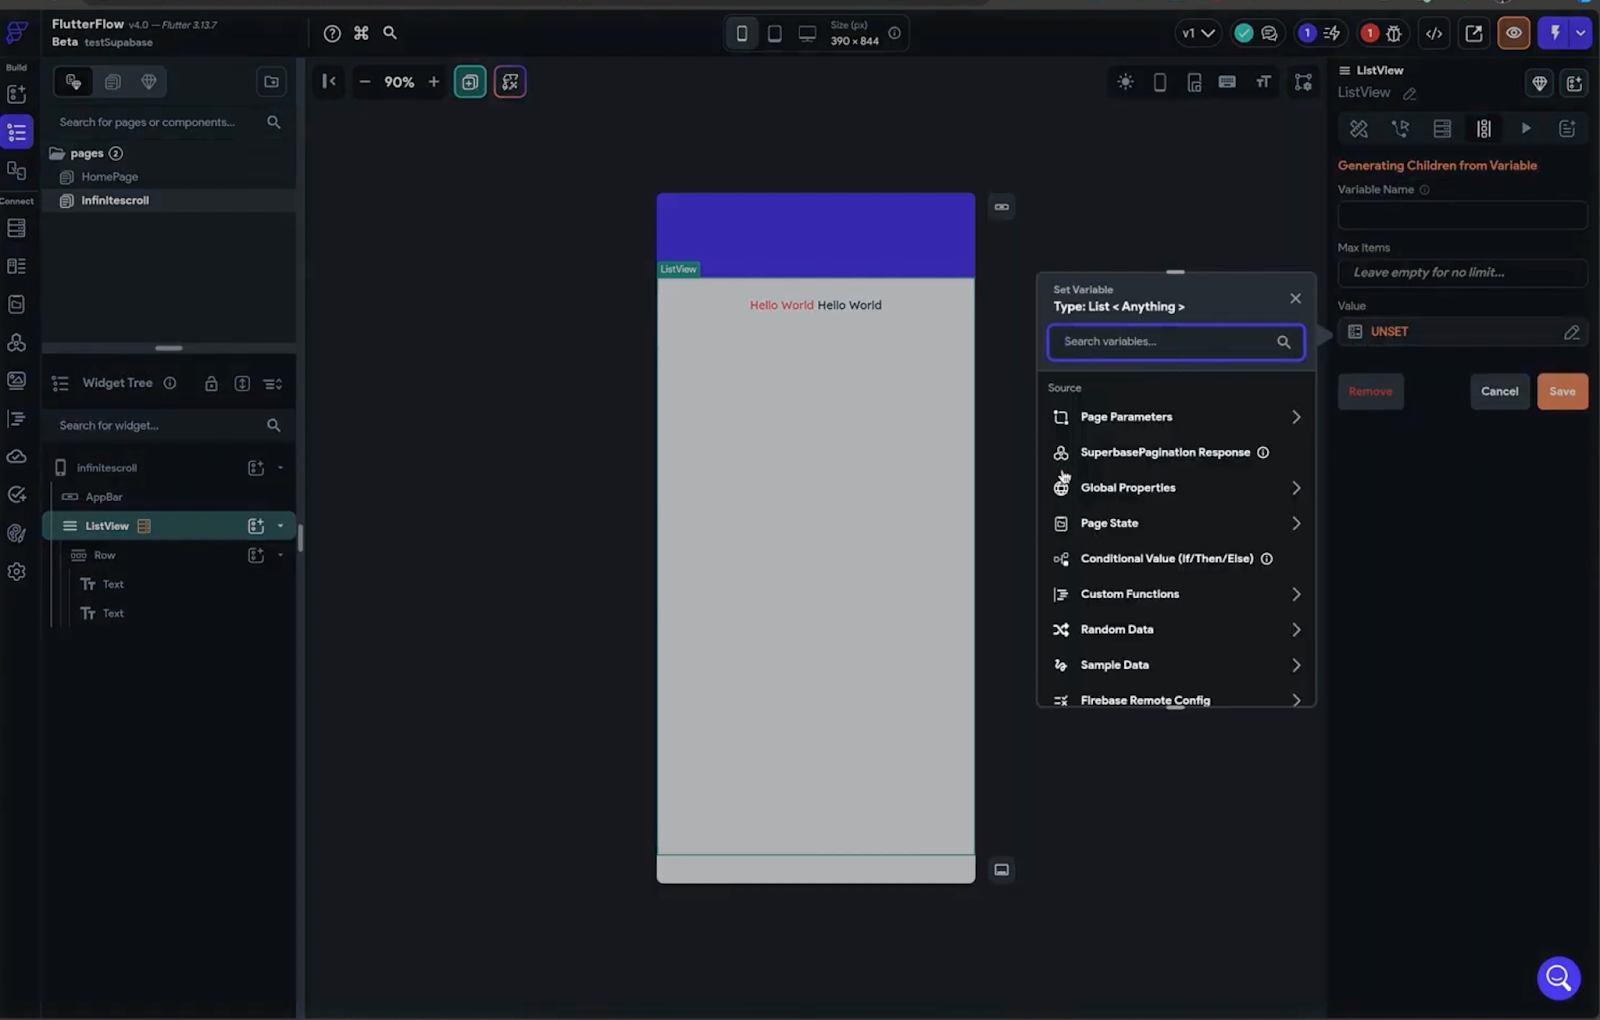
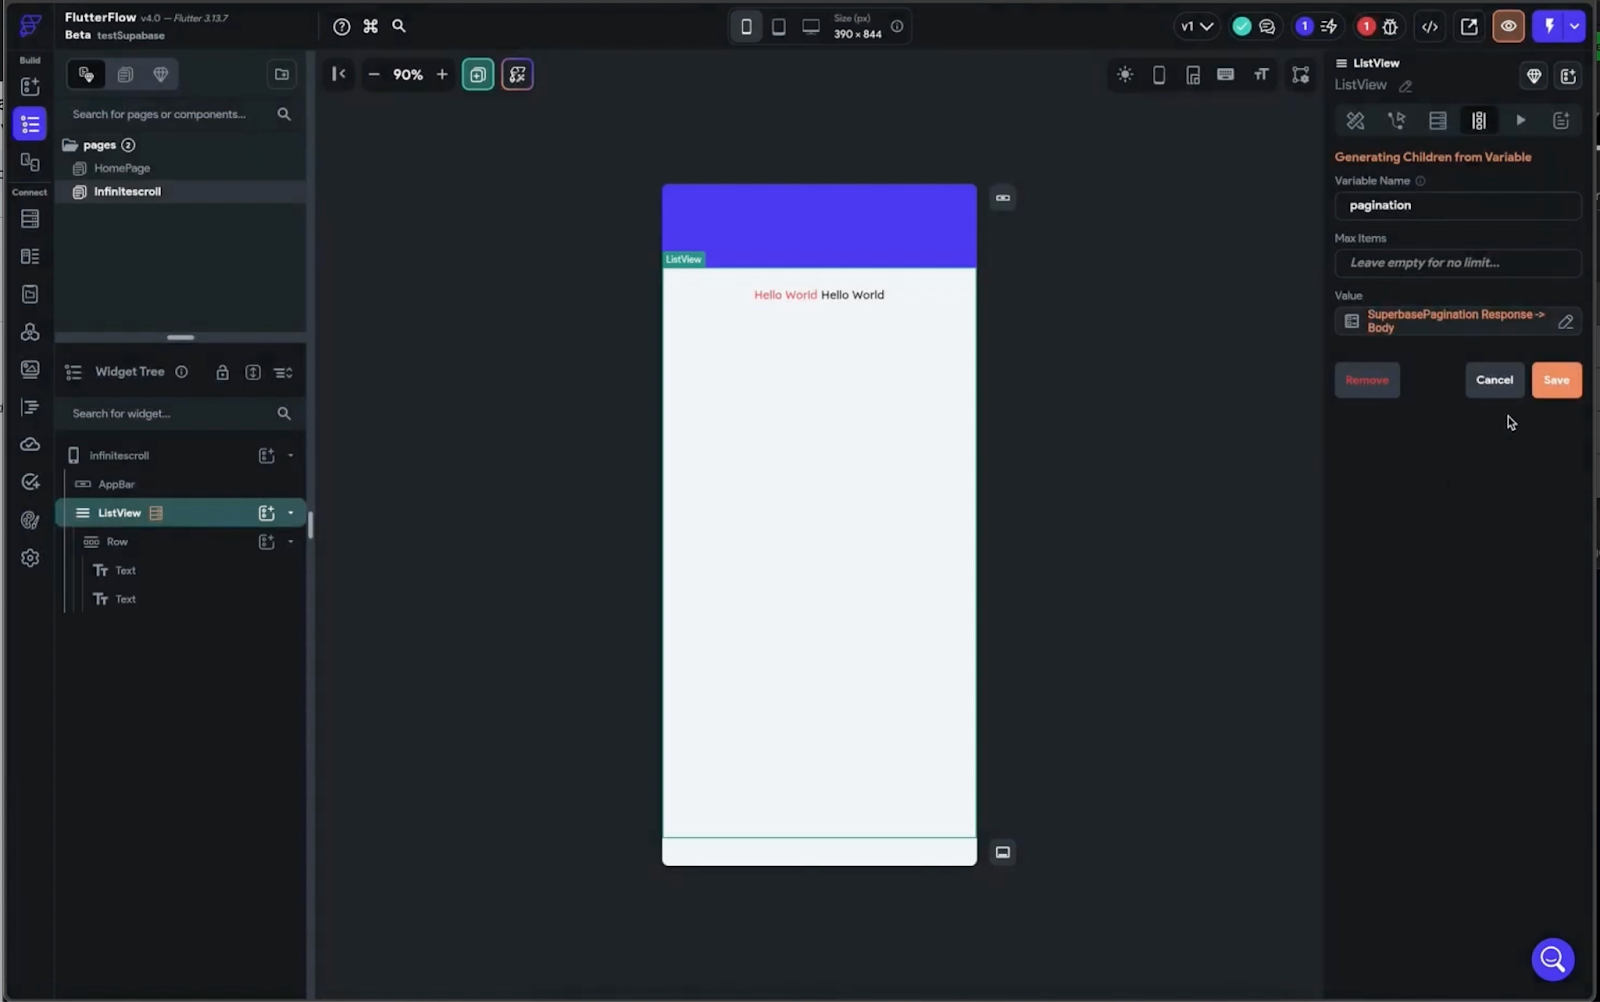
Click on the listview and then on the top right head over to the “Generate Children from Variable Section” and we will need to connect the api response to the variable and then give the variable a name.
(essentially this is an important step when working with api calls )
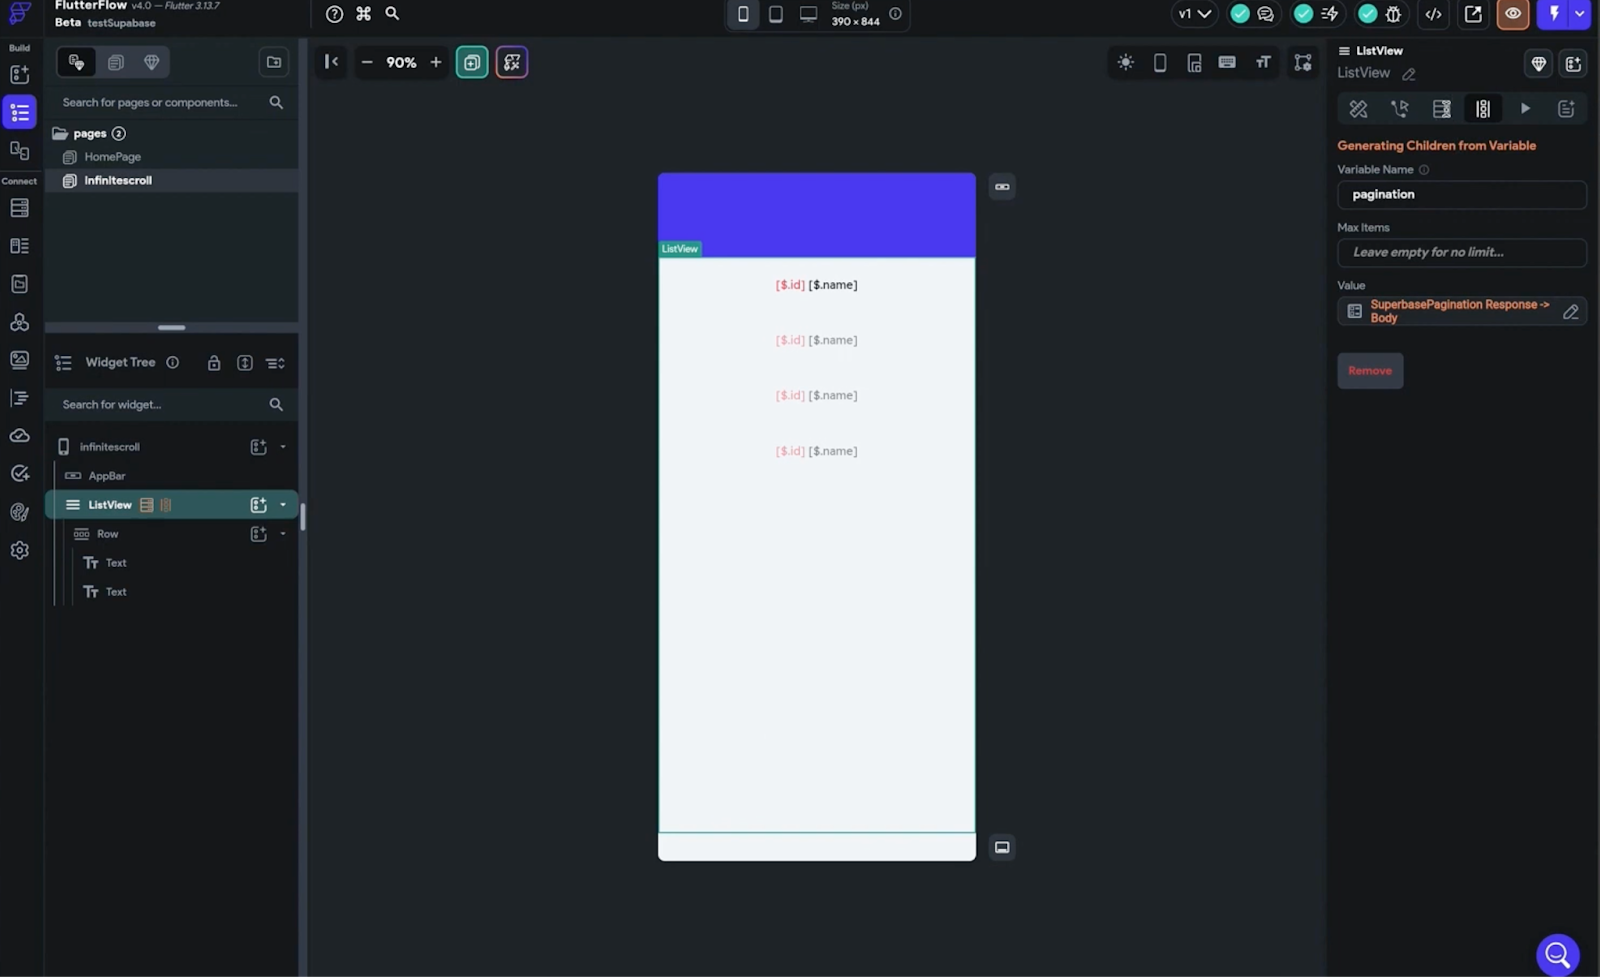
Once you’ve completed the implementation, you can connect the text on your page to the API results that we defined earlier.
This connection enables your app to dynamically display data fetched from the API as users scroll through the page. Preview your app to witness the infinite scroll and pagination feature in action.
If you’re a beginner and find certain sections challenging to understand, consider referring to FlutterFlow’s guide on API calls.
This resource can provide additional clarity and insights into the process, helping you better grasp the concepts involved in integrating API functionality into your FlutterFlow project.
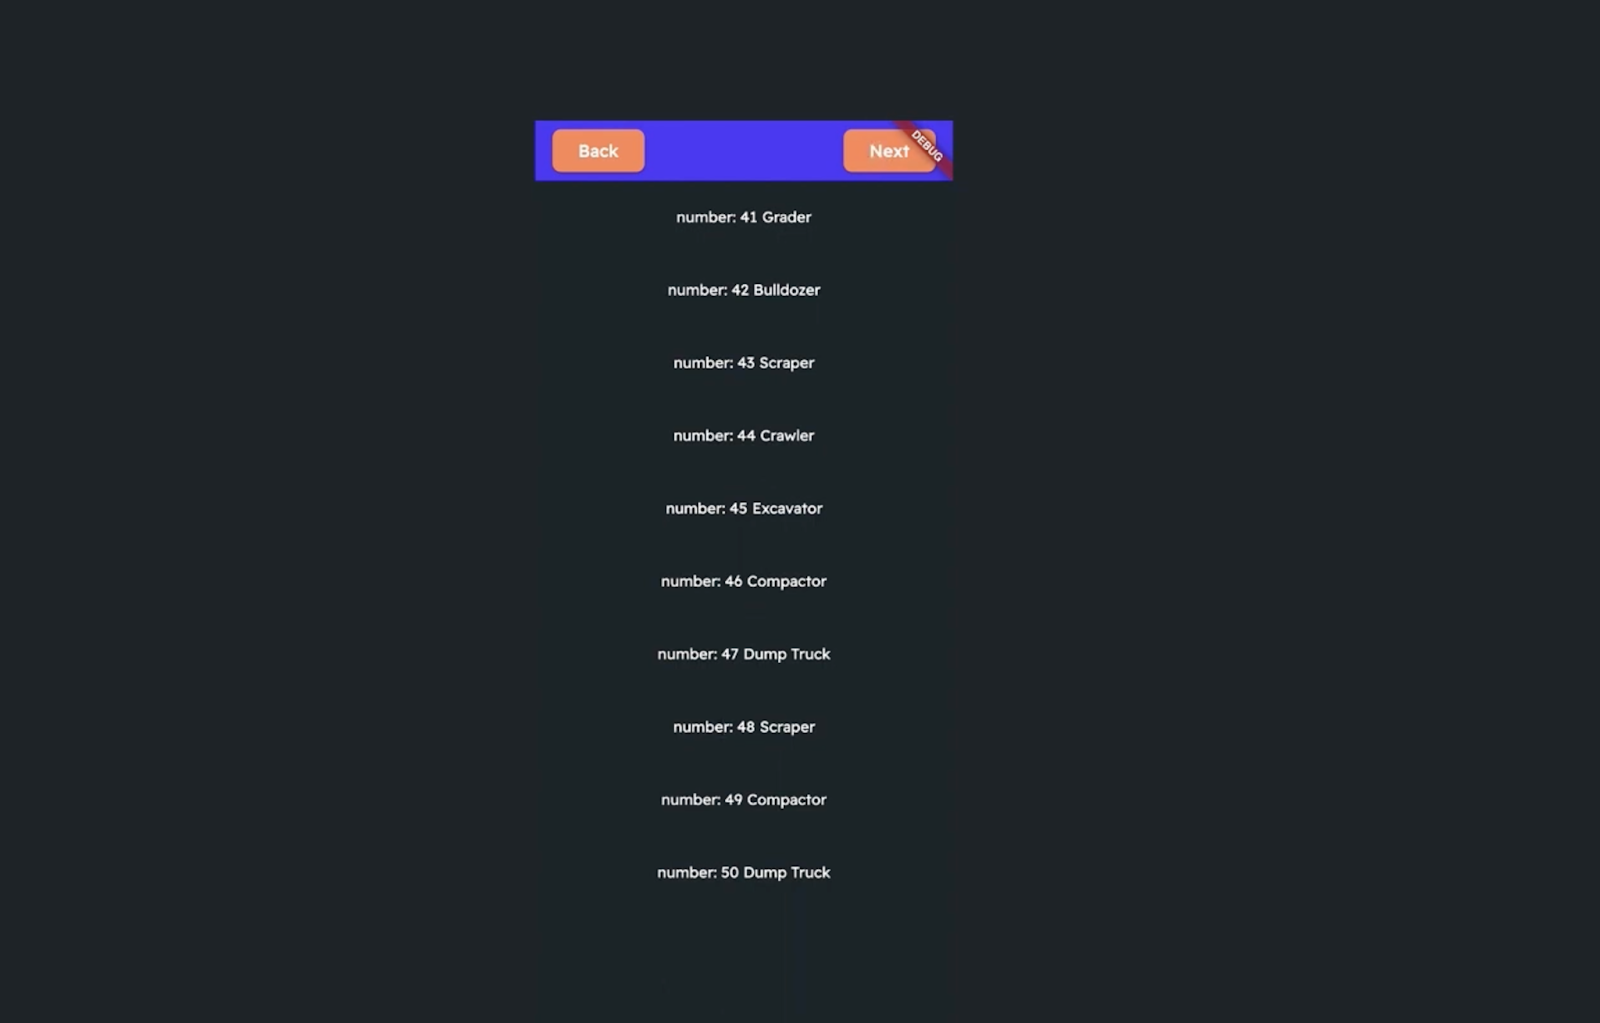
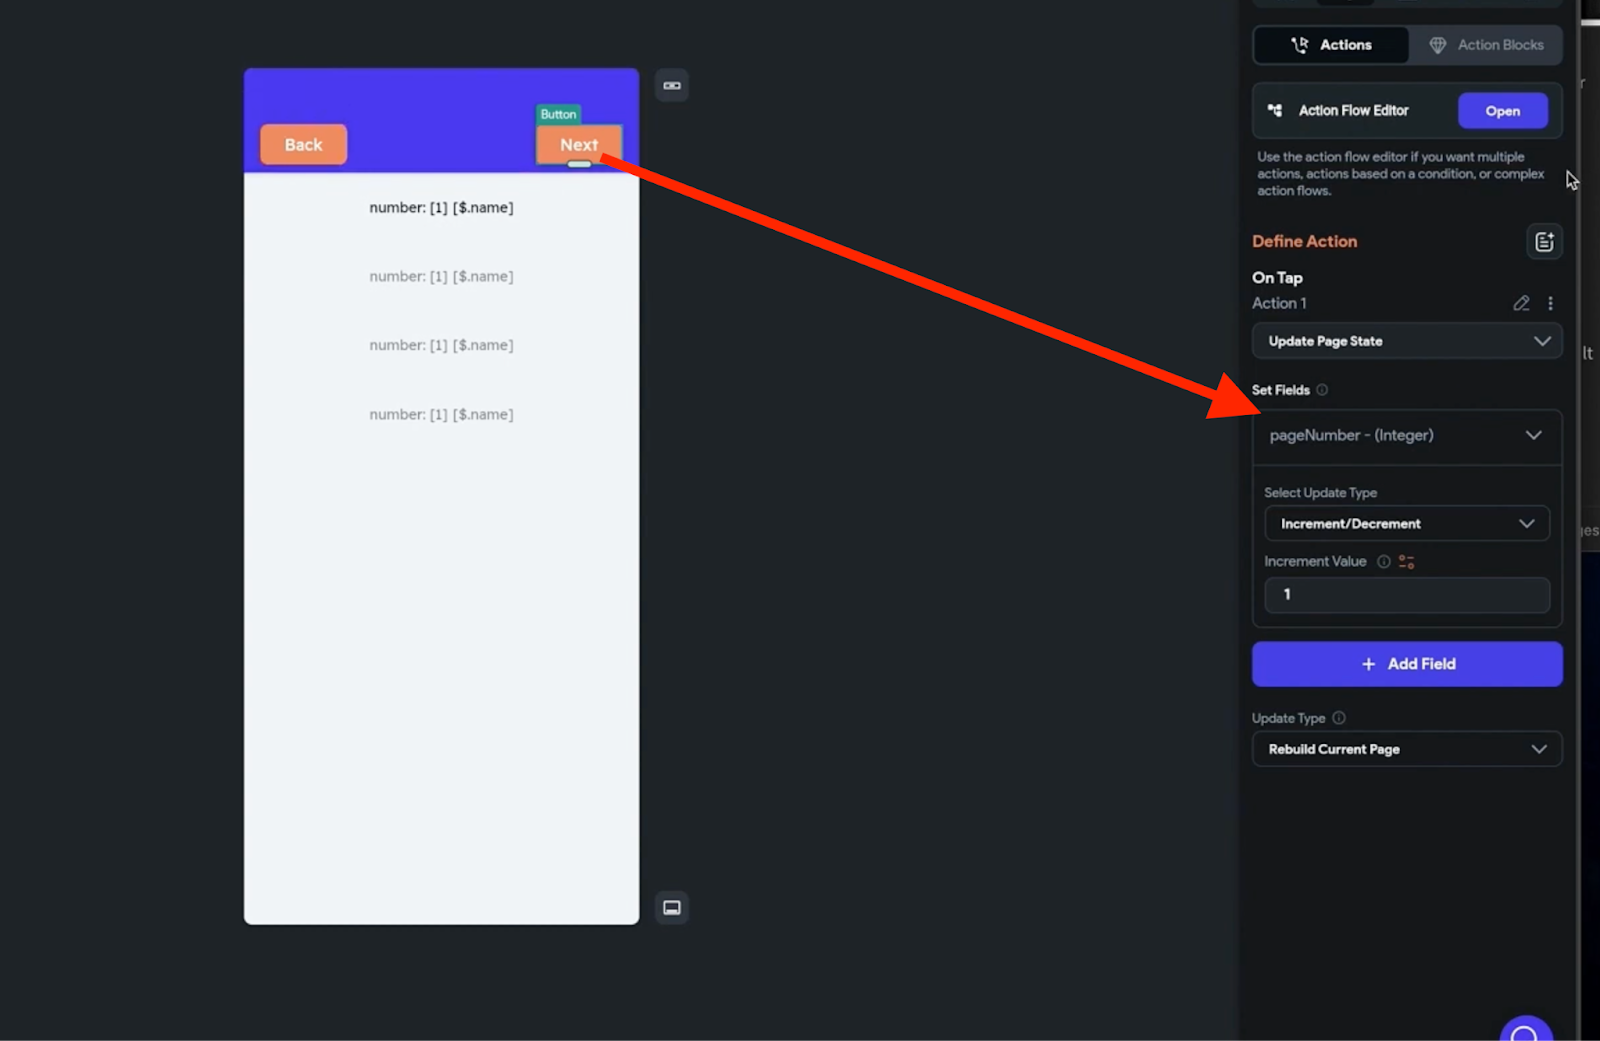
Page by page pagination

Following the UI design provided, we’ll incorporate a row containing “Back” and “Previous” buttons.
Utilizing the same API call and ListView with text inside, the desired functionality entails that when the “Next” button is clicked, a new set of 10 records will be displayed above the previously viewed items.
Conversely, clicking on the “Previous” button should return a set of 10 rows that were previously viewed.
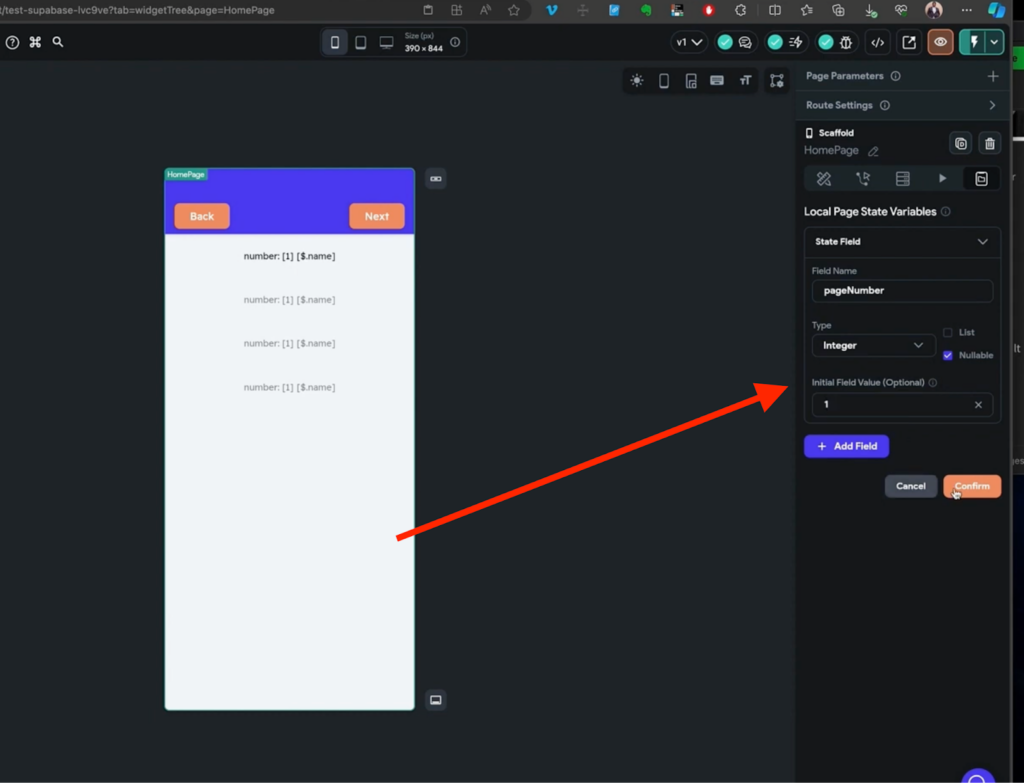
To manage this feature we will remove the infinite scroll check on the listview to disable it and with that we will need a new way to track the page number the user is currently on instead of the Next page index that the infinite scroll provided us so we will create a page state (integer) to substitute and manage the current page number>
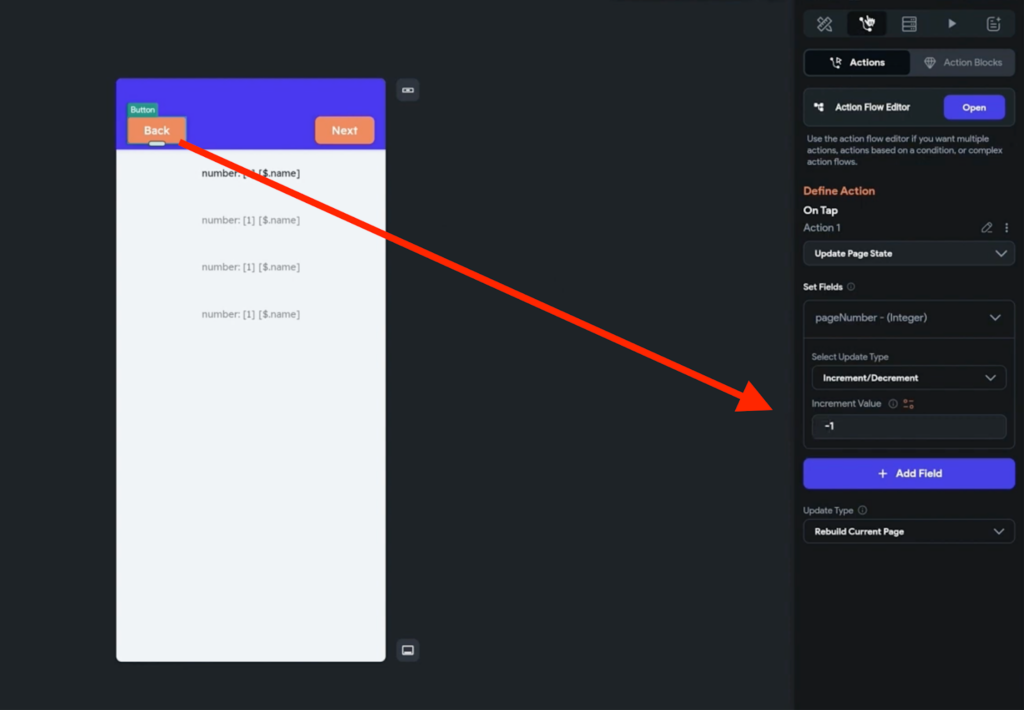
Here’s a rundown of the logic, Next button increments the “pageNumber” page state to increase the page number
and the previous button decrements the PageNumber.
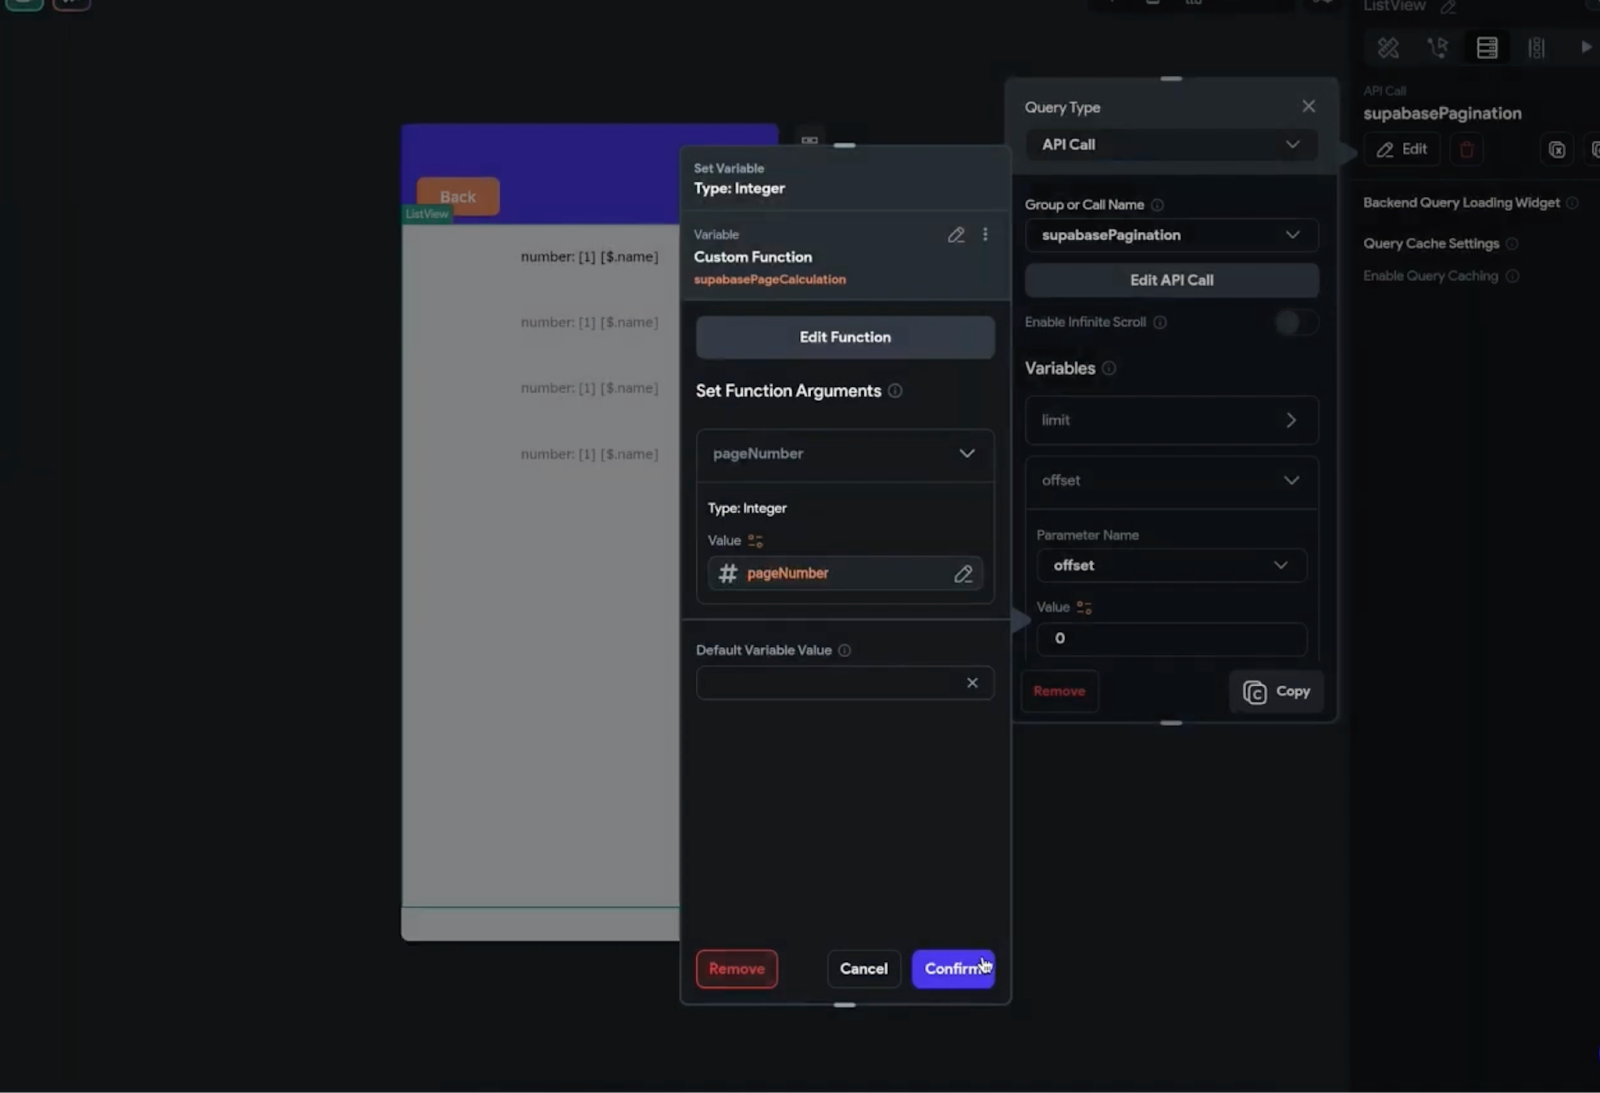
Next, we will utilize the same custom function for the offset, replacing the NextpageIndex with the pageNumber page state. To recap, the custom function multiplies the page number by the limit number (which is 10 in this example).
For instance, if the pageNumber is 0 and the limit number is 10, the function will return 0 as the offset value.
This signifies that the API call should return rows less than 0, indicating that we are on the first page. Subsequently, we can increment the page number until we exhaust all records.
This approach ensures dynamic pagination by adjusting the offset based on the current page number and limit, allowing seamless navigation through the dataset.
Tip: Create error handling scenarios like disabling your previous button when the pageNumber is equal to o or showing an error message on screen when there are no rows returned.
Finally, you can preview the application in test mode to thoroughly test out the page-by-page pagination functionality.
This allows you to validate that the pagination features work as intended and provides an opportunity to identify and address any potential issues or improvements.
Congratulations! You have now learned how to apply pagination to your FlutterFlow x Supabase applications.
Happy coding and enjoy building your dynamic and interactive applications with FlutterFlow and Supabase!