How to make a flutterflow pdf generator app step by step
In this guide, we’ll embark on an exciting journey to print PDF documents from our FlutterFlow app.
As of when this article was written, there is no way to do this in Flutterflow without custom code, so we will use custom code to create a custom action that can help us add this feature, a custom PDF action, that can help us with sharing reports, creating invoices, and provide you the skills to build rich experiences for your users with custom features.
Flutterflow pdf generator app
Getting Started

Before we dive into the technical details, it’s important to understand that when it comes to building custom code for FlutterFlow apps, the go-to method is leveraging dependencies/ packages available on pub.dev.
Pub.dev is the official marketplace for Dart and Flutter packages, offering bundles of pre-written code specifically tailored for your FlutterFlow projects. It’s like an online store where you can pick up ready-made code to easily enhance your app with various features or designs.
It’s worth noting that pub.dev exclusively hosts Dart code, the language used for FlutterFlow apps. This approach allows us to tap into a vast repository of functionalities created, tested, and packaged by other developers.
By adding these dependencies to FlutterFlow, we can seamlessly incorporate functionalities without starting from scratch, making the development process more efficient and accessible, even for those without extensive coding experience.
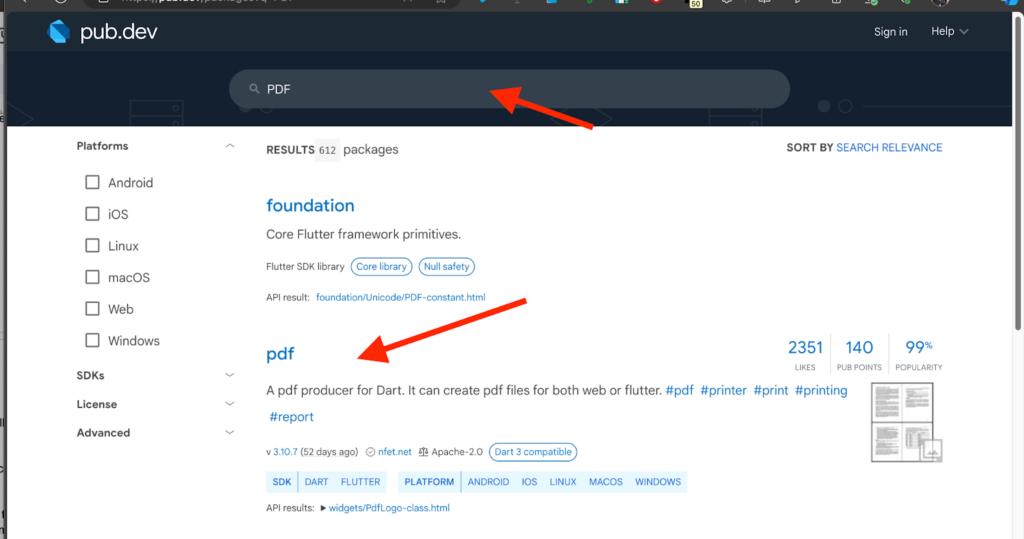
For the pdf function here are the dependencies we will need from pub.dev and the features they will give us.
PDF: Provides the essential tools to create a PDF document, allowing us to define pages and content, add images etc.
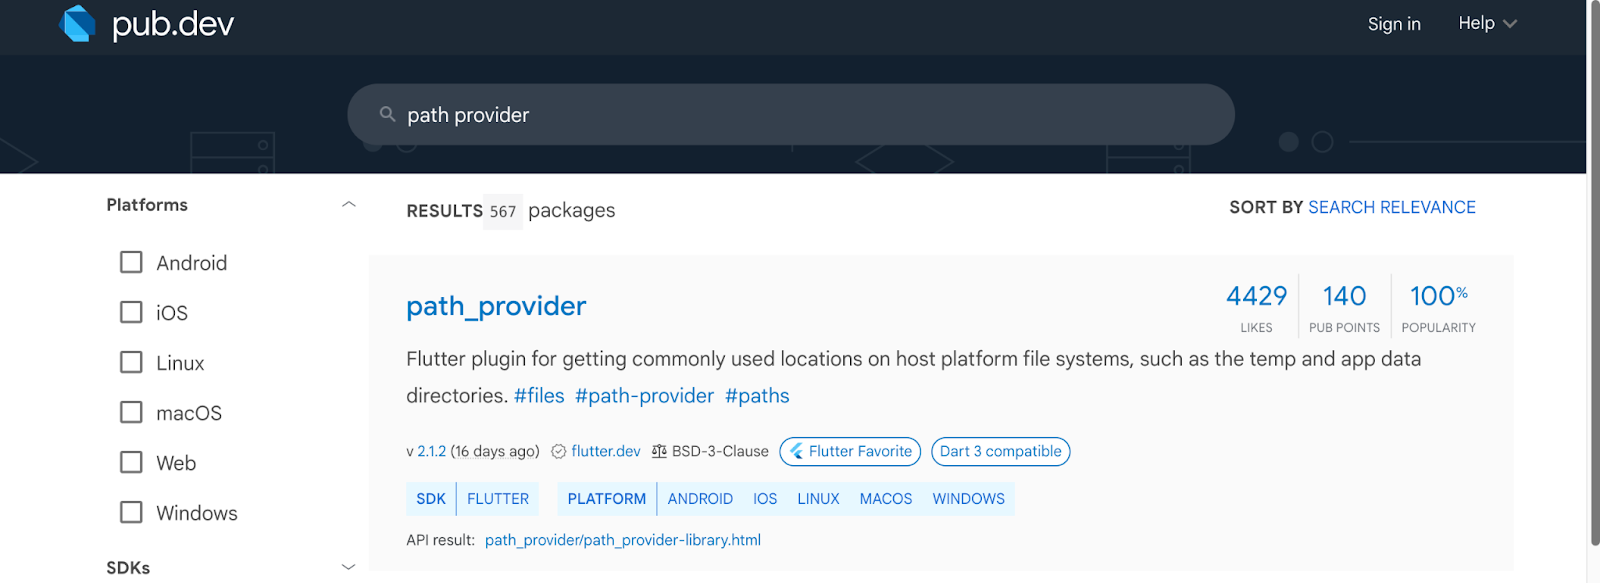
Path_provider: Helps us find the spot where we store temporary files, like our PDF, in our flutterflow app.
note: It’s important to highlight that FlutterFlow automatically includes packages to simplify your app building process.
This is aligned with the principles you follow when creating Flutter apps from scratch with code but with flutterFlow many of the dependencies/ packages you will need have already been integrated into your project.
Path_provider is one such dependency that FlutterFlow adds automatically, eliminating the need for manual inclusion. Just a heads up, this info will be handy as we proceed in this guide.
Open_file: is a handy tool that allows us to open the PDF file we saved.

Here’s a breakdown of all the steps we’ll follow to build this simple PDF custom action in FlutterFlow:
1. Initializing/Creating Your FlutterFlow Project
2. Incorporating/Adding Dependencies
3. Implementing the Main Logic for PDF Creation
4. Introducing Dynamic Content to Our PDF Custom Action
5. Adding/Integrating the Custom Actions in FlutterFlow
Additionally, we’ve included bonus code to help you practice and further enhance your skills. Let’s dive into each step to create our PDF custom action efficiently.
Step 1: Initializing Your FlutterFlow Project
Head to flutterflow.io and either create a new project or access an existing one. From there, go to the custom code section.

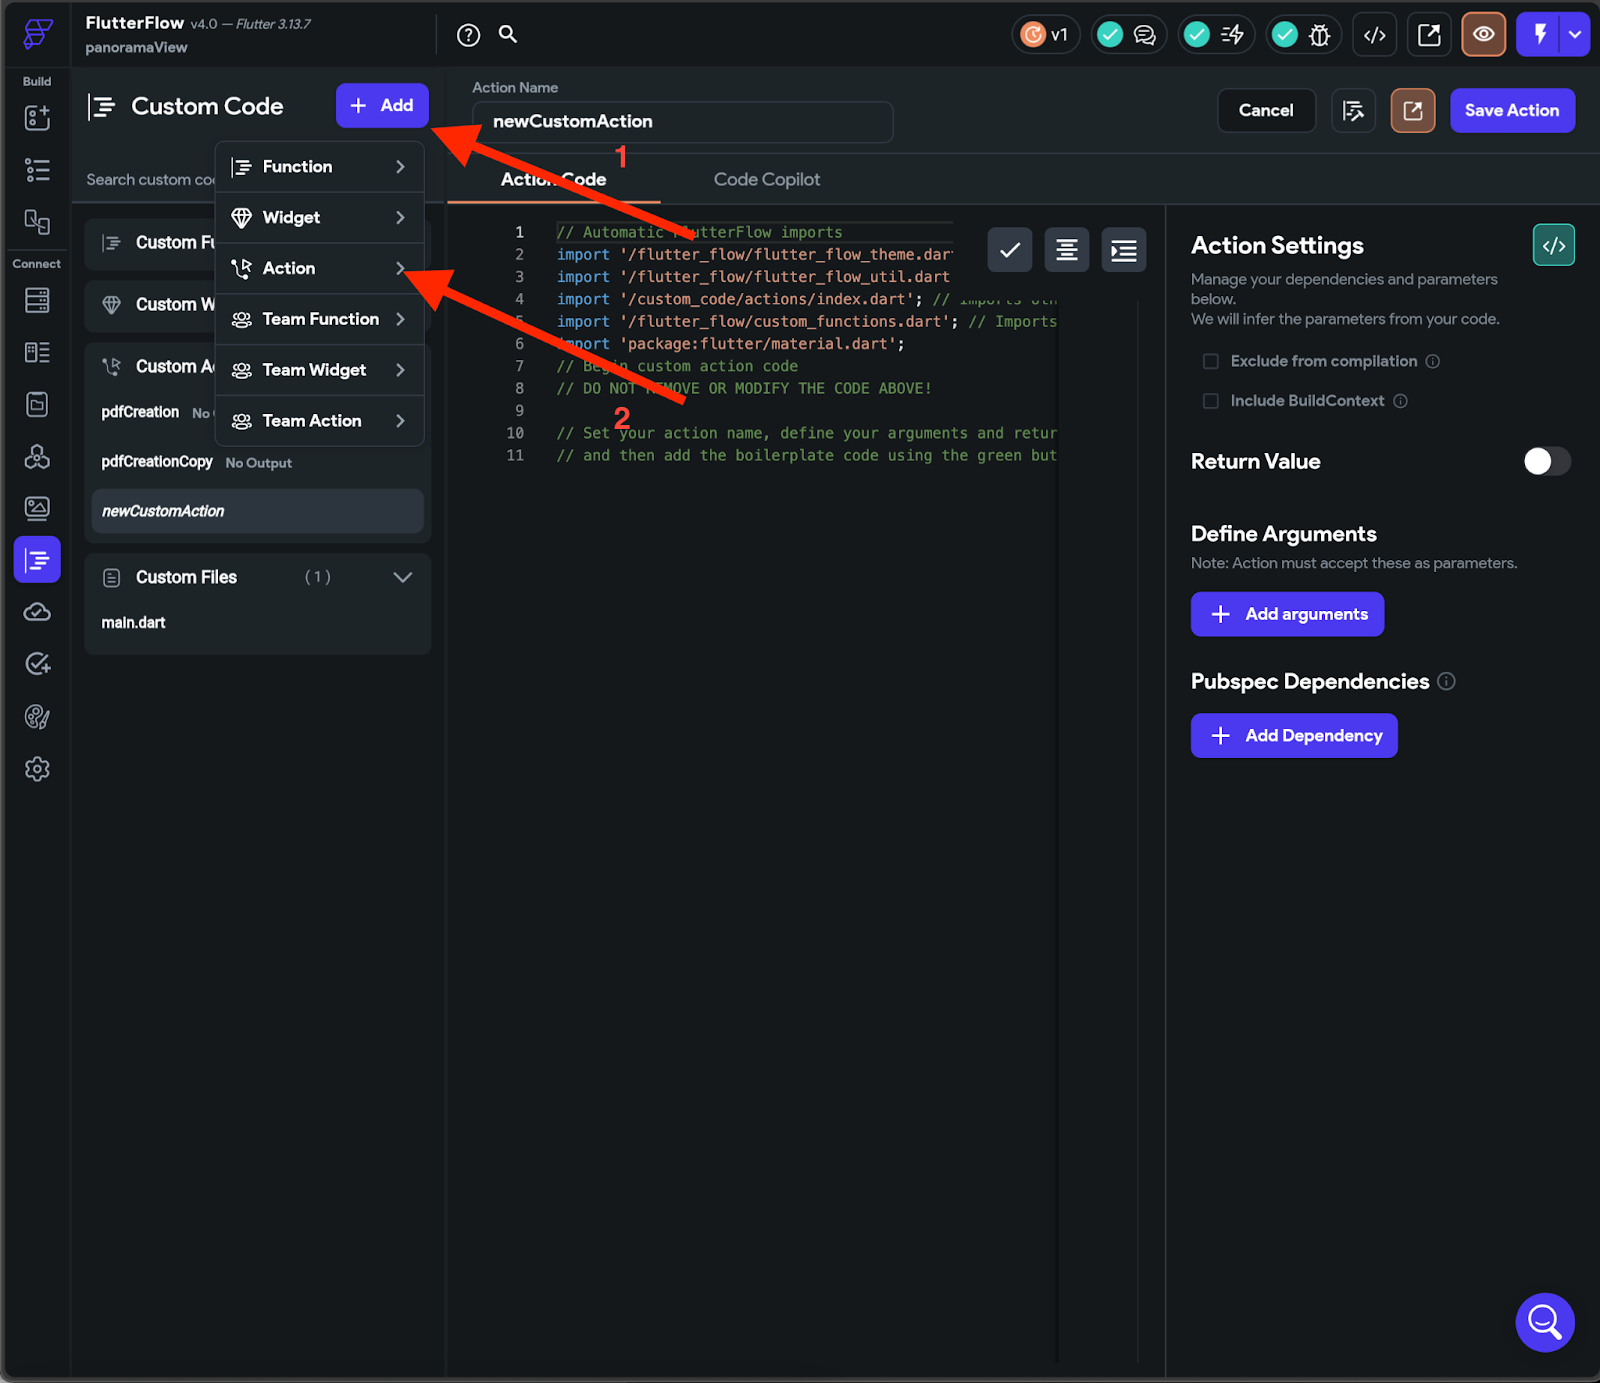
Click on the “Add” button, then choose the option to create a custom action.
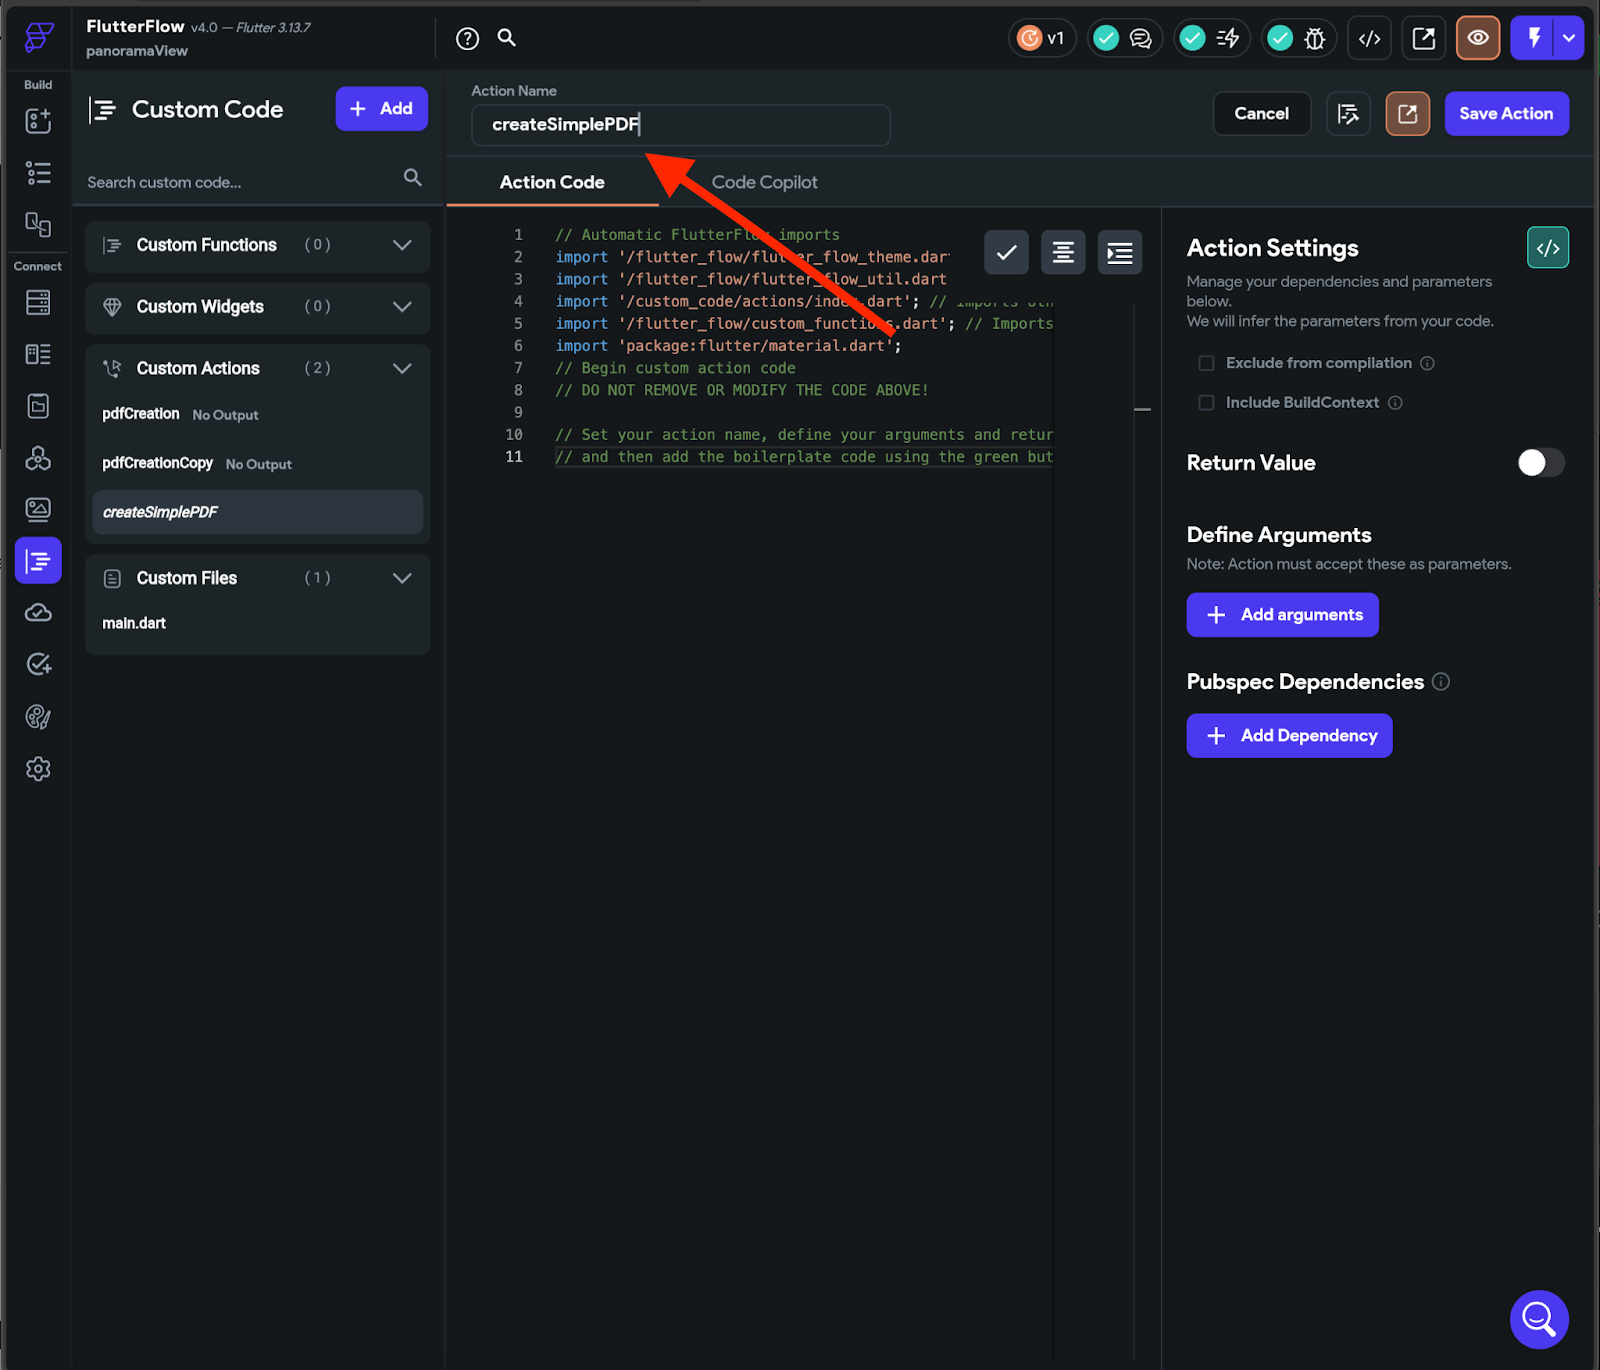
Finally, give the action a name, for example, “createSimplePDF.”
Step 2: Incorporating Dependencies
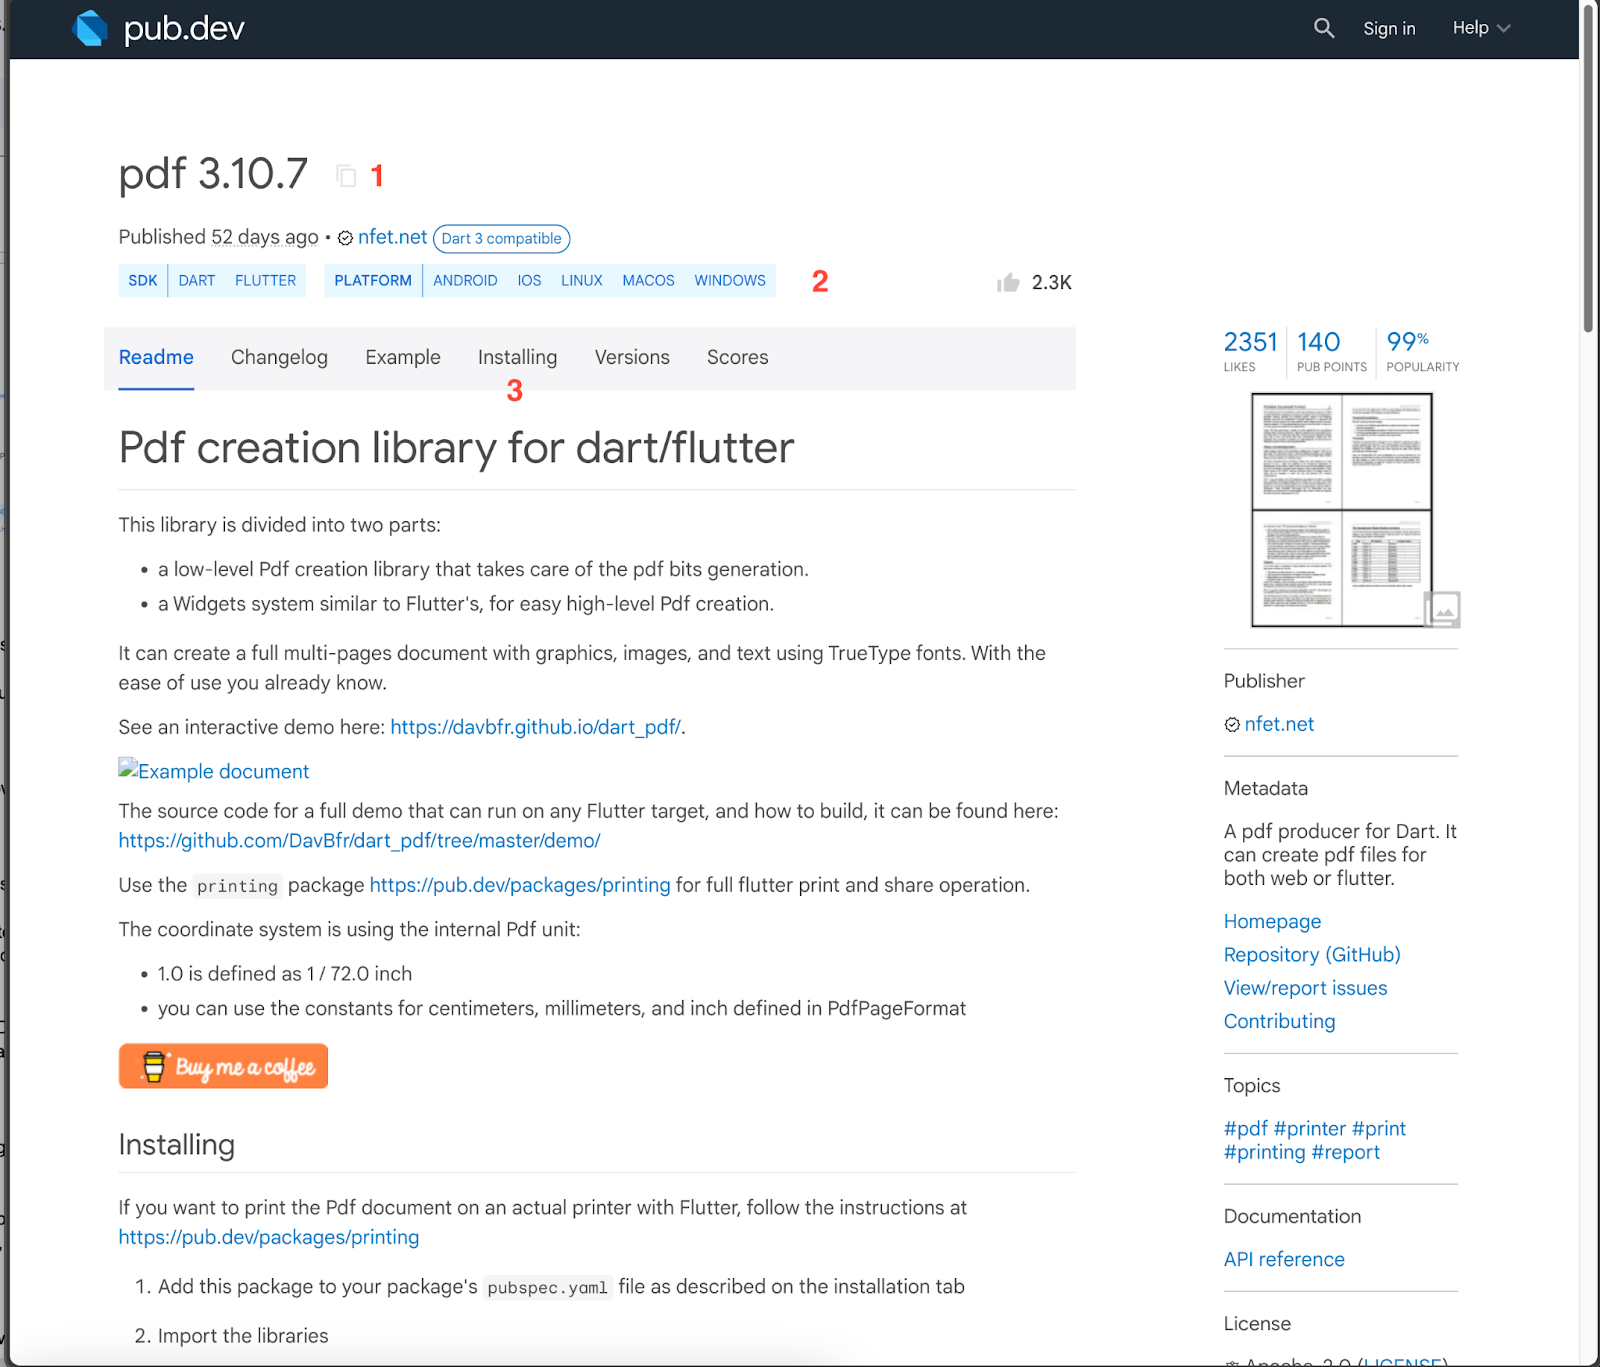
Building on our earlier exploration of the packages required for PDF creation, once you click on any of these packages on pub.dev, you’ll typically find detailed documentation on how to integrate the package into your project. In the example above, refer to the first section numbered thus
1) Click on the icon to copy the dependency for each package. When you paste it, it will resemble something like this (pdf: ^3.10.4). Take note that the version number (3.10.4) may change over time as these packages undergo improvements, and the numbers represent the most recent version.
2) Take note of the supported platforms for each package. For example, the pdf package works seamlessly on Android, iOS, Linux, MacOS, and Windows.
This is crucial because if your target platform isn’t supported, you’ll need to find an alternative package. In our tutorial, the open_file package, which we’ll use to open the generated PDF, is specifically designed for Android and iOS.
3) The installation section in the documentation outlines the necessary steps to successfully import the package into our projects.
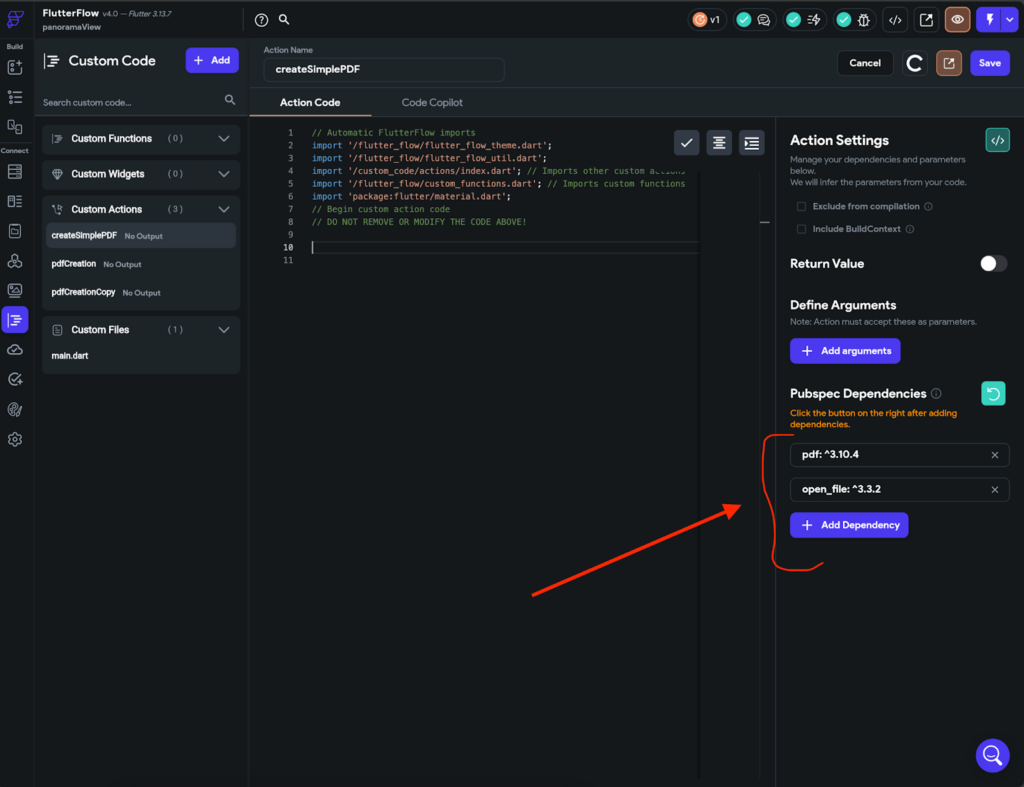
Head over to flutter flow and paste the dependencies copied earlier. Click on “Add dependency” to add all the dependencies needed for the action.
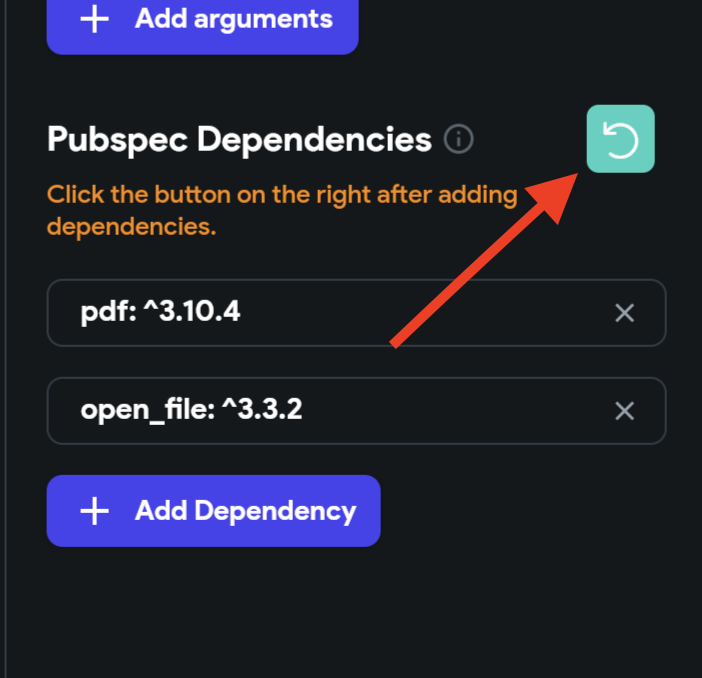
For this example we only need the pdf and an open file package. Also make sure you click the refresh button to import the dependencies (you might have to do this regularly).
Before we jump to step 3 we need to understand “imports” flutterflow has added some imports to our action already and we need to understand their function because we will add a few of our own too because without it our action will now be complete.
Understanding Imports in FlutterFlow:
In a nutshell, dependencies bring complete features into our projects from external packages. These dependencies typically come with import statements, allowing us to specify which parts of the added features we want to use in a particular action or app section.
Why does this matter?
It ensures that we only include functionalities necessary for a specific task. Importing only what’s needed maintains project efficiency, avoiding unnecessary clutter, especially when some dependencies come with a multitude of features.
For the upcoming packages in our project, we can find the necessary imports in the pub.dev documentation.
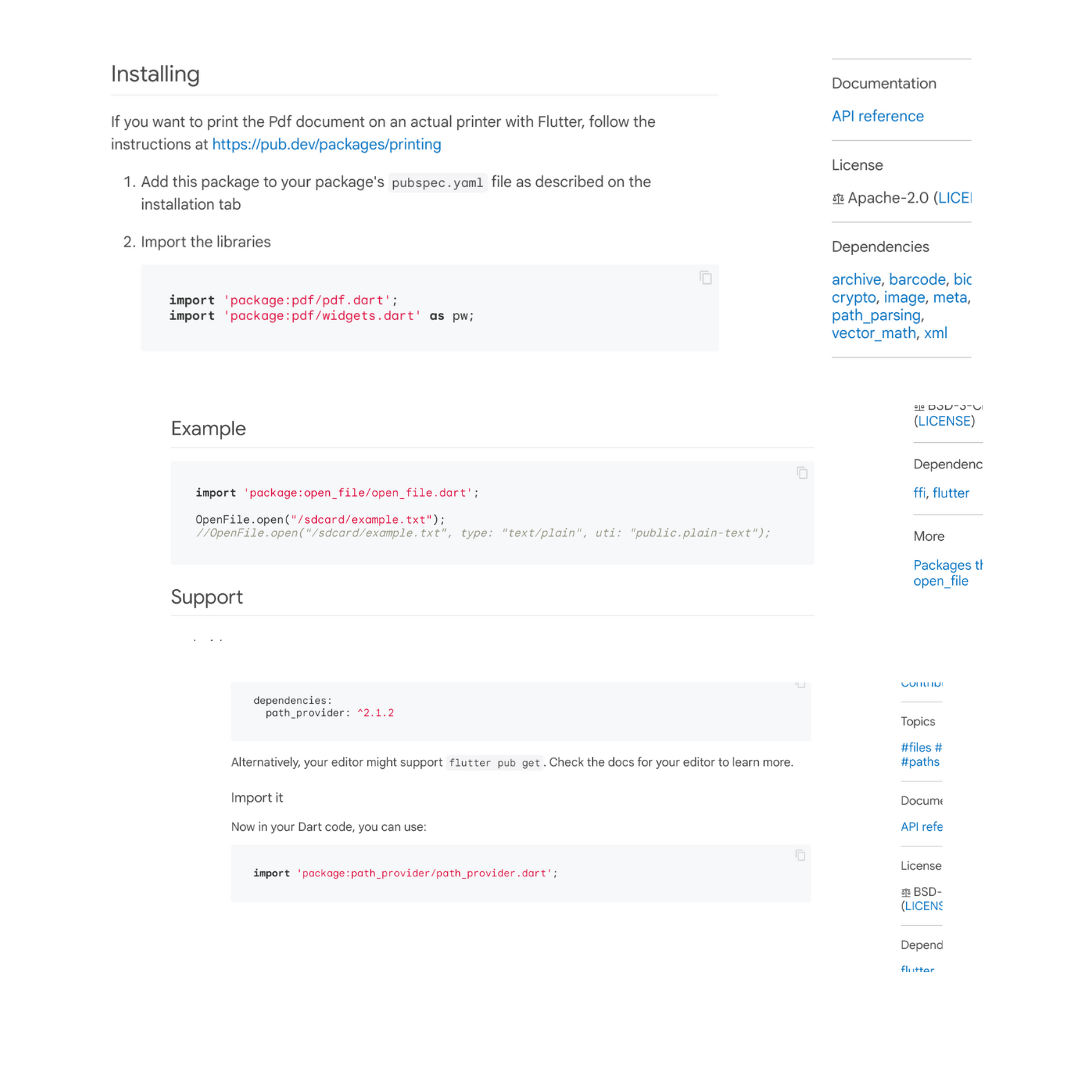
If we combine all of them together then we will get the following imports to add to our code:
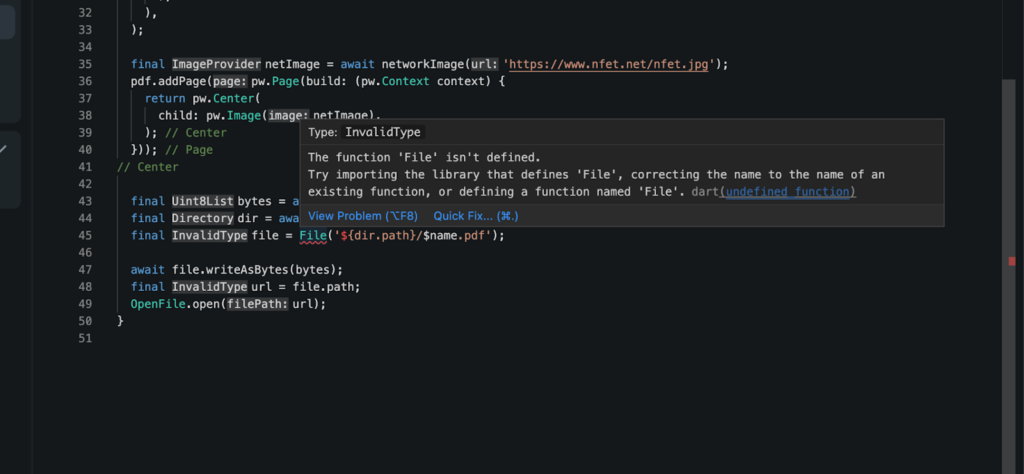
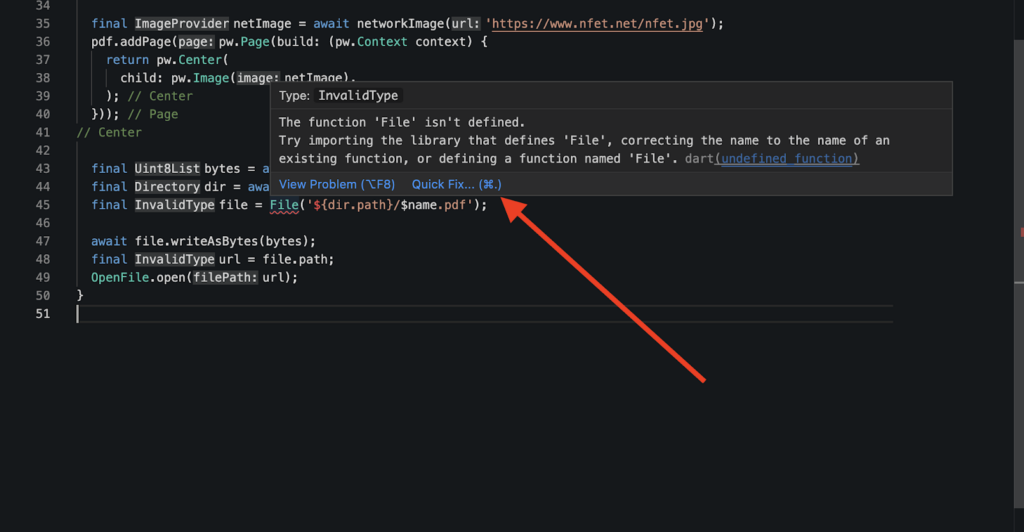
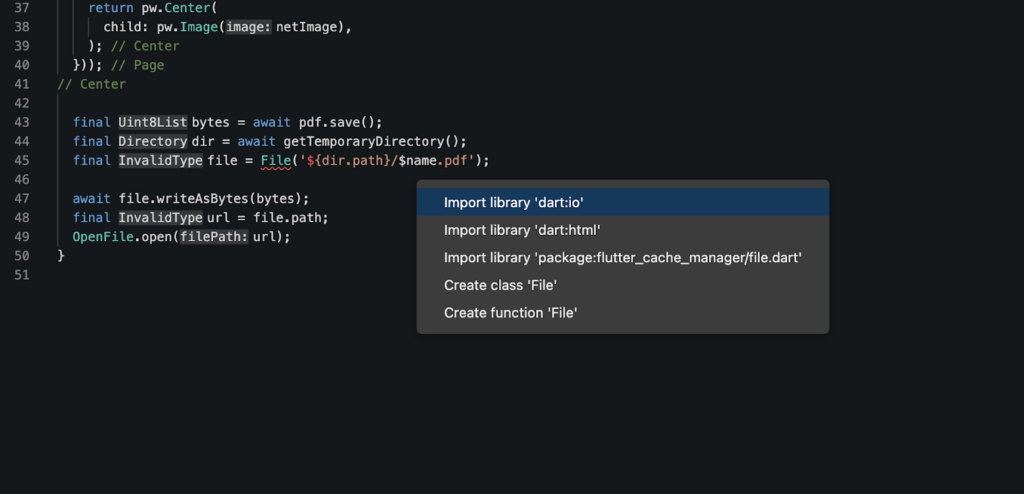
We will also need to add this import: “import ‘dart:io’; The dart:io import will help us with files and input/output tasks in our app
Note: if you are worried about all the right imports to add most times the code editor will show you red lines that you can hover over then click quick fix and you will see options to see which imports you might have missed, you can click any one but mostly the first option is the best solution.
and this should only be after you have added the imports from the pub.dev documentation on all the packages you want to add.
You can also submit your code to chat gpt if you get stuck.
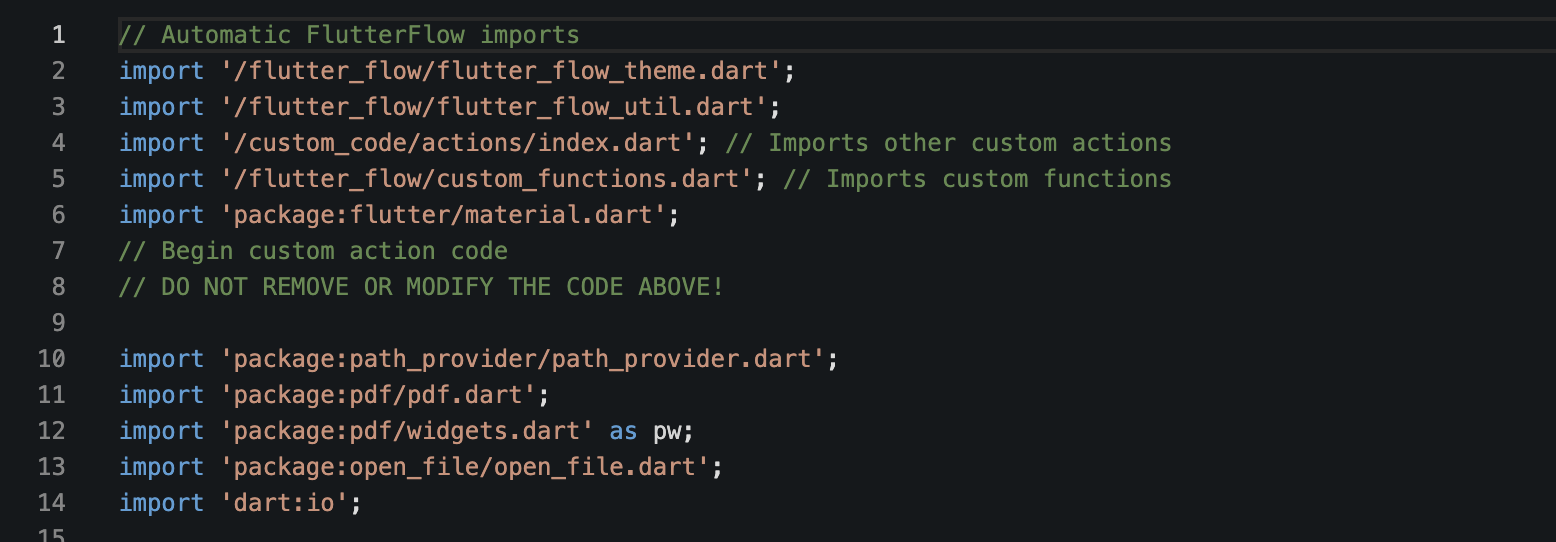
In the picture above we have added all the import statements into the project and we can move into step 3.
Step 3: Implementing PDF Creation Code
In this phase, we’ll delve into some technical aspects by utilizing code examples provided in the pub.dev documentation. If you lack coding experience, I recommend employing a tool like ChatGPT to ask questions, generate customized PDF designs tailored to your specific needs, or assist in troubleshooting any errors.
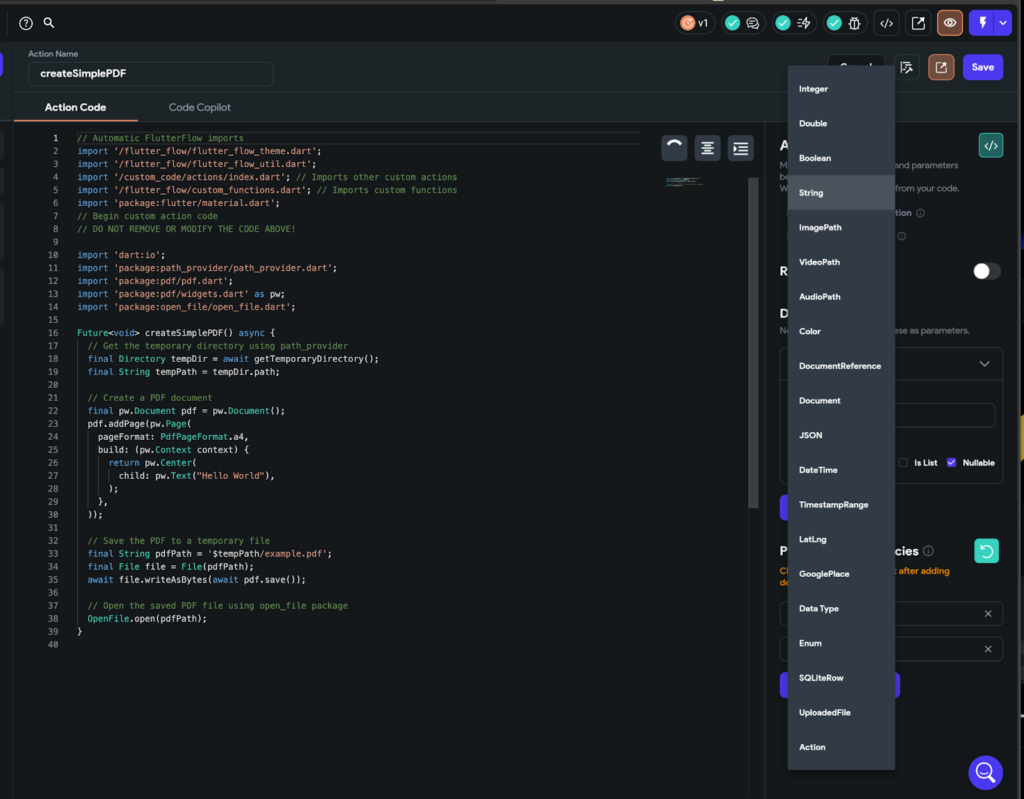
Firstly we will add flutterflows boiler plate code which formats your code in the way that flutterflow expects it. Click the green icon then add then copy to editor.
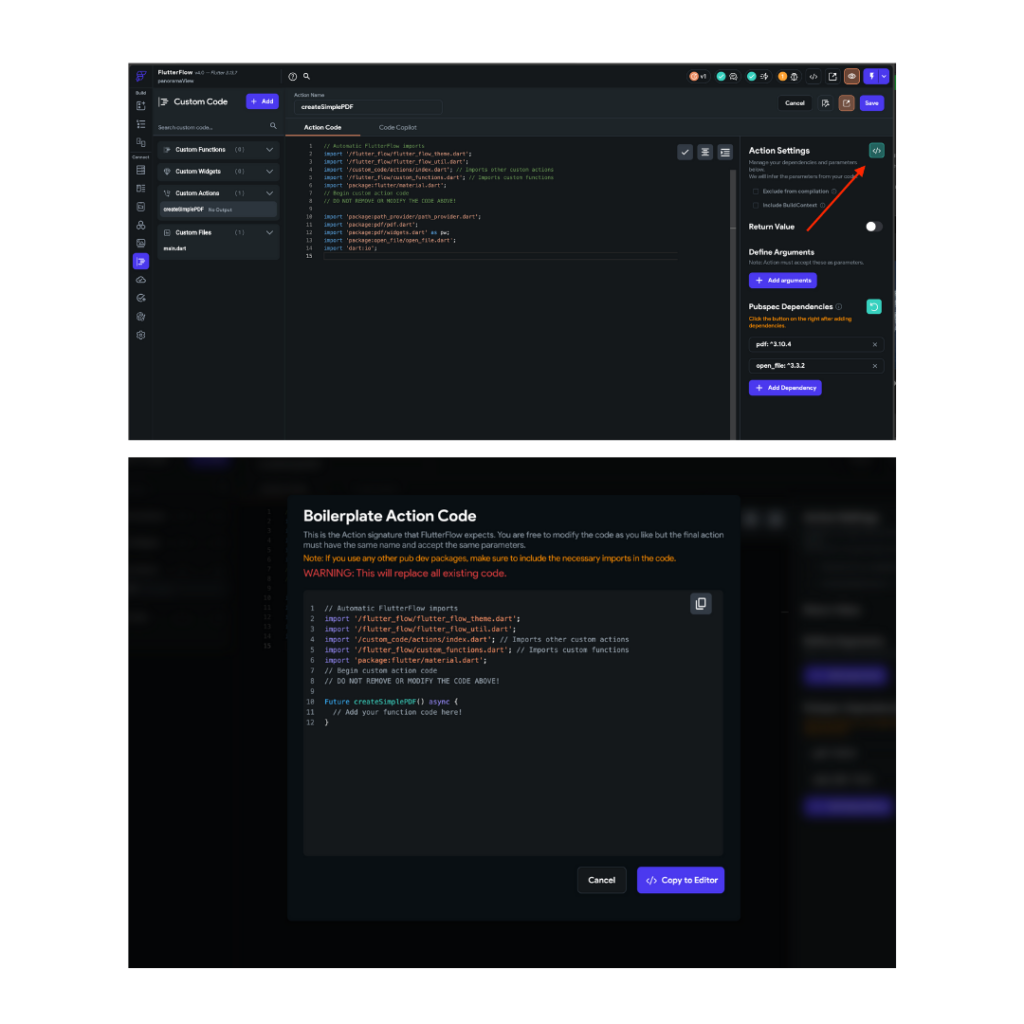
Now, you might have a block of code that looks like this:
Future createSimplePDF() async {
// Add your function code here!
// Note: all your custom code should be within the brackets
}
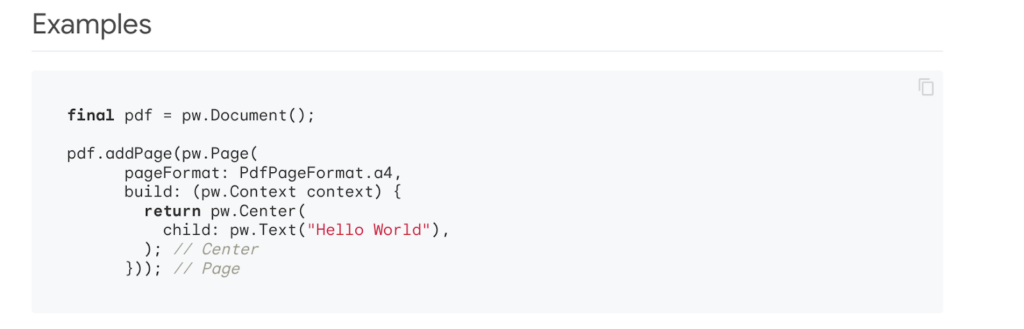
From the pdf pub.dev package we have this block of code that we can copy and paste into flutterflow custom action code and what it should do is allow us to create a pdf page that has a text in the center (“Hello World”). Lets paste this into flutterflow.

Note: To enhance your understanding of the code, we’ve added detailed comments explaining each aspect of the code from the pub.dev example. These comments, starting with //, are not part of the code itself.
The provided code includes the necessary methods to leverage the pdf library we imported earlier into FlutterFlow.
Now that we have the code to create the PDF, the next steps involve saving the PDF temporarily and opening the file on the user’s device.
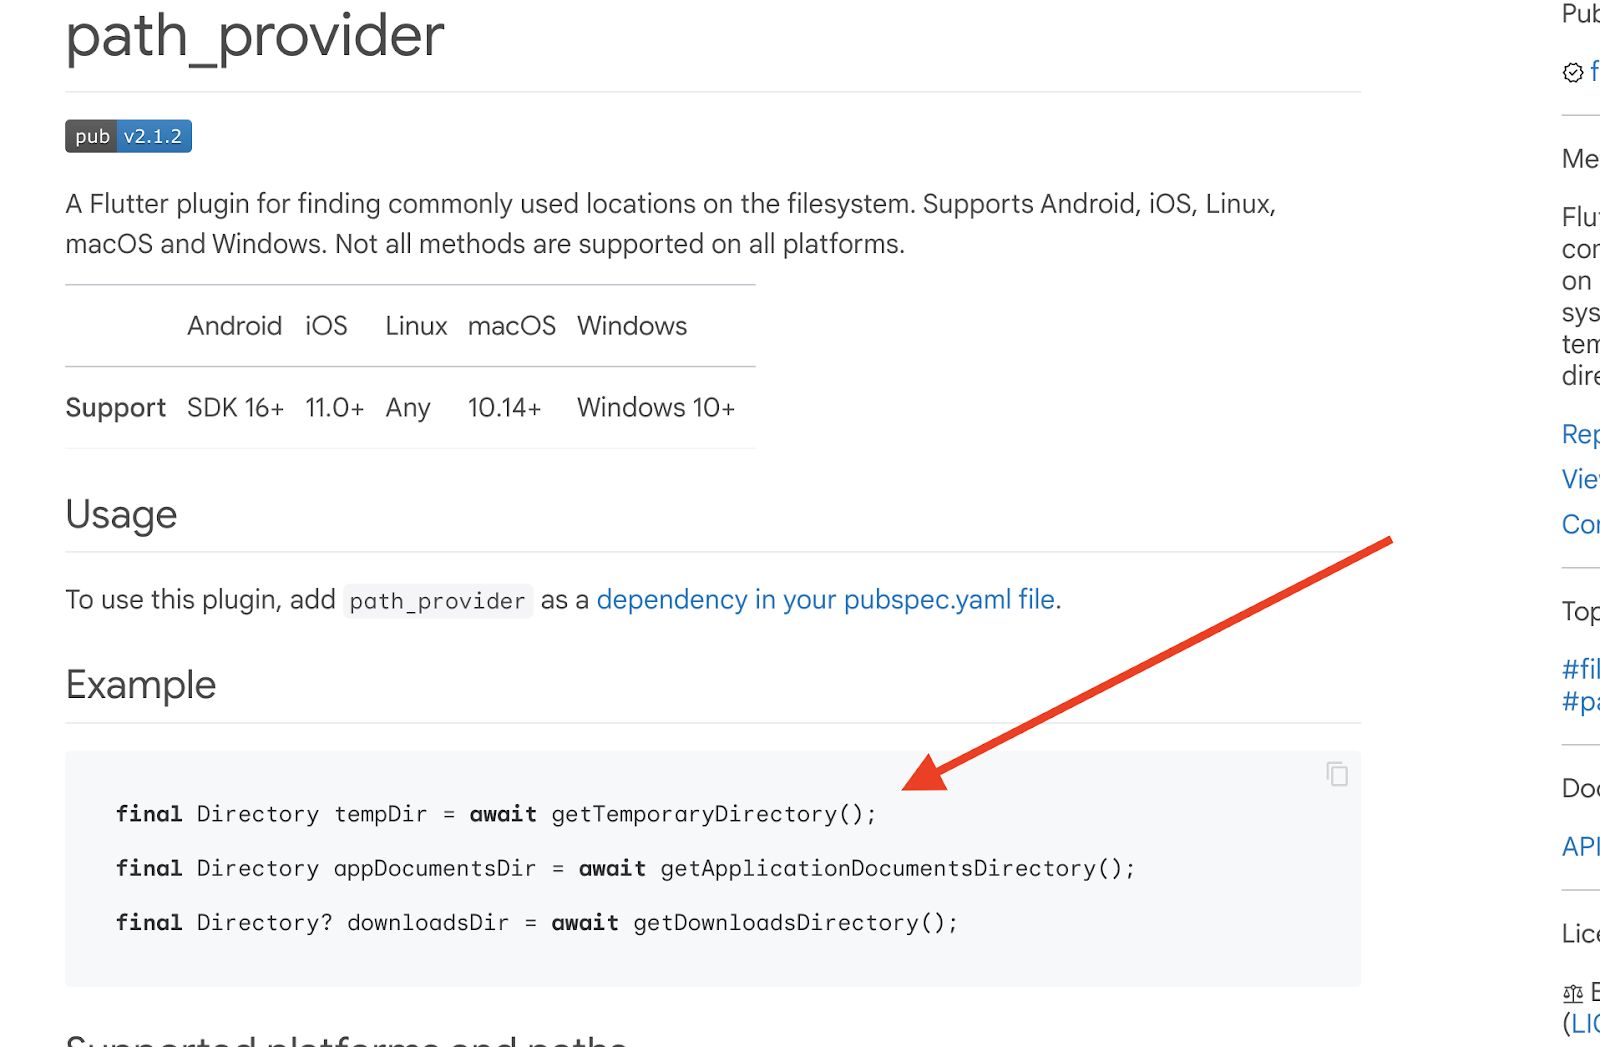
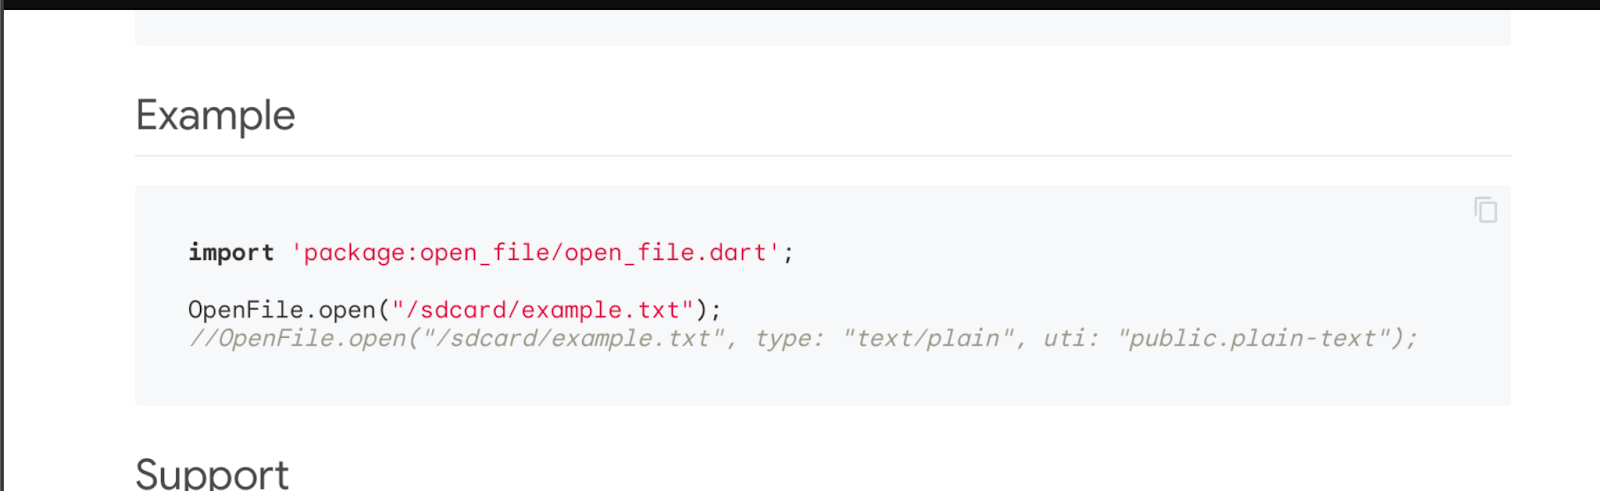
The path provider gives us a method that returns a Directory, representing a temporary space on the device where we can store temporary files and the open file pub.dev documentation has provided us with the method to open the file generated. So we will have to combine them together.
Now I know we are getting technical here but let’s do a simple experiment with chat gpt to generate the rest of the code to save and open the pdf.
This should help you get comfortable with providing prompts to help you generate the designs you need for the pdfs you will design.
Here’s my prompt to chat gpt below;
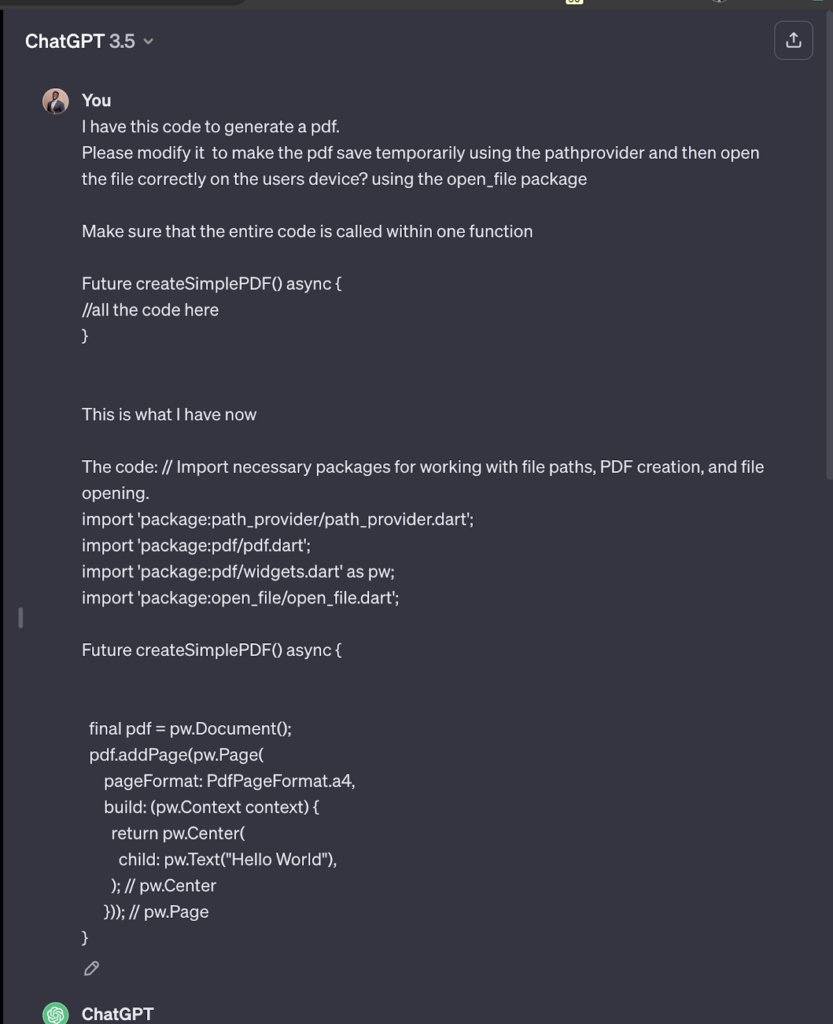
This is Chatgpts response:
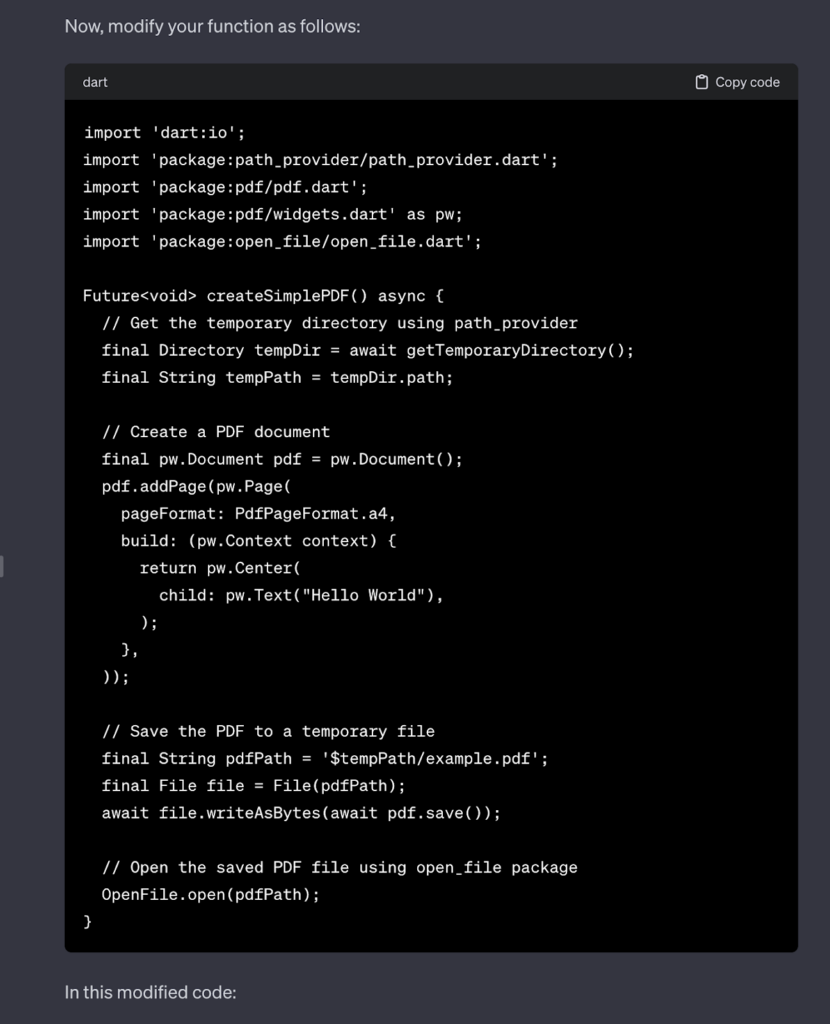

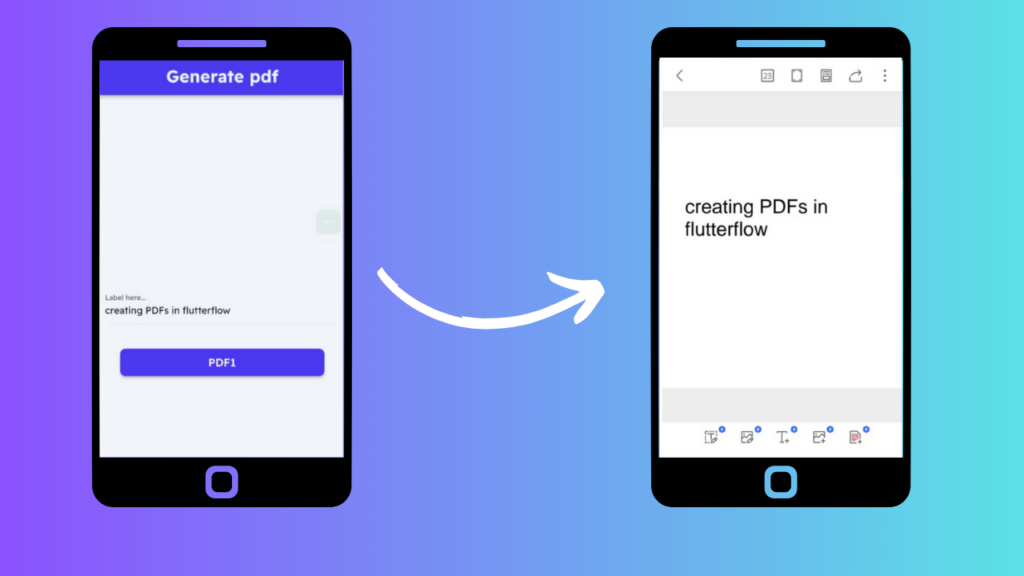
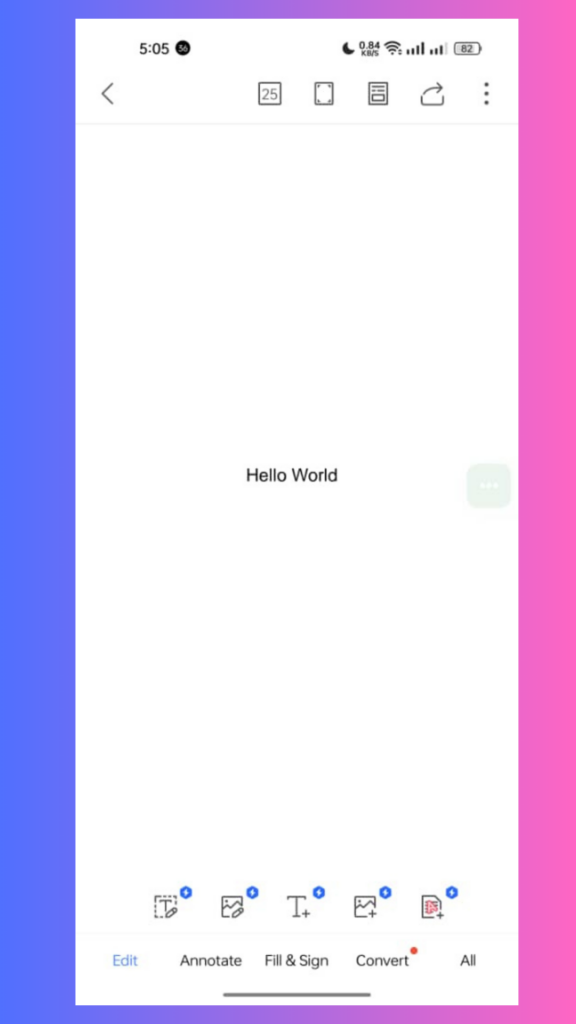
The code has been added into flutterflow successfully and after downloading the app locally the pdf generated looks like this;
Step 4: Introducing Dynamic Content
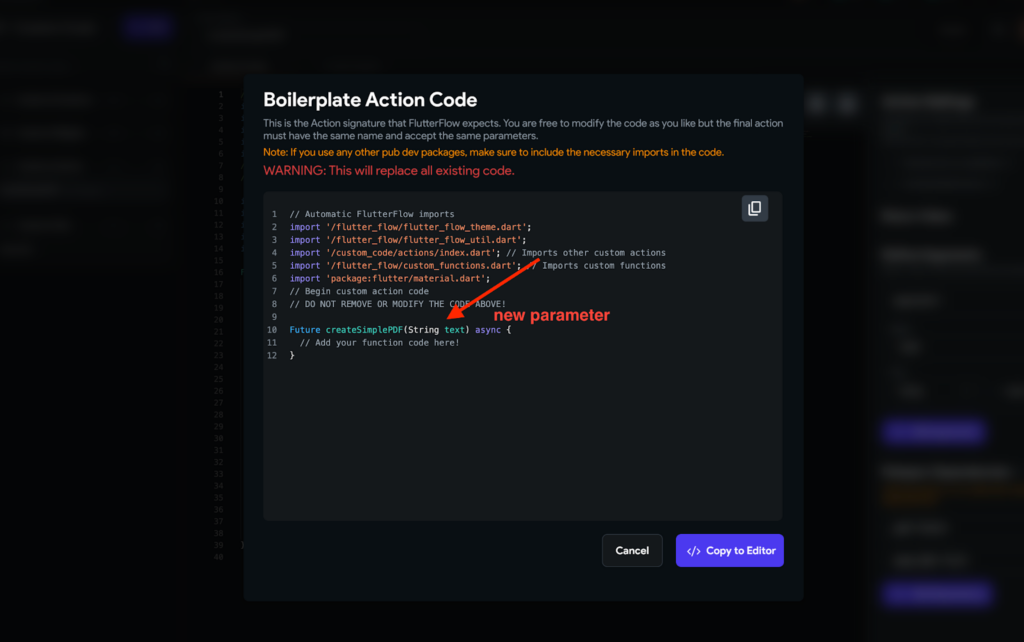
To make our code more dynamic and powerful, we need to pass dynamic parameters. Instead of having the text simply say “Hello World,” we want it to be adaptable.
In FlutterFlow, we can achieve this by adding parameters to the code so we can send in dynamic text.
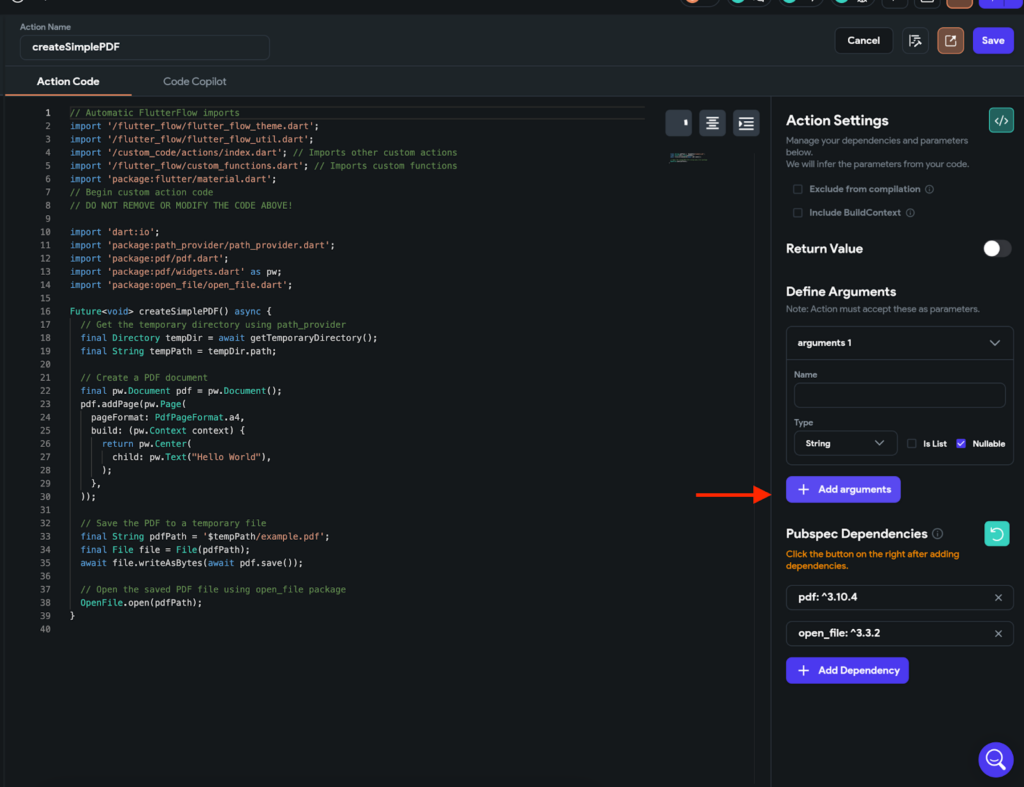
Click on “add arguments” and name your parameter,
We would choose a string for this example and name the argument “text” to represent the text in the middle of the pdf document.

Tip: when you add a new parameter in your editor, copy the parameter from your boiler plate section in flutterflow and paste the new parameter definition in your code. Donot copy to editor or else it will clear all your existing code.
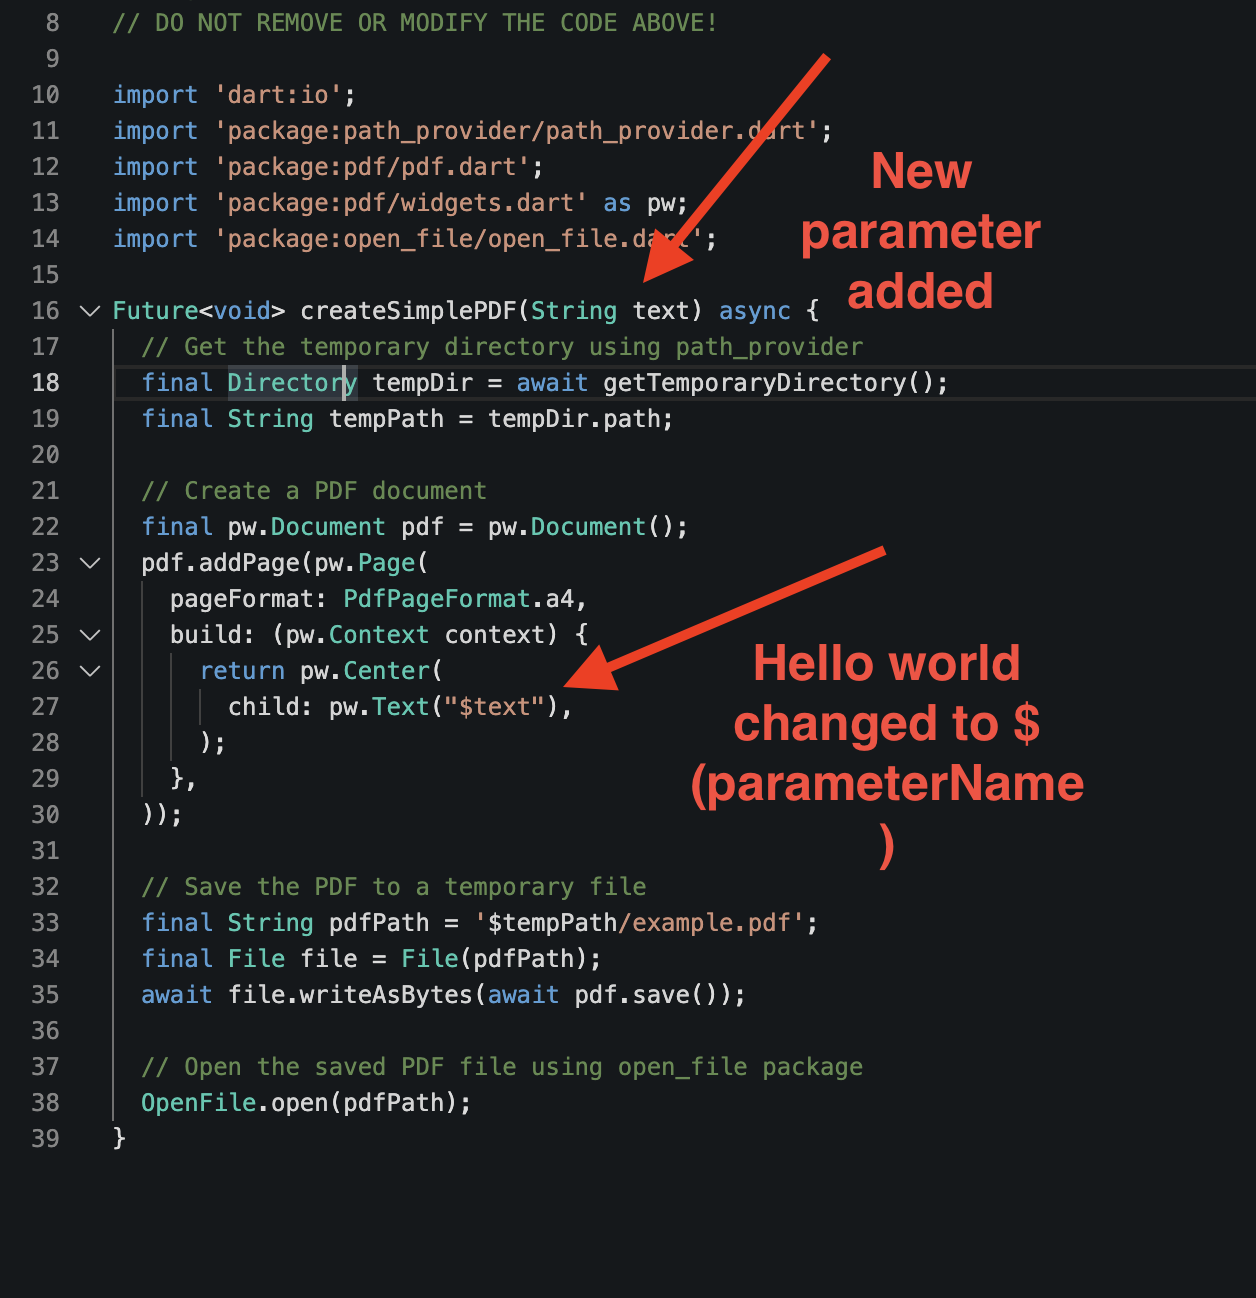
Here we have upgraded our PDF code by adding a special parameter called “text”. This simple addition opens the door to dynamic content within our PDF documents.
By introducing the “text” parameter, we’ve unlocked the ability to inject dynamic information into our PDFs. This means we can now pull information from various sources like our app’s database or backend and display it directly on our PDF documents.
To integrate the dynamic text, we’ve replaced the static “HelloWorld” with the dollar sign notation ($)followed by the name of the parameter we want to reference.
Step 5: Integrating the pdf Custom Action in FlutterFlow
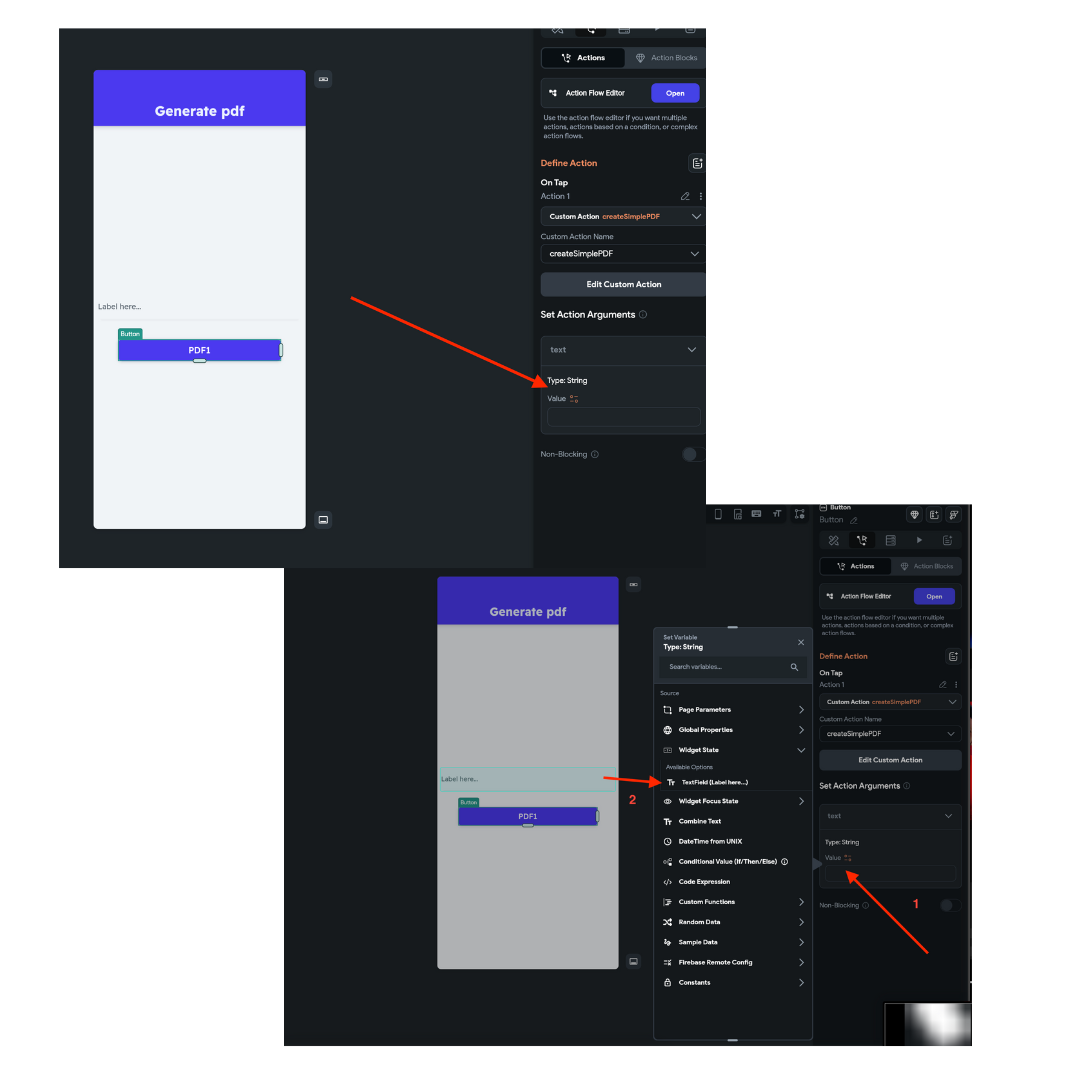
In your flutterflow project add a button and select the actions tab, then select the name of your custom action.
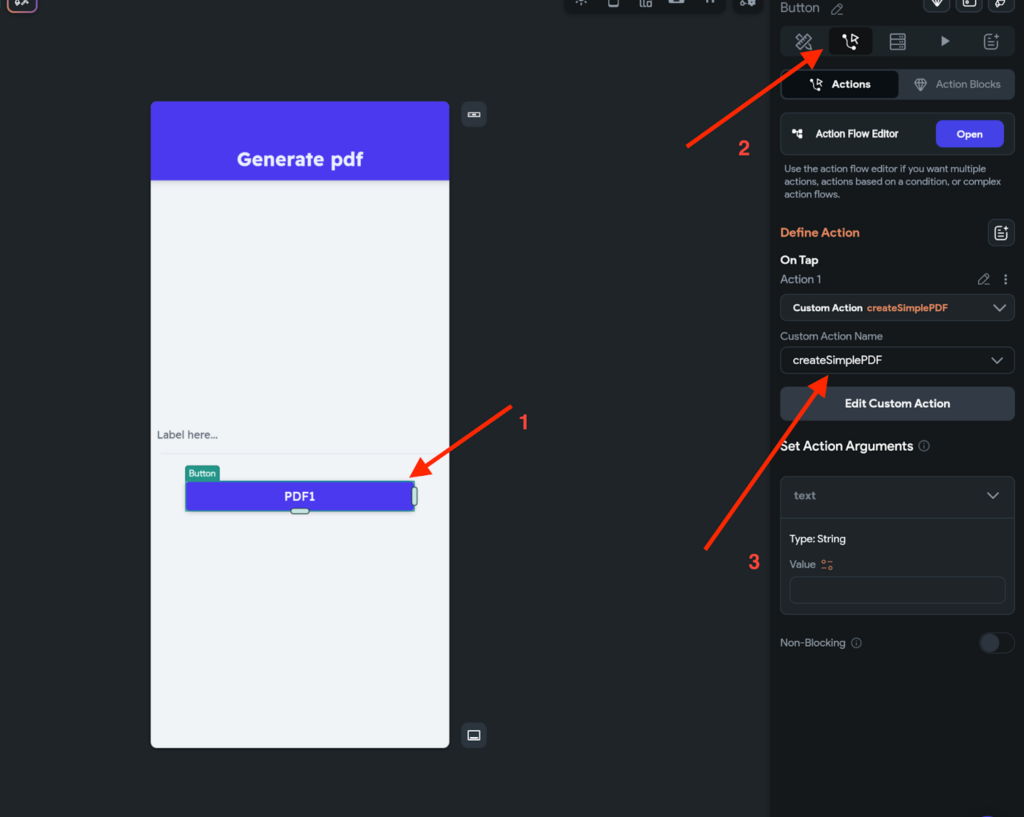
In the illustration below, you’ll notice that the parameter (text) we defined is a field where we can pass text into. In this example, we also have an input text field, and we will select the WIDGETSTATE > TEXTFIELD to pass a string dynamically from the text that the user types. This string will be printed on the PDF.
You can integrate various elements into your PDF custom code beyond text. Explore the pdf pub.dev (pdf | Dart package (pub.dev)) examples for features like adding pictures, including SVG files, inserting emojis, and more.
Additionally, consider utilizing a tool like ChatGPT to further customize your PDFs according to your specific needs and preferences.
With ChatGPT, you can generate personalized content and designs to enhance your PDFs even further.
Bonus Code:
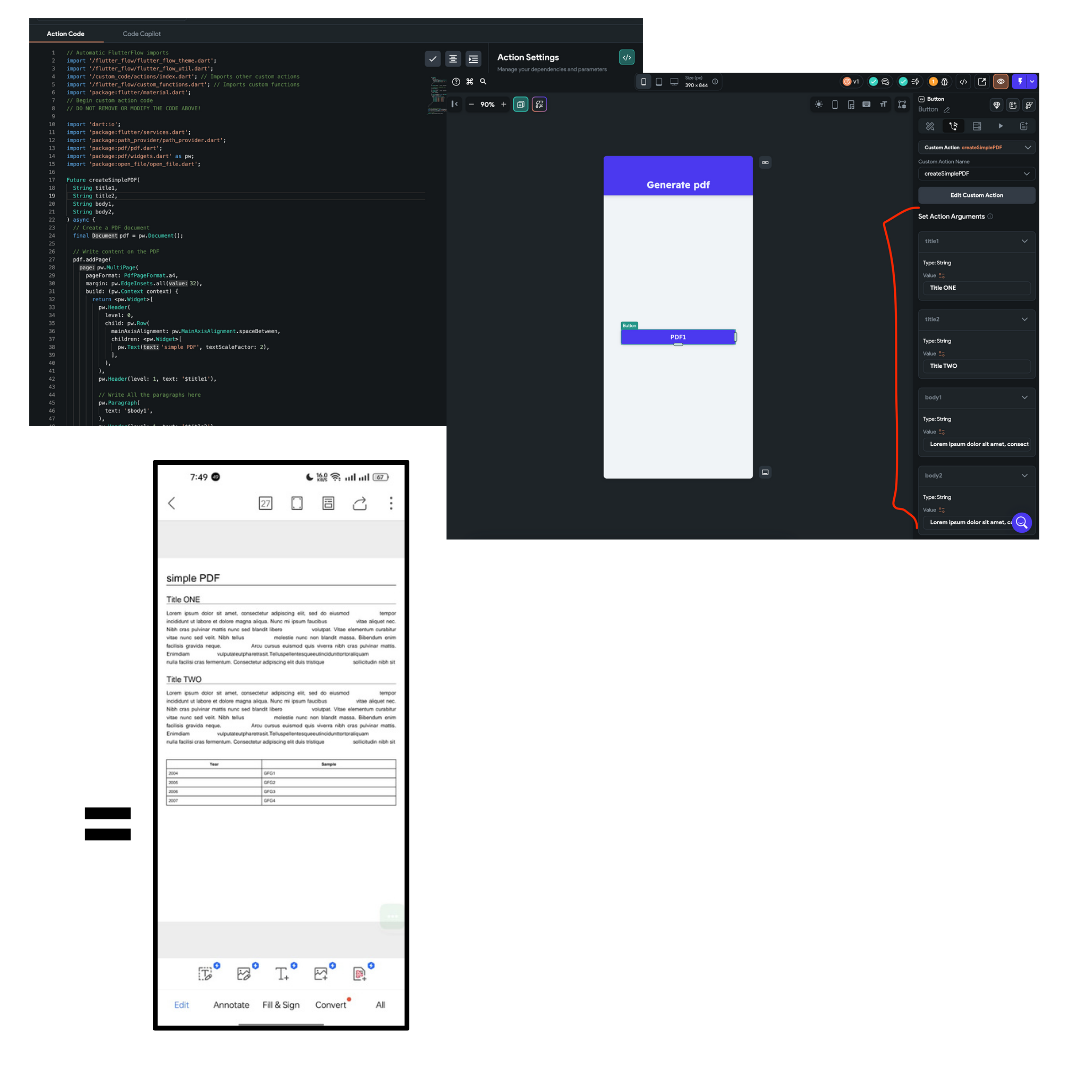
Here’s a bonus custom code snippet for FlutterFlow to generate a PDF document with tables. We utilized ChatGPT and other documentation from websites like GeeksforGeeks to create this action in FlutterFlow.
The code features four parameters:
– title1: Title for the first section
– title2: Title for the second section
– body1: Body text for the first section
– body2: Body text for the second section
Feel free to experiment with this code to enhance your mastery of PDF generation in FlutterFlow. The code snippet is provided below with detailed comments (check for descriptions that start with //) to provide context.
Conclusion:
Congratulations on mastering the art of creating simple PDFs in your FlutterFlow apps. This is just the beginning!
With this guide, you can start integrating other custom code features/packages into FlutterFlow projects or create more specialized PDFs for your specific needs, using tools like ChatGPT and online resources.
We can’t wait to see what you build.
Related blog posts :
How to find trending and low competition apps ideas
+21 Flutterflow app examples I apps built with flutterflow
.